I will be now blogging via
wordpress. This is just a matter of convenience for myself. Please update your bookmarks /
RSS feeds.
New blog address:
http://csaborio.wordpress.com/
When you submit a job to be run in a
Compute Cluster Server, you will find some information about the running tasks at the bottom pane. Information such as error output, task name, and so on is shown, but there is one vital piece of information that should be shown (IMHO) by default and it is not: what nodes are running the current task?
Luckily, this can easily be solved by right clicking on the column headers, selecting
Add/Remove Columns and adding the Allocated Nodes column. This will make it easier to know where to look for output. The following clip shows how it is done (BTW, if you have not checked
Jing, make sure you do, it's amazing):
Oops...nevermind, apparently our Community Server blog cannot embed objects correctly :(
Check out the video in this link:
Finding Nodes of your Job
Today while tryng to do a V2V migration form Parallels to VMWare, I had the need to boot my current VM into BartPE so I could create an image with Tru Image. When the VM started up, I tried to press al sorts of F key combos to get to the BIOS screen. In Virtual Server/Virtual PC, pressing F2 does the trick; but in Parallels it was not working.
After taking a trip to the VM preferences, I found that this is set within the VM properties, and is actually quite simple:

To recap, on my
last post we went through some of the steps that need to be taken when debugging an MPI application, namely:
-Install the x64 remote debugger
-Copy mpishim to an accessible loction
-Modify the registry to avoid UNC path problems in the future
Let's go ahead and finish the rest of the steps in order to debug an MPI application.
Step 4: Configure an Empty Job with the Job SchedulerThe job scheduler is a utility by which all jobs that are submitted to the cluster are managed. If you want to have something done at the cluster for you, then you need to use the job scheduler. Debugging is no exception, as you need to create an empty job that will host your debugging application.
To get started, open the job scheduler and from the File menu, select Submit Job:

Name your job "Debugging Job" and move over to the Processors tab. Select the number of processors you would like to use for this job and then (this is actually quite important), check the box that says "Run Job until end of run time or until cancelled". Failure to check this box will cause the empty job to run and finish - which is not what we want. We want the job to continually run, so that Visual Studio will then attach the running processes to this specific job. Don't forget to mark this!:

Next, you need to move to the Advanced tab and select which nodes will be part of your debugging scheme. In this case, I will only use 2 nodes, namely Kim03a (the head node) and Kim02a:

Click on submit job, you should see your job running. Make sure you write down the
ID of the job (in this case, it is 3) as you will need this info later on!!
 Step 5: Configure Visual Studio
Open Visual studio and the project you are working on. Go to project properties and access the Debugging section. From there, instead of the Local Debugger, select MPI Cluster Debugger:

The following screenshot shows my debugger properties window with all necessary values filled in:

Let's go ahead and talk about each of these values:
MPI Run Command: This needs to be mpiexec for MPI applications
MPIRun Arguments: The first argument "-job 3.0" is to specify which is the job in the scheduler to use. In my case, it was 3 when I created the job, and the 0 is to specify the task, which every job has by default. We then have "-np 2" which is used to specify that we will be using 2 nodes for this job. Finally you see I have "-machinefile \\kim03a\bin\machines.txt". The "-machinefile" is used to specfify the UNV location of a text file that contains the names of the machines that will be part of this job. The text file should have the names of the machines on each line.
MPIRun Working Directory: Use this location to specify the path where any output will be written to. Remember NOT to use absolute paths but rather UNC paths to make sure that this location is available to every node.
Application Command: This is the UNV path to the MPI application that you would like to debug. This application HAS to be compiled to 64-bit and debugging symbols should be in that same directory as well.
MPIShim Location: In this location, specify the path to the mpishim.exe binary that you copied in step 2 of this tutorial. Remember, mpishim should exist on each and every one of the machines at the specified local path.
MPI network security mode: I usually change it to Accept connections from any address to avoid problems
You probably also noted that there is an
Application Arguments window. In this row you would specify any additional commands you would like to send to the application.
Apply the settings, hit F5 and you should be ready to go and debug your processes. While trying to get this to work, I experienced pretty much every error out there, so post in the comments if you any issues and I will help you resolve them. Happy debugging!
The Compute Cluster Pack can be downloaded from Microsoft's site; however it is not as trivial as it sounds. These steps will hopefully make it easier to obatin the bits:
- Go to http://www.microsoft.com/windowsserver2003/ccs/default.aspx
- Click on the Get the Trial Software link:

- Click on the big blue button that says Get Started Today
- Sign-in to microsoft
- Select your country from the list
- Fill out the information that is being requested
- Review your order total (whooping $0.00), agree to the terms and conditions and click Place Order
- You will get a receipt and can now click on link to go to the installation instructions
- You will then be presented with the option to download the Compute Cluster Pack:

Enjoy!
While assisting some customers at a High Performance Computing Event, I had the need to remember how to debug an MPI application. See, when you create distributed applications that will run on various computers (nodes) you need to use special tools to debug them. Think about it, you want have a centralized Visual Studio instance and be able to debug each process within the same IDE. Even though the idea sounds demented, the implementation is actually quite simple given that you follow the steps carefully. Let's get started.
This is lengthy tutorial, so it will most likely be split into various steps.
Edit: It is now a 2 part tutorial, Part 2 is
found here.
Step 1 : Install the Remote DebuggerYou need to install the Remote Debugguer on EACH of the nodes that will run the application you are trying to debug. The remote debugger is included on the Visual Studio 2005 distribution media within the “\vs\Remote Debugger\x64” folder.
You need to install it on each of the compute nodes (and on the head node if it is going to be working as a compute node). Once you install it, make sure you fire it up so that it will be awaiting connections.
You need to use the x64 remote debugguer. Distributed applications on Windows Server 2003 Compute Cluster edition
NEED to be 64-bit if you would like to debug them with mpishim.
 Step 2: Make mpishim Easily Accesible
When you install the remote debugger, mpishim is installed. Mpishim is the binary responsible for launching the processes on each of the nodes for debugging. The default location for mpishim is "C:\Program Files\Microsoft Visual Studio 8\Common7\IDE\Remote Debugguer\x64". The trick here is to copy all those binaries from that x64 folder to a place that is easier to specify (such as c:\windows\system32). By doing so, you do not need to specify the whole path of mpishim when modifying the project properties debug info (which will be done later on).
Furthermore, you want to make sure that you copy mpishim to the
same location on
EACH compute node. That is, if you coiped mpishim on c:\windows\system32 on Node 1, then you must copy it for the rest of the nodes as well in the exact same directory.

It is a good idea to copy all of the files within that directory in order to avoid missing on a dependency that mpishim may have.
Step 3: Modify the RegistryCmd.exe has an issue with UNC paths. MPI Debugging relies on these paths so just to be safe and make sure nothing breaks, carry out the following modification on each of the clusters. Access the following registry key:
HKEY_CURRENT_USER\Software\Microsoft\Command Processor
Add a DWORD entry entitled
“DisableUNCCheck” and set the value to 1:

That about covers the first half, on my next post I will cover the what needs to be done at the scheduler and visual studio level. Read the
second part in this link.
Sending files can sometimes be a bit pesky. Depending on the size limit set by your SMTP server, you will usually end up splitting the file in smaller chunks or following
some other method. There are various compression mechanisms out there that work OK, such as zip or rar. Lately, I have found a new compression format called 7z.
I have been compressing archives and the level of compression of 7z (especially with word files that have embedded images) is amazing. I was able to compress a 24 Mb word file to 4 MB in less than 5 seconds. I really don't know if RAR offers the same (or better) compression ratio, but AFAIK, there is no RAR compression solution for OS X.
7z has various clients available for lots of platforms out there. My personal for OS X is
7zX. Download one of them and give them a try, you might save a byte or two.
Today I was helping a colleage to restore an image that was created with TrueImage to an empty VHD. The process can be narrowed down to the following steps:
- Create the image using TrueImage
- Create two VHDs on the target VM (one to store the image, and the other to restote the image to)
- Mount the VHD that will hold the TrueImage image using vhdmount and format it
- Copy the Image from step 1 onto the VHD
- Unmmount the image and commit changes
- Boot into drive image and restore the image
Sounds easy? Well, usually it is - but today I faced a problem with step 3 above. When I mounted the VHD and formatted it, everything seemed fine, but when TrueImage tried to read the VHDs, it barfed and said that it was "unsupported". This was very weird since I mounted the VHDs time and time again without problems and the contents were inside. The VHDs were formatted as NTFS, so there really was no reason for the "unsupported" file format.
We tested and decided to format the partitions from within TrueImage using the new hardware wizard. After formatting them, I mounted the one that would hold the TrueImage image, copied the file and then tried to restore the image once again.
To my surprise, this time around TrueImage read both drives and the image contained on the VHD that I just copied. After that, it was just a matter of specifying the source and target and the P2V migration was underway.
Bottom line, if you are planning on using empty VHDs with TrueImage (the bootable CD), make sure that you format the VHD with the utility itself and not within Windows using vhdmount. Why? Dunno, but if someone would like to shed some light on this issue, please be my guest!
There are many possibilities today when you would like to send a big file to a user. IMHO, sending big files over e-mail is a big waste of bandwidth; think about it. You send the file to the mail server, which sends it over to the recipients mail server, which is then transferred over to the recipients machine. The file travels a lot!
It is best to send links to files you would like to download (unless you are sending small files). For the last year I had been using
streamload, but lately things have changed and it has just been awful.
I searched for a way to send big files and stumbled upon
SendSpace, which lets you send files without any problems. They offer a client for uploading files for Windows, Mac OS X, and Linux. Furthermore, they offer some features such as notification when the file you have posted has been downloaded. Here is snapshot of the client, make sure you check it out:

During the last month, due to some testing we had to carry out with a software project, I needed to work with 64-bit virtual machines. Virtual Server does not support 64-bit virtual machines, so I downloaded a copy of VMWare's free server solution and decided to give it a try. After playing around with VMWare Server, I've had my ups and downs which I will try to contrast with my previous experiences with Virtual Server.
PriceBoth are free, no contest there. VMWare requires a registration process to obtain the product key for the server, which can be a bit of a hassle. Virtual Server requires a registration process as well but no product key is needed.
64-bit SupportVMWare's server runs as a 32-bit process on 64-bit hosts and offers support for 64-bit VMs (read again, slowly and it will make sense). Virtual Server runs as a 64-bit process on 64-bit hosts and does not offer support for 32-bit VMs.
Types of Virtual Hard DrivesVMWare offers virtual drives that expand as they become bigger or ones that are of fixed size. It does not offer what is known as Difference Disks in Virtual Server. These disks are amazing when working with lab environments or for multiple restore points, and is one feature I cannot believe is in some way or another on VMWare.
Undo Disks
VMware and Virtual Server both have this option. The restore process under VMWare is easier to carry out than on Virtual Server.
Cross CompatibilityVMWare Virtual Server imports Virtual Servers vhds seamlessly. It does, however, convert them to a big mess of chunks that is hard to maintain. Although Virtual Server does not import any other type of virtual hard drive from another reseller, there are tools out there that will do the job for you.
GUIEven though there are some clear advantages of having a web interface for Virtual Server, there should have been a binary to administer it. There are some
new alternatives out there that might work for Virtual Server, but the bottom line is that the 32-bit client for controlling VMWare's server blows any web application out of the water.
Overall, both are excellent products and the fact that they are free is amazing. I have grown so used to Virtual Server that I will continue to use it unless I have the specific need for a 64-bit VM, and when that time comes, I will hopefully be able to use Longhorn Virtualization.
I just found out (the hard way) about something (that I could
not find documented anywhere) that should be done when you are upgrading a WIndows 2003 R2 SP1 box to SP2 if you are planning on using WDS.
If you upgrade Windows Server without belonging to a domain, WDS will NOT work when you try and configure it. You will get a very useful error instead:
WDS Error Code: 0xe0000102which can be translated to: "You should have been on a domain prior to installing SP2!"
AFAIK, there is no turning back. I tested this theory using virtual machines and it holds - no domain, no WDS, no cigar.
VMWare, VirtualPC, Virtual Server, Parallels - they all have one thing in common: in order to work faster, they install a set of drivers that patch the VM. This has a very positive effect on the virtual experience, but what happens when, say - the VMWare drivers are running under Virtual Server?
As you might have guessed it, no good things happen.
Products such as Parallels and VMWare Virtual Server allow you to import machines that were created with Microsoft's virtualization products. If you grab a machine from Microsoft's VHD test drive program and import it right away, you are in for a nasty surprise. The drivers for the previous product are still there, and they *will* conflict when you install the additions of the new product.
So remember, get rid of your product's "additions" *before* migrating virtual machines.
We are racing against time to get an application ready that needs to deploy images with WDS and Active Directory. This is the latest problem I have encountered:
Ok, so based on this article (http://technet2.microsoft.com/windowsserver/en/library/383538a3-4129-4205-b363-d36b08e22ca81033.mspx?mfr=true)
, when using WDS and having the machine boot, you can bypass the F12
keypress by replacing pxeboot.ini by pxeboot.n12. This works like a
charm, all machines that boot into the PXE server bypass the F12 key.
However, I would like to specify which machines should boot fron
pxeboot.com and pxeboot.n12. I generated an Excel sheet that has the
info required to prestage the client on the AD. This is what I have
entered on the 4th row:
SERVER01 GUID Location.... \\wds_server_name\reminst\Boot\x86\pxeboot.n12
This
pre-stages the machine on AD and based on what I have read, will point
the machine (identified by its GUID to boot from the pxeboot.n12 file).
I have used the script called "PrestagRISCInt.vbs" (found here: http://www.microsoft.com/downloads/details.aspx?familyid=aaf0a7a4-71c1-4ee9-b974-66214651a23b&displaylang=en) and issued the following command:
cscript /InputFile:C:\Foo.xls /Server:hpc-dc
After a short wait, I get the following message: "Success creating new computer accounts in Active Directory based on UUIDs!"
When I boot tha machine, it still requests F12 to be pressed, which means that it is STILL using pxeboot.com to boot.
I have followed all the instructions carefully, any idea on what the problem might be?
While looking for a way to fully automate the installation of wim image file to a server, we immediately stumbled upon a small problem. When doing a PXE boot, the boot rom imaged asked for the F12 key to be pressed. If the key was not pressed, the machine booted normally into Windows - so much for the automation idea, huh?
Fear not, as Stephen sent me a link that explains the following from a RIS installation:
"...To enable a fully automated RIS-based installation, it is necessary to substitute the Startrom.n12 boot file for the default Startrom.com boot file..."
Further reading revealed this vital piece of information:
To configure all clients serviced by a RIS server with an automated installation, rename the startup boot files as follows:
• Change Startrom.com to Startrom.bak
• Change Startrom.n12 to Startrom.com
These files are located in the following directory location on your RIS server:
RemoteInstall\OSChooser\i386
There are certain differences between the RIS and WDS installations, but nothing big. First off, the location of the files for boot time (given that it is a 32-bit box is the following):
\\WDS_Server_Name\reminst\Boot\x86
There you will not find Startom.com and Startrom.n12, but rather pxeboot.com and pxeboot.n12.
If you rename pxeboot.n12 to pxeboot.com, your machine will PXE boot and will NOT ask for F12 key press. Ok, now that the problem is solved, we can go back and try to find solutions for the remaining 500.
On a previous post I was having problems with the VMRC ActiveX control when creating an instance at runtime. The problem boiled down in having an invalid OCX state exception thrown at me whenever I tried to access a property of the VMRC ActiveX control at runtime.
After researching for quite a while on the Internet, it struck me that if I just placed the VMRC ActiveX in a UserControl at Design time, and instantiated that UserControl instead of the ActiveX directly, things would work great. I implemented this into the VMCA application and it worked perfectly fine. You can see I managed to get VMRC connections to different machines in different tabs at runtime on this post.
Some people have asked where they can get a copy of the VMCA. Unfortunately as of now, the application hasn't been thoroughly tested and is missing some functionality which I deem as basic. Also, this is something I have been working on my spare time and lately I have been swamped with other projects. Perhaps the best approach would be to take it to stable phase and then try and get it on CodePlex so that everyone can pitch in...we'll see how that goes.
For all things related to software migration, be sure to visit Artinsoft's website. For training in Visual Basic to C# migrations, Visual Basic to VB.Net, Virtualization, and 64-bit training check our training web page.
As I previously mentioned, I've had some chance of working on the application dubbed as the Virtual Machine Configuration Assistant in the last few days. One of the most noticeable changes are the GUI. This is the old GUI of the app:
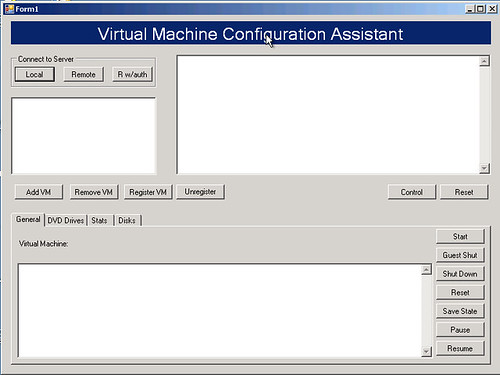
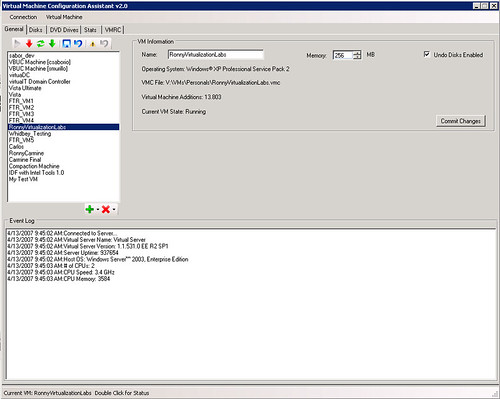
This is the revamped, improved version:
The application has undergone major revisions under the hood. I have tried to separate tasks into different classes in order to gain modularity. So far I have a VMManager, a VHDManager, a VMRCManager and so on. Reading the code now makes a lot more sense than before.
This is the part in which most of the work has been lately done, the Disks tab:

From here, you can pretty much do anything related with VHDs. After modifying some ISOs, I have also managed to completely automate the defragmentation-precompaction-compaction phase required to reduce the size of VHDs. Now I just leave the process running and when I arrive the next day, my VHDs are like 50% smaller.
I had not touched C# in a while, and all I can say is "Wow". C# rocks, it is very intuitive and creating efficient GUIs is a bliss. One can only wish that there was a 2.0 framework to run under OS X.
I have also fixed the problem with OCX stats at runtime - actually it was a workaround, not a fix. Here is a video I made of some of the features of the application, which include:
- VHD Attachment
- VHD Creation
- VM Creation
- VMRC in tabs for each of the machines
*sigh*...It has been impossible to embed the video here, here is the
youtube link.
In case the resolution of the movie above is too small, the avi can also be downloaded.
For all things related to software migration, be sure to visit Artinsoft's website. For training in Visual Basic to C# migrations, Visual Basic to VB.Net, Virtualization, and 64-bit training check our training web page.
During the Virtualization labs, which are freely available to anyone interested in Virtualization, the Artinsoft trainers have had a chance to teach the Virtual Server COM API and its uses. One of the attendees showcases the application that they build on his blog. I think the application in its finished state is a great start to create something functional, but it is in no way something that can be used for management right out of the box. The reason for this is simple: we wanted simple in order to reduce the learning curve of the COM API.
I have started to work on my spare time on a new version of the Virtual Machine Configuration Assistant (VMCA) which will be version 2.0 due to major UI overhaul it has had. One of the cool things I wanted to do, was the ability to open VMRC connections within the app in tabs (gotta love tabs in everything!). So here is the interface I have so far (click on the image for larger view, as it has info on what I am trying to accomplish):
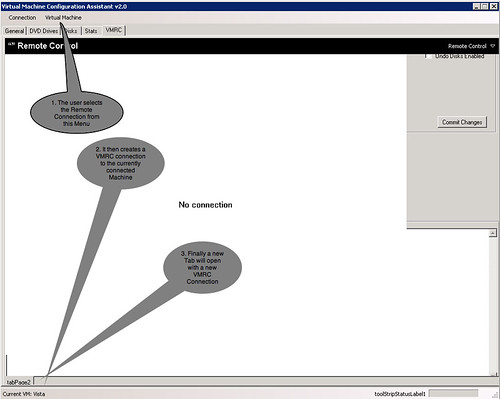
Sounds easy, huh? Well, that is what I thought. I have in my application the reference to the VMRC ActiveX control, the image that you see above depicts a VMRC instance placed on the form in Design Time.
When the user selects the VMRC option, I have the following code:
vmrcControl = new AxVMRCClientControl();
vmrcControl.ServerAddress = "vs02";
vmrcControl.Size = new System.Drawing.Size(985, 675);
//Add a New Tab
this.tabPage1 = new TabPage();
tabPage1.Text = VMCA.VirtualInstances.getVMInstance().Name;
//Add the VMRC Control
tabPage1.Controls.Add(vmrcControl);
vmrcControl.Location = new System.Drawing.Point(0, 0);
this.tbcVMRC.TabPages.Add(tabPage1);
vmrcControl.UserName = "Administrator"
The line in red below is where all hell breaks loose:
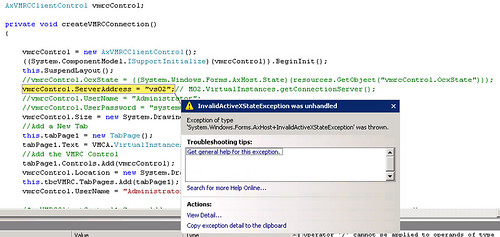
The problems seems to be that at design time, the VS Designer creates and configures a resource that is used to keep track of the ActiveX instance's state. At runtime, this resource does not exists and that is the reason why the ActiveX is an invalid state. Not being the ActiveX hacker that I would like to be, I am baffled on this problem.
Have you ever suffered with a problem such as the one above? I have looked for help at various locations without any luck. Although not critical, this feature is something that would definitely rock. Help me solve this problem and I will send you a couple of pure quality Costa Rican coffee wherever you may be (if you are in Costa Rica, I'll send you beer instead ;)
I have posted a project which repros the problem:
http://amd.streamload.com/artinsoft/Links/5B75335893
In order to repro, just debug the app, and from the menus select Remote Control...if you can somehow make it through without the invalid OCX state exception, you are right on the money.
UPDATE: In order to run the project above, you *need* to have the VMRC ActiveX control installed on your machine. The following page will guide you with the necessary steps to complete this process:
https://www.microsoft.com/resources/virtuallabs/installactivex-technet.aspxFor all things related to software migration, be sure to visit Artinsoft's website. For training in Visual Basic to C# migrations, Visual Basic to VB.Net, Virtualization, and 64-bit training check our training web page.
Ever had this happen to you?:
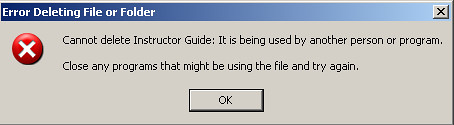
I think this is the most annoying message that Windows has (OS X has one similar which is not very useful in letting you know what the problem is). IMHO, I think that if the OS is informing you about an attempt to delete a file that has a handler open, it should be smart enough to tell you one thing: which is the application/process using it!!!
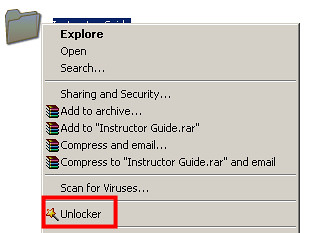
Fear not, as there is a workaround for this. Unlocker is a (free) utility that will give you this info. Once installed, it is a contextual menu:
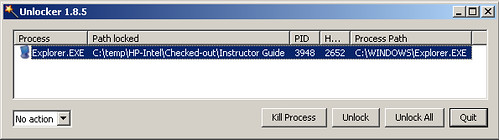
Unlocker will then present you with a dialog that will let you deal with the situation:
One less Windows nuisance to worry about. Credit where credit is due: Stephen was the person who referenced me to this program.
For all things related to software migration, be sure to visit Artinsoft's website. For training in Visual Basic to C# migrations, Visual Basic to VB.Net, Virtualization, and 64-bit training check our training web page.
I use CoRD for multiple desktops on OS X - it works like a charm. But what about Windows users, what can they use? After reading a bit on
Dugie's Perspective, I read about
MuRD (multiple remote desktops), which does exactly this trick.
Further reading on his blog points out to vXCopy, which is like xcopy on sterorids (which was like the copy command on steroids).
I haven't tested any of the two, but I am sure the Virtualization crew at the upcoming Munich event will put vXCopy to the test when copying VMs through the network.
Longhorn Server will have a virtualization role that will basically replace the need to use Virtual Server when working with Longhorn. If you want to play around with the new virtualization role as of now, it is not going to be possible because this feature not present in any public betas.
If you are curious about what this "role" is and a little more information on how this will impact that way we run virtual machines, take a look at the following demo done byJeff Woolsey:
Video: Longhorn - Windows Server Virtualization
Try this link instead for no-registration hassle
If you are still a bit lost in terms of what virtualization is, check the Intel webcast below:
These videos introduce virtualization technology and point out the differences between sofware and hardware based virtualization. They explore existing and emerging usage models of Virtualization: Server consolidation, disaster recovery, development/testing, load balancing, fast provisioning, etc They introduce the next generation of Intel� Virtualization Technology (Intel� VT) and VT -d (Directed I/O) and suggest usage models for the future enterprise.