What is the ROT?
“Using ROT (Running Object Table) is a great way to establish interprocess communication between two windows applications. From a purely logical aspect, one application registers a pointer to an instance of a class in the ROT, the other one gets a pointer pointing to the same instance of the registered class and therefore can use the same instance of the class via this pointer. The class that is registered has to be a COM class, otherwise it can be written in any language. The application that will retrieve the pointer from the ROT can be written in any language that can use COM, as ROT gives a pointer to a COM interface.”
Can it be implemented in .NET?
Sure a .NET application can be exposed thru COM and then its pointer can be gotten and consumed by other applications querying the ROT.
And excelent example can be found here: http://www.codeproject.com/KB/COM/ROTStuff.aspx
As always it has its caveats. Be careful.
Obvious replacement?
Well if what you want is (Interprocess Communication) IPC,there are several options in .NET :
* Classical .NET remoting which is very simple and stable to
* Named Pipes see an example here http://bartdesmet.net/blogs/bart/archive/2007/04/12/getting-started-with-named-pipes.aspx
* or WCF with Named Pipes, an example here http://www.codeproject.com/KB/WCF/WCF_CommOptions_part1.aspx
WCF can be an interesting option specially if we were doing things like DCOM and Remote monikers.
Specially if you are working with Silverlight and Azure you will end up in situation where you would
like to redirect your WCF Endpoint dinamically ( I don’t think you can guess the GUID that Azure will generate
for your staging enviroment).
Out of the box the silverlight behaviour is that the WCF endpoints are hardcoded in a config file called
ServicesClient.config embedded in the .xap file.
This can be problematic at least for Azure deployment infraestructure because you can deploy to different sites:
Staging and Production.
Each of this Web Sites will have differente URLs.For example phonebook.cloudapp.net or asdf-asdf-asdf-dasxxx.cloudapp.net
So an easy workaround is:
In WCF when a channel is created in code you can specify the endpoint,
so we only need to created different endpoints depending of the site where the the .xap file was download.
The proposed changes will be:
For example if you create services in your App.xaml.cs method Application_Startup
Then you can change your code for something like:
string url = "http://" + HtmlPage.Document.DocumentUri.Host + "/MyService.svc";
EndpointAddress endpoint = new EndpointAddress(url);
var service = new MyService(new ChannelFactory<IMyService>("*").CreateChannel(endpoint)));
This will allow you to just deploy your application to either Staging or Production environment
in Azure with no more code or config file changes.
Today I found this excellent post:
http://smehrozalam.wordpress.com/2009/01/29/retrieving-huge-amount-of-data-from-wcf-service-in-silverlight-application/
and I was the key to solve a problem I had with a WCF service.
I had made some changes to an application to send a text file to the server
for batch processing, everything was working fine until I started sending big files.
I just received one of those obnoxious Not Found error.
So what could I do? Well as any respectable WCF developer would I started tracing the WCF messages with Fiddler, and I found this:
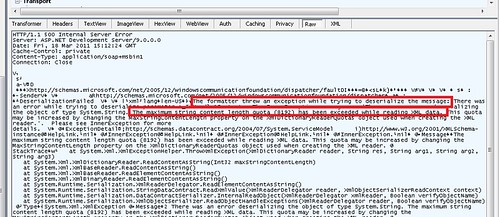
If you cannot read it from the image the message was:
DeserializationFailed… The formatter threw an exception while trying to deserialize the message:
There was an error while trying to deserialize parameter :_xxxxxx.
The InnerException message was 'There was an error deserializing the object of type System.String.
The maximum string content length quota (8192) has been exceeded while reading XML data.
This quota may be increased by changing the MaxStringContentLength property on the XmlDictionaryReaderQuotas
object used when creating the XML reader.
I was a little confused but thanks to that post I was able to just add:
          <binaryMessageEncoding maxWritePoolSize="16" maxSessionSize="8192">
            <readerQuotas maxDepth="2147483647" maxStringContentLength="2147483647" maxArrayLength="2147483647"
                                   maxBytesPerRead="2147483647" maxNameTableCharCount="2147483647" />
          </binaryMessageEncoding>
And got everything working again!
In .NET Framework 2.0 the attribute configSource was added to several elements of the .NET config files so you could use external files.
Sadly those attribute are not available for the system.serviceModel.However I found this post that shows a interesting workaround.
You can modify your serviceModel file to look like this:
<configuration>

  <system.serviceModel>
    <services configSource="Services.config" >
    </services>

    <bindings configSource="Bindings.config">
    </bindings>

    <behaviors configSource="Behaviors.config">
    </behaviors>

  </system.serviceModel>

</configuration>
And then you can put your configuration settings in separate files like the following:
Behaviors.config
<configuration>

  <system.serviceModel>
    <services configSource="Services.config" >
    </services>

    <bindings configSource="Bindings.config">
    </bindings>

    <behaviors configSource="Behaviors.config">
    </behaviors>

  </system.serviceModel>

</configuration>
For more details see the full post by Pablo Cibraro
During a Silverlight migration project from VB6 I was trying to add a WCF reference,
everything seemed to work in the wizard but no code was generated.
After reviewing the Warning messages, i found that some said:
Custom tool warning: Cannot import wsdl:portType
What I did to solve this issue?
1. Right click on your service reference
2. Select Configure Service reference
3. Uncheck the option that says Reuse types in referenced assemblies.

4. Press OK
After that VS generated the code and I could use the WCF service.
If you dont have Windows Azure Tools installed
1. Open Visual Studio 2010
2. On the File Menu, Click new, and then click Project. This opens the New Project dialog
3. In the New Project dialog under Installed Templates, expand the Visual C# node
4. In project type click Cloud. A project that says Enable Windows Azure Tools appears
5. In Name type for example EnableTools and click OK
6. A project with a web page will appear. Click the Download Windows Azure Tools button. Close Visual Studio. Download and installed them.

Once you have Windows Azure Toolsl installed
1. Open Visual Studio 2010
2. On the File Menu, Click new, and then click Project. This opens the New Project dialog
3. In the New Project dialog under Installed Templates, expand the Visual C# node
4. In project type click Cloud. A project that says Windows Azure Cloud Service appears

5. In Name Type for example Phonebook and click ok. The New Cloud Service Project is shown
If you are developing a Silverlight application with some services select the WCF Service Web Role. Rename it to something appropriate. In this example will be Phonebook.Web and Press OK

Your solution explorer will look like this:

Now you can developing your application. We already have an Silverlight application (that was migrated from VB6 to Silverlight) and some existing Silverlight Class libraries and Server Class Libraries (Class Libraries compiled with the full 4.0 Framework that will be used in the Server Project Phonebook.Web).
To add your Silverlight app. Right Click your server project (Phonebook.Web), then Properties and in Properties go to Silverlight Application and add Phonebook_Silverlight
When everything compiles Go to the Visual Studio Menu Bar, then Debug and then Start Without Debugging. That starts the local development environment on your computer.

You can now start testing and finish development of your application.
There is something you myst notice. Everytime you start the Cloud Service, the Azure test environment starts. By default it will start in http:\\localhost:81 but there was a previous Development Fabric it will start in http:\\localhost:81. This is important for Silverlight applications because you must configure your service end point to a particular port. Make sure that your ServiceReferences.ClientConfig file is in sync with the port that your DevelopmentFabric is using
|
Notes for Azure development:
Sometimes during development it might happen that you get more than one instance of the Development Fabric. This will affect your silverlight apps that rely on WFC services because each new instance starts on a new port. You can use the CSRun tool to stop all instances.
If you have installed the Windows® Azure™ SDK to the default location, the CSRun tool can be found at C:\Program Files\Windows Azure SDK\v1.0\bin\csrun.exe.Then run C:\Program Files\Windows Azure SDK\v1.2\bin\csrun.exe /devfabric:shutdown
|
Publishing your Application
1. Navigate to Azure : https://windows.azure.com/Cloud/Provisioning/Default.aspx
2. On the page that says My Projects. When you are starting you will only see one project line. Click on it

3. Click on New Service

4. Click on Hosted Services

5. In the Create Service page, specify the service properties. In this example we will use Phonebook.Web for service label and a short description and press next.

6. Now your hosted service needs a public url. You must check availability. In this example we will use phonebook. Hosted Affinity tries to group your services and storages in the same area. We have a SQL Azure database that is hosted in North Central US, so we will create a new AffinityGroup and call it PhonebookGroup. Press Create

7. After Creation your Service is ready, and you can start the deployment.

8. In Visual Studio 2010 Right click your Cloud Service. And Select Publish…

9. The Publish Cloud Service Dialog appears. From the Credentials drop down list select <Add>

10. From the Create or select an existing certificate select <Create>.
10.1 In our example we will enter a FriendlyName for the new certificate of PhoneBook.

10.2 Click the “Copy the full path” link in the dialog. Then Open your browser and navigate to https://windows.azure.com/cloud/provisioning/ and click on your project

10.3 Now click on account.And in the Account page click on Manage My API Certificates

10.4 Click the Choose file and paste the full path you had copied before and then click upload

the installed certificate will be shown below.

10.5 Now navigate to AppFabric by clicking AppFabric on the left hand side. This will show your subscription ID. Select it and copy it. You have to pasted on the dialog box in Visual Studio on the textbox that says above it “Copy the subscription ID”

and name those Credentials PhonebookAccount and press OK
11 You need a storage account. If you have not created one. Then you have to follow these steps:
11.1 Open your browser and navigate to https://windows.azure.com/cloud/provisioning/ and click on your project.
11.2 Now click on New Service

11.3 Now click on Storage Account

11.4 The Create Service Page is show. Enter a Service label and Description and Click Next

11.5 Select a name for the public URL, check its availability. And select Affinity.And press Create

12. Press OK on the Publish Cloud Service Dialog

13. Visual studio will upload your application to the cloud

While your application is in staging the only problem might be that the published URL changed and that might be conflictive for your ServiceReferences.ClientConfig.
Once your application is on Staging you can switch it to Production and your are ready for business.