In VB6 the communication with backend services usually involves the definition of Types (or Structs) using fixed length strings.
VB6 provided language support for defining these data types.
For example:
Public Type HostData
	UserName       As String * 8
	PassWord       As String * 8
	FullName       As String * 50
End Type
Figure 1 Example of VB6 Type with Fixed Length Strings
There are some ways to model this structures in .NET using the FixedLengthString defined in Microsoft.VisualBasic.Compatibity.
Here I will present another approach.
This approach uses character arrays (char[]) to model this structures.
Ok. Let’s get down to business. To model a vb6 type like the one in Figure 1, we will use this approach:
struct HostData
    {
        [DebuggerDisplay("{s(UserName)}")]
        [MarshalAs(UnmanagedType.ByValArray, SizeConst=8)]
        public char[] UserName;

        [DebuggerDisplay("{s(PassWord)}")]
        [MarshalAs(UnmanagedType.ByValArray, SizeConst = 8)]
        char[] PassWord;

        [DebuggerDisplay("{s(FullName)}")]
        [MarshalAs(UnmanagedType.ByValArray, SizeConst = 50)]
        public char[] FullName;
        /// This method is used to provide a better display of
	 /// character arrays as strings on the debugger.
        string s(char[] array) { return new string(array); }

        public byte[] toByteArray() {
           return StructsHelper.StructToByteArray(this);
        }

 public static explicit operator HostData(byte[] array)
        {
            return (HostData)StructsHelper.ByteArrayToStructure(array,typeof(HostData));
        }

        /// <summary>
        /// Constructor to initialize the char arrays that are used as fixed length strings
        /// Struct constructors must have at least one parameter.
        /// </summary>
        /// <param name="initFixedLengthStrings">if true will automatically init all fixed length char arrays according to the SizeConst property of the MarshalAs attribute</param>
        public HostData (bool initFixedLengthStrings=false)
        {
            UserName = null;
            PassWord = null;
            FullName = null;
            if (initFixedLengthStrings)
            {
                StructsHelper.InitFixedStrings(GetType(), __makeref(this));
            }
        }
    }
Figure 2: Code of Example 1 in C#
So several tricks are used here, I will describe them:
First
All fixed length strings are declared as char[]. A MarshalAs attribute is applied to each field. Like this:
[MarshalAs(UnmanagedType.ByValArray, SizeConst=n)]
Where n is the number of characters in the fixed length strings. Note that character arrays must be initialized. However structs do not allow field initializers. So they will need to be initialized on a constructor.
Second
A DebuggerDisplay attribute
[DebuggerDisplay("{s(<AttributeName>)}")]
is added to each field, just to make the developer experience. That makes that instead of showing this field as a character array it will be shown as a string.
This attribute uses a small helper function used s that just converts the character array to string.
Third
A constructor is added. Structs do not accept parameter-less constructors.
This struct receives a Boolean indicating whether you want to initialize the character array fields.
As a requirement character arrays fields should at least be initialized to null. Character arrays could have been initialized here but I opted to create a helper function. Why? Well I think it is better if this arrays are initialized using the SizeConst attribute. So if I want to change their size I do not have to update both the SizeConst and the constructor.
public static void InitFixedStrings(Type type,TypedReference reference)
        {
            if (type.IsValueType && !type.IsPrimitive && !type.Namespace.StartsWith("System") && !type.IsEnum)
            {//This should be an struct
                foreach (var field in
                    type.GetFields(System.Reflection.BindingFlags.Instance |
                    System.Reflection.BindingFlags.Public | System.Reflection.BindingFlags.NonPublic))
                {

                    if (field.FieldType.IsArray && field.FieldType == typeof(char[]))
                    {
                        var attr = field.GetCustomAttributes(typeof(MarshalAsAttribute),false);
                        if (attr != null && attr.Length > 0)
                        {
                            MarshalAsAttribute maa = (MarshalAsAttribute)attr[0];
                            var constSize = maa.SizeConst;
                            if (constSize != -1)
                            {
                                var newValue = new char[constSize];
                                field.SetValueDirect(reference, newValue);
                            }
                        }
                    }
                }
            }
        }
Forth>
In VB6 the common approach is to use the StrConv and CopyMemory functions to copy memory to and from structs and send them as strings or event to copy data between structs of different types.
To solve that utility methods have been created:
/// <summary>
        /// Takes a bytearray and uses it to create a struct of the given type
        /// and populate it with the data of the byte array.
        /// NOTE: this method only works withs Structs which have a fixed size
        /// </summary>
        /// <param name="bytearray"> The data that will be used to initialize the struct</param>
        /// <param name="type">The type of the expected struct</param>
        /// <returns>A new struct instance with its fields initialized with the bytes from bytearray</returns>
        public static object ByteArrayToStructure(byte[] bytearray, Type type)
        {
            int len = Marshal.SizeOf(type);
            IntPtr i = Marshal.AllocHGlobal(len);
            Marshal.Copy(bytearray, 0, i, len);
            var obj = Marshal.PtrToStructure(i,type);
            Marshal.FreeHGlobal(i);
            return obj;
        }

/// <summary>
        /// Returns the contents of an struct as a byte array.
        /// It only works with fixed length structs.
        /// </summary>
        /// <param name="obj">the struct that holds the data that will be returned in the byte array</param>
        /// <returns>A byte array with the contents of the struct</returns>
        public static byte[] StructToByteArray(this object obj)
        {

            int len = Marshal.SizeOf(obj);
            byte[] arr = new byte[len];
            IntPtr ptr = Marshal.AllocHGlobal(len);
            Marshal.StructureToPtr(obj, ptr, true);
            Marshal.Copy(ptr, arr, 0, len);
            Marshal.FreeHGlobal(ptr);
            return arr;

        }
With these utility methods you can then use your structs like this:
var hostData = new HostData (true);
var byteArray = UnicodeEncoding.Unicode.GetBytes(new String(' ', Marshal.SizeOf(typeof(HostData))));
hostData = (HostData)byteArray;

var size = Marshal.SizeOf(HostData);
var test = "helloworld";
test = test.PadRight(size, '*');

byteArray = UnicodeEncoding.Unicode.GetBytes(test);
hostData = (HostData)byteArray;
Fifth
And finally how to you easily get/set data from these structs?
Very easy. We will add an extension method:
const string IF_VALUE_NOT_PROVIDED_THEN_RETURN_VALUE = "\0\0internal";
        /// <summary>
        /// This method is used to get/set the values of a char array as an string.
        /// It has been implemented in a way similar to that used in the jquery .val function.
        /// If called without parameters it will return the character array value as an string.
        /// If called with parameters will use the given string to set the character array value.
        /// If the given string is bigger that the character string the value is truncated
        /// </summary>
        /// <param name="array"></param>
        /// <param name="value"></param>
        /// <returns></returns>
        public static string val(this char[] array, String value = IF_VALUE_NOT_PROVIDED_THEN_RETURN_VALUE)
        {
            if (value == IF_VALUE_NOT_PROVIDED_THEN_RETURN_VALUE)
                return new string(array);
            else
            {
                var source = value.ToCharArray();
                Array.Copy(source, array, Math.Min(source.Length, array.Length));
                return value;
            }
        }
With that if you want to set a field you will do something like:
hostData.UserName.val(“Mauricio”)
And if you want to get the contents of the field you will do something like:
String username = hostData.UserName.val();
Well that’s all. Hope this helps
StructsHelpers.cs (5.93 kb)
I have a development computer with Windows 8 and Visual Studio 2012, and I was planning on doing some tests with MSMQ. Everybody will tell you that you should just (in Visual Studio) open the references tab and add a COM reference to Microsoft Message Queue, but (yes there is always a but) the component was not present.
I looked for it in C:\Windows\System32 and C:\Windows\SysWOW64 and nothing there was nothing called mq*.tlb. So I found this thread in StackOverflow and it was pretty obvious :| I just had to go to Add Programs \ Turn on Windows Features and select it:
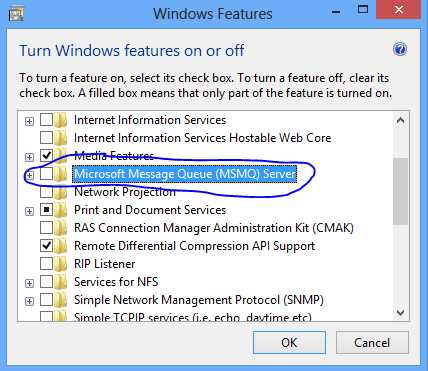
Figure 1. Adding MSMQ COM components
And after that I could find a file called C:\Windows\System32\mqoa30.tlb and added that reference.
Well tonight while I was deleting some spam comments from my blog and watching Dr. Who with my wife, I found a rather interesting comment.
So the story was:
First there is a VB6 DLL that had a class called Class1 with code like the following:
public type emprecord
name as string
end type

Public Sub Fn(T()as emprecord)
 MsgBox "The silence is comming said Prisoner 0"
End Sub
When this little dll was called from a VB.NET big brother
Dim test as new prj.class1
Dim em(0) as prj.emprecord 'able to create it no problem
em(0).name="hello"
test.fn(em)  ' here gives error
An error ocurred... well this is not very document issue with the TLBIMP tool which creates the interop assemblies. See StackOverflow Answer. The workaround is to right click on your type library, select properties, and change Embed interop Types to false.
After that you will be able to call your function.
Again Access... hey Access was a great database.
So if you are using access and you are thinking in how to use it from PHP or from a C/C++ app then you should check
mdbtools.
Does it work on iOS, well there is a discussion about at (http://old.nabble.com/Port-libmdb-(mdb-tools)-for-iOS-td34282658.html) but I think there might be some licensing issues.
If that is the case I would recommend writting your own version of mdbtools, Take a look at https://github.com/brianb/mdbtools/blob/master/HACKING for detail info about the file format.
In IDL you can have a helpstring attribute that adds descriptions to your interfaces.
To be able to generated those helpstring tags in a VB.NET class you should use the Description tag
For example see this example taken from:http://stackoverflow.com/questions/6668500/getting-the-helpstring-attribute-applied-to-c-sharp-properties-exposed-via-com-i
using System;
using System.ComponentModel;
using System.Runtime.InteropServices;


namespace ClassLibrary1 {
    [ComVisible(true), InterfaceType(ComInterfaceType.InterfaceIsDual)]
    public interface IFoo {
        int property {
            [Description("prop")]
            get;
            [Description("prop")]
            set;
        }
    }
}
NOTE: remenber that in some cases you have to apply the description attribute to both get and set.
ADITIONAL NODE:
After some test, I found that there are some differences with the helpstring behaviour in VB.NET. For example the helpstring attribute is not generated for methods. More on C#/VB.NET Interop Differences http://mheironimus.blogspot.com/2006/10/vbnet-com-interface-issues.html
A long time ago, I had the idea of writing a series of posts about the issues
related to the migration of Point Of Sale applications developed in VB6.
(http://blogs.artinsoft.net/Mrojas/archive/2007/05/07/Migration-of-VB6-POS.aspx)
A lot of companies developed this kind of software in VB6, and they faced a lot of
of similar issues specially when dealing with POS devices.
It's nice that the industry has made the effort of developing standards as the UPOS or
Unified POS (http://en.wikipedia.org/wiki/UnifiedPOS) and Microsoft also did a great work
by providing the COM and .NET implementations.
It was nice to move VB6 applications to POS for .NET, but times have change and so
has the UPOS grown to interesting proposals like WS-POS.
"The fundamental benefit of WS-POS is the ability to provision POS peripherals as
services that can be accessed by remote POS applications, including mobile POS
solutions. Retailers can then use the power of Service-Oriented Architecture (SOA)
to allow access to their existing peripherals anywhere in the store through these
services. WS-POS holds potential benefits for all members of the retail ecosystem." from http://www.ibm.com/developerworks/webservices/library/ws-pos-retail/index.html
So you can now think about leveraring your VB6 POS to Silverlight or HTML5 and
consume WS-POS services to provide for example tablet-based implementations.
Imagine your POS application running in Silverlight or WinFX on a Windows 8 Tablet
or in HTML5 in iPads or Androids. Does it sound appealing? Well that is exactly the
kind of experience that our migration solution brings to the table.
You can download a working implementation of WS-POS from the Association for Retail
Technology Standards (ARTS) web site.
Go to http://www.nrf-arts.org/arts_download/schema-non-member
Download the UnifiedPOS 1.13 pdfs and reference implementation from the
WS-POS Addendum link (http://www.nrf-arts.org/download/file?f=http://www.nrf.com/Attachments.asp?id=30476&rid=227810) There are Java and WCF implementations. It is also very easy to modify the WCF
implementation so it can receive and respond JSON and work with your HTML5 implementations.
I always appreciate feedback, so if you have any more toughts or questions about HTML5 or Windows 8 POS implementations just let me know.
Well I tought this was gonna be more difficult, but no. The Silverlight community is great and there are tons of
of code out there.
So I found a great project in codeplex called obviously http://silverlightbarcode.codeplex.com/
And printing barcode with that library is a peace of cake.
Just do something like this:
private void button1_Click(object sender, RoutedEventArgs e)
{
    var p = new PrintDocument();
    p.PrintPage += new EventHandler<PrintPageEventArgs>(p_PrintPage);
    p.Print("NuevoDocument");
}

void p_PrintPage(object sender, PrintPageEventArgs e)
{
    Canvas canvasBarCode = new Canvas();
    canvasBarCode.Width = 200;
    canvasBarCode.Height = 200;
    Me.BarcodeSoftware.Barcode.Barcodes barcode =
           new Me.BarcodeSoftware.Barcode.Barcodes();
    barcode.BarcodeType =
                  Me.BarcodeSoftware.Barcode.Barcodes.BarcodeEnum.Code39;
    barcode.Data = "123456";
    barcode.encode();
    string encodedData = barcode.EncodedData;
    //if you want to put the barcode number
        // add a label to canvas and set text to barcode.HumanText;

    int encodedLength = 0;
    for (int x = 0; x < encodedData.Length; x++)
    {
        if (encodedData[x] == 't')
            encodedLength++;
        else if (encodedData[x] == 'w')
            encodedLength = encodedLength + 3;
    }

    float barWidth = (float)(canvasBarCode.Width / encodedLength);

    if (barWidth < 1) barWidth = 1;
    float thickWidth = barWidth * 3;
    double incrementWidth = 0;

    int swing = 0;
    for (int x = 0; x < encodedData.Length; x++)
    {
        Brush brush;
        if (swing == 0)
            brush = new SolidColorBrush(Colors.Black);
        else
            brush = new SolidColorBrush(Colors.White);

        if (encodedData[x] == 't')
        {
            Rectangle r = new Rectangle();
            r.Fill = brush;
            r.Width = barWidth;
            r.Height = canvasBarCode.Height;
            r.SetValue(Canvas.LeftProperty, incrementWidth);
            r.SetValue(Canvas.TopProperty, 0.0);
            canvasBarCode.Children.Add(r);
            incrementWidth = incrementWidth + ((barWidth));
        }
        else if (encodedData[x] == 'w')
        {
            Rectangle r = new Rectangle();
            r.Fill = brush;
            r.Width = 3 * barWidth;
            r.Height = canvasBarCode.Height;
            r.SetValue(Canvas.LeftProperty, incrementWidth);
            r.SetValue(Canvas.TopProperty, 0.0);
            canvasBarCode.Children.Add(r);
            incrementWidth = incrementWidth + (3 * (barWidth));
        }

        if (swing == 0)
           swing = 1;
        else
           swing = 0;
    }
    e.PageVisual = canvasBarCode;
    e.HasMorePages = false;

}
This is a very strange error that you can find sometimes when working with ADO.NET.
David McKean from MSFT says:
This occurs when you have multiple DataReaders open concurrently on the same connection,
ie you call SqlCommand.ExecuteReader but don't close the SqlDataReader returned by this
method before calling it again (either on the same command or another command on the same connection).
It requires a feature called MultipleActiveResultSets which is not available in all providers.
For example SQL2000 does not support it, it was implemented starting from SQL2005.
Also .NET 2.0 must be used.
For more information about enabling Multiple Active Result Sets see: http://msdn.microsoft.com/en-us/library/h32h3abf(v=vs.80).aspx
A good recommendation to make sure that the the readers are closed is to put them inside a using statement, in that case,
no matter if an exception happened they will be closed and disposed.
If you are using SQL Server 2000, MARS is not available so you can create two different connection objects.
Another good article about this issue is: http://blogs.msdn.com/b/spike/archive/2009/08/20/there-is-already-an-open-datareader-associated-with-this-command-which-must-be-closed-first-explained.aspx
But in general to use it is just a change in the connection string:
<connectionStrings>
    <clear />
      <add name="VasquezDB"
         connectionString="Data Source=rvasquez;Initial Catalog=VasquezDB;
                 Integrated Security=True;MultipleActiveResultSets=Yes" />
 </connectionStrings>
Good Luck
NOTE: a good link with more details about MARS is:
http://blog.typps.com/2011/04/mars-multiple-active-result-sets.html
I just came back from executing a Ready assessment for a company in Minnesota, where I analyzed 740,000 lines of code in a VB6 application, of which 660,000 belonged to a single Visual Basic project (.vbp). This is actually the largest single .vbp I have seen so far, beating the previous record of about 500,000 lines of code held by an European company. We have migrated plenty of applications that contain 1+ million lines of code, but they are usually distributed across many .vbp’s.
Though unusual, single vbp’s of this size are perfectly manageable from a migration standpoint, and here are some things that can be done to deal with them:
- Ensure that the migration computer has at the very minimum, 3GB of RAM.
- Look for customization opportunities before you start migrating the code. Customizing the VBUC for this specific VBP can reduce manual effort drastically.
- When making manual changes, start with a small team until you get the project to compile, especially if migrating to VB.NET as the compiler has a maximum of build errors that it can show at any given time.
- Once the application compiles, increase the team size and go for Visual Equivalence by distributing the different forms and user controls across your developers.
Visual Basic 6.0 property pages allow you to work around the
limitations of the Visual Basic Property Browser. For example,
you can use property pages to give users a way to add a collections of
colors to a color list user control.
In the property page you would write code that manages the collection,
something beyond the capabilities of the Visual Basic Property Browser.
In contrast, the Visual Basic .NET Property Browser can be used
to edit any .NET variable type or class. Property Pages are no longer needed.
The Upgrade Wizard and the VBUC do not automatically upgrade your
Visual Basic 6.0 property pages but they can sure be of help.
What if you really what to keep those property pages? Is there any workaround.
mmmm Sure there is.
You can follow these steps.
1. Before migrating your Visual Basic 6.0 project with the VBUC
modify your property pages (.pag) files to resemble common Visual Basic 6.0 forms.
For example a property page looks like this:
VERSION 5.00
Begin VB.PropertyPage PropertyPage1
   Caption         =   "PropertyPage1"
   ClientHeight    =   3600
   ClientLeft      =   0
   ClientTop       =   0
   ClientWidth     =   4800
   PaletteMode     =   0  'Halftone
   ScaleHeight     =   3600
   ScaleWidth      =   4800
   Begin VB.TextBox Text1
      Height          =   495
      Left            =   480
      TabIndex        =   1
      Text            =   "Text1"
      Top             =   1200
      Width           =   2175
   End
   Begin VB.CommandButton Command1
      Caption         =   "Command1"
      Height          =   615
      Left            =   3120
      TabIndex        =   0
      Top             =   480
      Width           =   1455
   End
   Begin VB.Label Label1
      Caption         =   "Label1"
      Height          =   375
      Left            =   240
      TabIndex        =   2
      Top             =   600
      Width           =   1815
   End
End
Attribute VB_Name = "PropertyPage1"
Attribute VB_GlobalNameSpace = False
Attribute VB_Creatable = False
Attribute VB_PredeclaredId = False
Attribute VB_Exposed = False
Can be turned into a Form, to ease migration with simple changes:
VERSION 5.00
Begin VB.Form  PropertyPage1
   Caption         =   "PropertyPage1"
   ClientHeight    =   3600
   ClientLeft      =   0
   ClientTop       =   0
   ClientWidth     =   4800
   PaletteMode     =   0  'Halftone
   ScaleHeight     =   3600
   ScaleWidth      =   4800
   Begin VB.TextBox Text1
      Height          =   495
      Left            =   480
      TabIndex        =   1
      Text            =   "Text1"
      Top             =   1200
      Width           =   2175
   End
   Begin VB.CommandButton Command1
      Caption         =   "Command1"
      Height          =   615
      Left            =   3120
      TabIndex        =   0
      Top             =   480
      Width           =   1455
   End
   Begin VB.Label Label1
      Caption         =   "Label1"
      Height          =   375
      Left            =   240
      TabIndex        =   2
      Top             =   600
      Width           =   1815
   End
End
Attribute VB_Name = "PropertyPage1"
Attribute VB_GlobalNameSpace = False
Attribute VB_Creatable = False
Attribute VB_PredeclaredId = False
Attribute VB_Exposed = False
If the form had a event like:
Private Sub PropertyPage_Initialize()
End Sub
Change that to Form_Load()
2. Rename the file from .pag to .frm.
3. Remove the .pag from the VB6 project
4. Add the .frm file to the VB6 project
5. Run the VBUC tool.
Once migrated you have a close migration of your original Property Page.
Remember however that some things change in .NET and you will need to manually finish some details.
For example, you need to review code in the
PropertyPage_ApplyChanges(),
PropertyPage_EditProperty(PropertyName As String)
PropertyPage_SelectionChanged().
Ok. Once you take your Property Page to .NET how do you integrate it with your control.
Well that’s easy. There you could create a ControlDesigner or just use an UITypeEditor.
Let’s see the UITypeEditor aproach.
The general idea with this aproach is to provide an UITypeEditor (this is just a way to provide an
editor in the property Browser that is not supported by default. And taking advantage of that editor
we will show the form that was produced after migrating out Property Pages. If you want an interface
more similar to what you had on Visual Basic 6.0 you can modify the property page and add a TabControl.
Ok. So these are the steps to follow:
1. First you need to create a type for which you will provide a Type Editor. We will call this type CustomData
namespace CustomEditor
{
    public class CustomData
    {
    }
}
2.Now we will add a property to our control.
        public CustomData Custom
        {
            get;
            set;
        }
3. Now add attributes to associate an editor
        [Description("Custom"), Editor(typeof(CustomDataEditor), typeof(UITypeEditor))]
        public CustomData Custom
        {
            get;
            set;
        }
4. And now lets implement the CustomDataEditor
using System.Windows.Forms.Design;

namespace CustomEditor
{
    public class CustomDataEditor : UITypeEditor
    {
        public CustomDataEditor() {}

        public override UITypeEditorEditStyle GetEditStyle(System.ComponentModel.ITypeDescriptorContext context)
        {

            return UITypeEditorEditStyle.Modal;
        }

        public override object EditValue(System.ComponentModel.ITypeDescriptorContext context, IServiceProvider provider, object value)
        {
            IWindowsFormsEditorService frmsvr = (IWindowsFormsEditorService)provider.GetService(typeof(IWindowsFormsEditorService));
            if (frmsvr == null) return null;
            PropertyPageForm propPage = new PropertyPageForm();
            propPage.control = (MyControl)context.Instance;
            frmsvr.ShowDialog(f);
            return null;
        }

    }
}
5. In the previous put attention to the highlighted details. What we are doing is getting a reference
to the WindowsFormEditor service so we property open the PropertyPage that has now been turned into a form.
It is important that you add a public property to the migrated PropertyPage like:
public MyControl control { get; set; };
because that will give you a reference to the actual control that is on the form. The property page is just an interface
you will need to set the values into properties on your control, in order for them to be serialized.
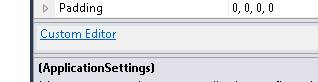
6. Once you do that, when you see the property editor for your control you will see something like:
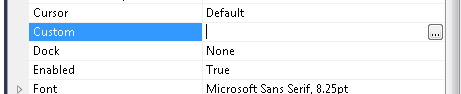
When you press the … button it will show up your property page form.
You could also add other visual elements like:
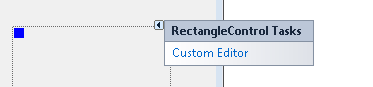
Or
But that is maybe for another post.
Regards
Here is a list of some things that you should consider for Internationalization of Applications.
1. CurrentUICulture and CurrentCulture.
Is is better if you don’t change CurrentUICulture form the the Operating System
2. Windows Forms Layout
Forms must be set Localizable property to true.
This will allow you to define different layouts for your forms depending on the current culture.
3. Strongly Typed Resources.
Instead of something like MessageBox.Show(“Invalid code”) use something like:
MessageBox.Show(resourceManager.GetString(“InvalidCode”)) or even better if you strongly type it:
MessageBox.Show(Form1Resources.InvalidCode);
4. Localize Exceptions messages.
If you include messages in your exceptions that will be shown somehow
on the user interface it is better if your localize those strings also.
If exceptions messages are only for developers then you might not need this.
5.Relate Internationalization sensitive values to the Culture Info
For example
a) Extension methods something like:
CurrentCulture.GetPostalCode();
static class CultureInforExtensions
{
public static string GetPostalCode(this CultureInfo cultureInfo)
{
return new PostalCode(cultureInfo.Name).ToString();
}
}
and then use it like:
maskedTextBox1.Mask = CultureInfo.CurrentCulture.GetPostalCode()
b) Customized CultureInfo it can be helpful for
- Change inappropiate Culture Information
- Supplementary Cultures
- New Combinations of Existing Languages and Regios (for example: Spanish (United States))
6. Right To Left
In some languages Right to Left is important and is an important aspect to consider.
In your forms you have to set the RightToLeftLayout to true and RightToLeft to Yes.
However some controls do not have rtl layoout when RightToLeft=yes: Panel, GroupBos, TabPages and SplitContainerPanels.
You need to rearrange the items in these controls to flow from RightToLeft manually.
This is an example of rearranging the layout of the controls programmatically at runtime, without changing the Form at design-time:
int NumberOfControls = ParentPanel.Controls.Count;
for ( int i=0; i<NumberOfControls;i++)
{
ParentPanel.Controls[i].Left = ParentPanel.Width -
(ParentPanel.Controls[i].Left + ParentPanel.Controls[i].Width);
}
This code iterates into all the controls in the ParentPanel and changes their location to be rtl oriented.
Other problematic controls are: MainMenu, ToolBar, StatusBar MenuStrip, ToolStrip, StatusStrip and ContextMenuString
Other advises:
When you develop multi-lingual application you are bound to change your Forms direction to rtl programmatically at runtime.
There are several techniques to detect the OS language and display your application with the appropriate language and rtl settings, here are some ideas:
The old technique, you would need to detect your UIculture and change the RightToLeft value accordingly.
public static bool CultureInfoIsRightToLeft()
{
string cultureInfoLanguage = System.Globalization.CultureInfo.CurrentUICulture.TwoLetterISOLanguageName;
return
cultureInfoLanguage == "ar" ||
cultureInfoLanguage == "div" ||
cultureInfoLanguage == "fa" ||
cultureInfoLanguage == "syr" ||
cultureInfoLanguage == " ur " ;
}
In Visual Studio 2005, you have a new property TextInfo.IsRightToLeft that indicates the direction of each culture. This is a simple code snippet to detect the culture direction.
private static bool CultureInfoIsRightToLeft()
{
return System.Globalization.CultureInfo.CurrentUICulture.TextInfo.IsRightToLeft;
}
GDI+
In case you implement your own drawing, you need to specify how your digits would appear in your DrawString. This is achieved using the StringFormat.SetDigitSubstitution. For more info to this method please refer to the documentation . Below is a code snippet that shows how to display digits using the different enums.
private void IndicDigits_Paint( object sender, PaintEventArgs e)
{
StringFormat StrFormat = new StringFormat ();
int AraLCID = new System.Globalization. CultureInfo ( "ar-eg" ).LCID;
StrFormat.SetDigitSubstitution(AraLCID, StringDigitSubstitute .National);
e.Graphics.DrawString( "Digit Substitution National 0,1,2,3,4,5,6,7,8,9" , this .Font, newSolidBrush ( this .ForeColor), new PointF (10, 10), StrFormat);
StrFormat.SetDigitSubstitution(AraLCID, StringDigitSubstitute .Traditional);
e.Graphics.DrawString( "Digit Substitution Traditional 0,1,2,3,4,5,6,7,8,9" , this .Font, newSolidBrush ( this .ForeColor), new PointF (10, 30), StrFormat);
StrFormat.SetDigitSubstitution(AraLCID, StringDigitSubstitute .None);
e.Graphics.DrawString( "Digit Substitution None 0,1,2,3,4,5,6,7,8,9" , this .Font, newSolidBrush ( this .ForeColor), new PointF (10, 50), StrFormat);
StrFormat.SetDigitSubstitution(AraLCID, StringDigitSubstitute .User);
e.Graphics.DrawString( "Digit Substitution User 0,1,2,3,4,5,6,7,8,9" , this .Font, newSolidBrush ( this .ForeColor), new PointF (10, 70), StrFormat);
}
A friend at work asked me how do I make my form bigger that the screen resolution. I was not able to do it, but
he google it and found a solution from: http://social.msdn.microsoft.com/Forums/en/vblanguage/thread/65c48eea-408a-45ed-a1cc-ea0336047798
This is just the transliteration of that code in C# just as a reference
using System;
using System.Collections;
using System.Collections.Generic;
using System.Data;
using System.Diagnostics;
using System.Runtime.InteropServices;
using System.Windows.Forms;

public class Form1 : Form
{
	[DllImport("User32.dll", CharSet = CharSet.Ansi, SetLastError = true, ExactSpelling = true)]
	private static extern bool MoveWindow(IntPtr hWnd, int x, int y, int w, int h, bool Repaint);

	private void Form1_Load(System.Object sender, System.EventArgs e)
	{
		this.MaximumSize = new Size(5000, 800);
		bool Result = MoveWindow(this.Handle, this.Left, this.Top, 5000, 500, true);
	}
	public Form1()
	{
		Load += Form1_Load;
	}

}
The following C# code shows how to use WMI to query printers information, set and get default printer.
public bool SetDefaultPrinter()
{
    System.Management.ManagementObjectSearcher search =
                   default(System.Management.ManagementObjectSearcher);
    System.Management.ManagementObjectCollection results =
                   default(System.Management.ManagementObjectCollection);
    System.Management.ManagementObject printer =
                   default(System.Management.ManagementObject);


    search =
     new System.Management.ManagementObjectSearcher("select * from win32_printer");
    results = search.Get();
    //Get Default Printer
    System.Management.ManagementObject defaultPrinter = null;
    foreach (System.Management.ManagementObject foundPrinter in results)
    {
        System.Management.PropertyDataCollection
              propertyDataCollection = foundPrinter.Properties;

         if ((bool)foundPrinter["Default"]) // DEFAULT PRINTER
         {
              System.Diagnostics.Debug.WriteLine(foundPrinter["Name"]);
              System.Diagnostics.Debug.WriteLine(foundPrinter["Location"]);
         }
     }


     //Sets new default Printer
     foreach (System.Management.ManagementObject foundPrinter in results)
     {
         System.Diagnostics.Debug.Print(foundPrinter["Name"].ToString());
         if (foundPrinter["Name"].Equals("PDFCreator"))
         {
             System.Management.ManagementBaseObject outParams =
                   foundPrinter.InvokeMethod("SetDefaultPrinter", null, null);
             if (outParams == null)
                 System.Diagnostics.Debug.WriteLine("Unable to set default printer");
             Int32 retVal = (int)(uint)outParams.Properties["ReturnValue"].Value;
             if (retVal == 0)
                return true;
             else
                return false;
         }
     }

    return false;

}
I was playing around with dumpbin trying to figure out some problems with a 32-bit dll and in order to make
dumpbin run from the command line I just copied the mspdb100.dll file to
C:\Program Files\Microsoft Visual Studio 10.0\VC\bin>
Something simple right! No harm can be gotten from something like that? WRONG!!!
After that some of my C++ project stop compiling with the annoying message: Program database manager mismatch!!.
Luckily I remembered copying that file, so I just gave it a try, and guest what? Everything works fine now.
Well I’m posting it just a reminder that for VS C++ you must put attention on all the details 
How do you write a Windows Service in VB6?
Althought this is not a recommend practice due to the stability issues and VB6 support, if for
any reason you need to do this I provide a guide of how to do that in VB6 and how do the same thing
in VB.NET and C#.
Using the NTSVC.ocx
This is an OCX implement by Mauricio Ordonez some time ago.
It is very simple to use. You just drop it on a form and add some code to your VB6.
Example: VB6 Form with the NTSVC.ocx control
Private Sub Form_Load()
Me.Visible = False
Dim strDisplayName As String
On Error GoTo Err_Load
strDisplayName = NTService1.DisplayName
If Command = "-install" Then
' Enable interaction with desktop.
NTService1.Interactive = True
If NTService1.Install Then
MsgBox strDisplayName & " installed successfully"
Else
MsgBox strDisplayName & " failed to install"
End If
End
ElseIf Command = "-uninstall" Then
If NTService1.Uninstall Then
MsgBox strDisplayName & " uninstalled successfully"
Else
MsgBox strDisplayName & " failed to uninstall"
End If
End
ElseIf Command = "-debug" Then
NTService1.Debug = True
ElseIf Command <> "" Then
MsgBox "Invalid command option"
End
End If
' Connect service to Win32 services controller.
NTService1.StartService
Err_Load:
' Error starting service
End Sub
Private Sub Timer1_Timer()
MsgBox "hola"
End Sub
NOTE: Remember that VB6 is not a supported platform and that even if it is true
that you can still run VB6 code in Windows Vista and Windows 7 MS does not support this
platform anymore.
How can I convert my VB6 service to .NET?
To create a Windows Service in VB.NET follow this steps.
1. First you need to create a Windows Service Project:
a. Open Visual Studio 2010
b. Go to the File\New\Project….
c. Select the Windows Service Template
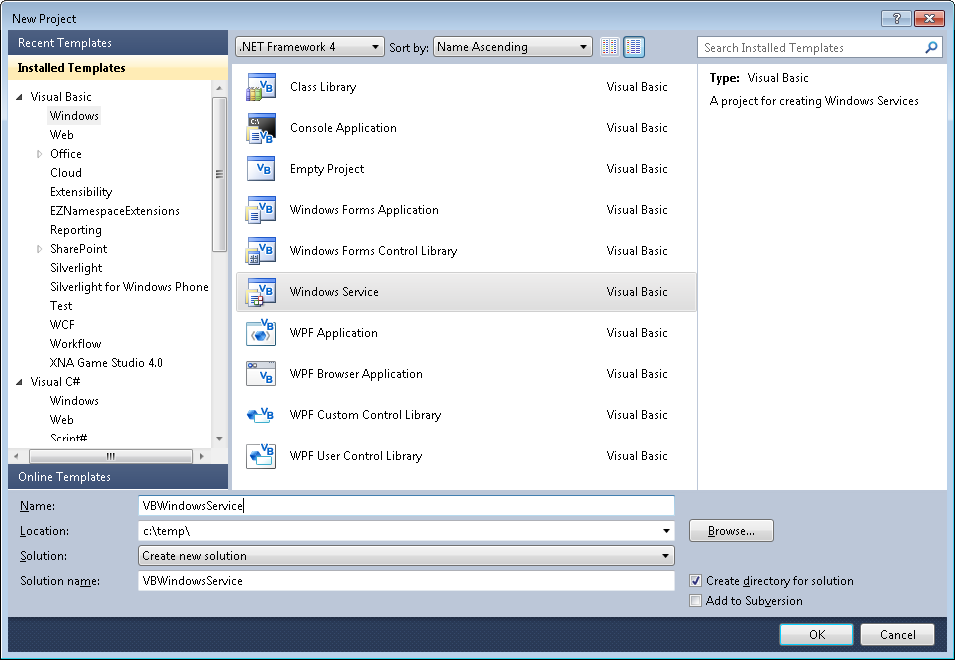
d. And you just put your code in the OnStart method:
Public Class Service1

    Protected Overrides Sub OnStart(ByVal args() As String)
        ' Add code here to start your service. This method should set things
        ' in motion so your service can do its work.
        ExecuteWindowsServiceCode()
    End Sub

    Protected Overrides Sub OnStop()
        ' Add code here to perform any tear-down necessary to stop your service.
    End Sub

    Private Sub ExecuteWindowsServiceCode()
        'TODO Add Some Code
    End Sub

End Class
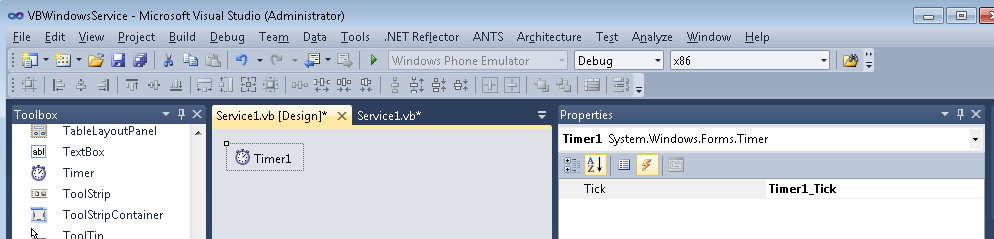
e. Another typical thing to do in Windows Service is to add a Timer Control, you you can have
your windows service performs some actions every number of seconds. To do that, drag a
Timer Control on your Service component, execute the Start method of the timer control on the OnStart method and
handle the Tick event:
Public Class Service1

    Protected Overrides Sub OnStart(ByVal args() As String)
        ' Add code here to start your service. This method should set things
        ' in motion so your service can do its work.
        Timer1.Start()
        ExecuteWindowsServiceCode()
    End Sub

    Protected Overrides Sub OnStop()
        ' Add code here to perform any tear-down necessary to stop your service.
        Timer1.Stop()
    End Sub

    Private Sub ExecuteWindowsServiceCode()
        'TODO Add Some Code
    End Sub

    Private Sub Timer1_Tick(sender As System.Object, e As System.EventArgs) Handles Timer1.Tick
        MsgBox("Viva la vida Loca!")
    End Sub
End Class
If you need to recover some of your code from your VB6 project, download our Visual Basic Conversion Tool VBUC tool.
How do I Install my Windows Service?
In general you just need to use the command line utility installutil.exe for more details see this other post.
On a previous post I was describing how some basic Objective-C elements were mapped to C#.
In particular I showed how the @interface and @implementation definitions are to be mapped in .Net, including basic properties.
In this post I will show a little about how methods are migrated.
There are several things to analyze when moving Objective-C code to C# it might be simple but can be a complicated
task. Objective-C is a language created under the inspiration of SmallTalk. And in Smalltalk programmer do not think of
method calls but instead of message sending and that is something to keep in mind when doing this migration.
Also all methods are virtual and even if there are access restriction in Objective-C I will map those methods to
public for simplicity sake.
In the previous post we had:
FIRSTFIRST
Fraction.h
#import <Foundation/NSObject.h>
@interface Fraction: NSObject {
    int numerator;
    int denominator;
}
-(void) print;
-(void) setNumerator: (int) n;
-(void) setDenominator: (int) d;
-(int) numerator;
-(int) denominator;
@end
And
Fraction.m
#import "Fraction.h"
#import <stdio.h>

@implementation Fraction
-(void) print {
    printf( "%i/%i", numerator, denominator );
}

-(void) setNumerator: (int) n {
    numerator = n;
}

-(void) setDenominator: (int) d {
    denominator = d;
}

-(int) denominator {
    return denominator;
}

-(int) numerator {
    return numerator;
}
@end
And that example shows properties and methods with no parameter. OK. Now lets just focus on methods with 0, 1 and more parameters.
MethodsExample.h
#import <Foundation/NSObject.h>
@interface MethodsExample: NSObject {

}
-(void) print;
-(int) multiplyByTwo: (int) n ;
-(void) multiplyTwoNumers: (int) a andSecondNumber: b;

@end
MethodsExample.m
#import "MethodsExample.h"
#import <stdio.h>

@implementation MethodsExample
-(void) print {
    printf( "Hola mundo\n" );
}

-(int) multiplyByTwo: (int) n {
    return n * 2;
}

-(int) multiplyTwoNumbers: (int) a  andSecondNumber (int) b {
    return a * b;
}
@end
And calling those functions will be:
#import <stdio.h>
#import "MethodsExample.h"

int main( int argc, const char *argv[] ) {
    // create a new instance
    MethodsExample *m = [[MethodsExample alloc] init];
    [m print];
    int result;
    result = [m multiplyByTwo: 1];
    result = [m multiplyTwoNumbers: 1 andSecondNumber: 5];
    // free memory
    [m release];
    return 0;
}
This little example shows some of the particularities of Objective-C.
In Objetive-C all parameters starting from the second parameter can have
what is called a label and labels are similar to namedParameter. Ok lets go ahead and map that class.
using System;

public class MethodsExample
{
    public virtual print() {
        Console.WriteLine("Hola mundo\n");
    }
    public virtual int multiplyByTwo(int n)
    {
      return n * 2;
    }
    //AproachOne
    public virtual int multiplyTwoNumber(int a,int andSecondNumber)
    {
        return a * andSecondNumber;
    }
    //AproachTwo
    //I just renamed as multiplyTwoNumber2 to avoid compilation errors.
    //The idea is that you will choose one of the two aproaches
    //or define a criteria for the instances where aproach one should be used
    //instead of approach two
    public virtual int multiplyTwoNumber(int a,int andSecondNumber)
    {
        int n = andSecondNumber;
        //This aproach will be better if you have a lot of code in the method
        //and you prefer to keep the original arg name
        return a * n;
    }

}
So the thing here is what to use as the parameter name, the label or the argument name.
In the example you can see the two approaches in the multiplyTwoNumbers case.
And calling the methods is simple and the named parameters syntax can be exploited.
using System;

public static class Program
{
    public static int Main(string[] argv ) {
        // create a new instance
        var m = new MethodsExample();
        m.print();
        int result;
        result = m.multiplyByTwo(1);
        result = m.multiplyTwoNumbers(1,andSecondNumber: 5); //using named parameters
        // free memory
        m.release();
        return 0;
    }
}
REMEMBER: This is just a glimpse of some mapping concepts from Objective-C to C#.
There are many subtle details in this kind of migration and is my belief that only
an automated tool is able to process all those details in an effectively and more error-free
than a manual approach. For example in objective-c if m is null that will not cause any error if you
do something like [m print] and in C# that will throw an error. However a migration tool could determine
if the variable will have a value before its use and avoid adding unnecessary if (m!=null) statements.
We will examine this and other details in following posts. I hope this little examples give you enough information

for playing around migrating some Objective-C code. And if it gets too complicated just send me an email!!!
Windows Phone 7 (WP7) is out! and it’s a great platform for developing new Apps. After being involved with Silverlight for a while
I am glad to have now the option to deploy apps to Windows Phone 7.
But we have to recognize that there are tons of great Apps for iPhone already. You might even have some of them.
So it’s porting time. Here at Artinsoft we love to upgrade/port application to all platforms.
So I will provide here some basic thoughts to help you upgrade your code.
For this post let’s discuss a little about applications written for XCode.
XCode applications are written in Objetive-C.Let’s map some examples:
In Objective-C your class will be usually
#import <Foundation/NSObject.h>
#import <Foundation/NSObject.h>

@interface Fraction: NSObject {
    int numerator;
    int denominator;
}

-(void) print;
-(void) setNumerator: (int) n;
-(void) setDenominator: (int) d;
-(int) numerator;
-(int) denominator;
@end
How you should understand that? Well this is just the list of methods in your class something like:
using System;
public class Fraction {
    int _numerator;
    int _denominator;
    public void print() { /* TODO*/}
    public int numerator   { get { /* TODO */ } set { /*TODO*/} }
    public int denominator { get { /* TODO */ } set { /*TODO*/} }
}
The code for these methods will be in the .m file.
#import "Fraction.h"
#import <stdio.h>

@implementation Fraction
-(void) print {
    printf( "%i/%i", numerator, denominator );
}

-(void) setNumerator: (int) n {
    numerator = n;
}

-(void) setDenominator: (int) d {
    denominator = d;
}

-(int) denominator {
    return denominator;
}

-(int) numerator {
    return numerator;
}
@end
So that will complement your class implementation for something like:
using System;
public class Fraction
{
    int _numerator;
    int _denominator;
    public void print()
    {
        Console.Write("{0}/{1}" ,numerator,denominator);
    }
    public int numerator
    {
        get { return _numerator; }
        set { _numerator = value; }
    }
    public int denominator
    {
        get { return _denominator; }
        set { _denominator = value; }
    }
}
Ok An now let’s look at the Objective-C main.m:
#import <stdio.h>
#import "Fraction.h"

int main( int argc, const char *argv[] ) {
    // create a new instance
    Fraction *frac = [[Fraction alloc] init];
    Fraction *frac2 = [[Fraction alloc] init];

    // set the values
    [frac setNumerator: 1];
    [frac setDenominator: 3];

    // combined set
    [frac2 setNumerator: 1 andDenominator: 5];

    // print it
    printf( "The fraction is: " );
    [frac print];
    printf( "\n" );

    // print it
    printf( "Fraction 2 is: " );
    [frac2 print];
    printf( "\n" );

    // free memory
    [frac release];
    [frac2 release];

    return 0;
}
Which can be rewritten in C# as:
using System;
static class ProgramMain{static int Main(string[] argv) {
    // create a new instance
    Fraction frac = new Fraction();
    // set the values frac.Numerator = 1; frac.Denominator = 3;
    // print it
    Console.Write( "The fraction is: " );
    frac.print();    Console.Write( "\n" );
    // free memory frac = null;
    return 0;
}}
Well this is just for warming up. In following posts we will be looking
at more Objective-C \ XCode concept mapping to C#.
I recommend looking at the site http://wp7mapping.interoperabilitybridges.com/
that provides a lot about mapping iOS API