In VB.NET if you want to make your interfaces available thru COM and make sure that its parameters are of a certain type you have to use the MarshalAs attribute. For the return type it is a little tricky because it has to be added after the As Keyword.
<ComVisible(True)> _
<Guid("15D492C7-CD14-4239-B98D-689F329EEDA4")>
<InterfaceType(ComInterfaceType.InterfaceIsDual)> _
Public Interface MyCOMInterface
	Function FooReturningShort(ByVal data As Integer, <MarshalAs(UnmanagedType.U2)> ByVal shortData As short) As <MarshalAsAttribute(UnmanagedType.U2)> Short
End Interface
Silverlight is when you have to add a lot of items.
I know, I know maybe you should choose another way to show that data,
but leaving philosophical-ui design discussions, the real problem is that
usually those components are bind to ObservableCollections.
ObservableCollections are a bit of an exhibitionist.
Each time you add an item it will yell
Hey!! Yoo-hoo! HEY!!! YOU!!
I'm HEREEEEEEEEEEEEEEEEEE!!!!
Look at me!! Look at Me!!! Look Mom No Hands!!! Look Dad no Feet!!! HEY!!!!!!!!
So if you have some code like:
for(int i=0;i<10000;i++)
{
    comboItems.Add("item" + i);
}
A nice thing will be to be able to do something like:
var items = new String[10000]
for(int i=0;i<10000;i++)
{
    items[i]="item" + i;
}
comboItems.AddRange(items);
And then provide just ONE notification of Collection Changed instead of a lot of
little cries for attention.
Well that is the reason for this new version of ObservableCollection that I call
RangeObservableCollection:
using System;
using System.Collections.ObjectModel;
using System.Collections.Generic;

namespace Utils
{
    public class RangeObservableCollection<T> : ObservableCollection<T>
    {
        private bool _suppressNotification = false;

        public RangeObservableCollection() : base() { }

        public RangeObservableCollection(IEnumerable<T> collection) : base(collection) { }

        protected override void OnPropertyChanged(System.ComponentModel.PropertyChangedEventArgs e)
        {
            if (!_suppressNotification) base.OnPropertyChanged(e);
        }

        protected override void OnCollectionChanged(System.Collections.Specialized.NotifyCollectionChangedEventArgs e)
        {
            if (!_suppressNotification)
                base.OnCollectionChanged(e);
        }

        /// <summary>
        /// Adds a collection suppressing notification per item and just raising a notification
        /// for the whole collection
        /// </summary>
        /// <param name="list"></param>
        public void AddRange(IEnumerable<T> list)
        {
            if (list == null) throw new ArgumentNullException("list");
            _suppressNotification = true;
            foreach (T item in list)
            {
                Add(item);
            }
            _suppressNotification = false;
            OnCollectionChanged(new System.Collections.Specialized.NotifyCollectionChangedEventArgs(System.Collections.Specialized.NotifyCollectionChangedAction.Reset));
        }

    }

}
The following C# code shows how to use WMI to query printers information, set and get default printer.
public bool SetDefaultPrinter()
{
    System.Management.ManagementObjectSearcher search =
                   default(System.Management.ManagementObjectSearcher);
    System.Management.ManagementObjectCollection results =
                   default(System.Management.ManagementObjectCollection);
    System.Management.ManagementObject printer =
                   default(System.Management.ManagementObject);


    search =
     new System.Management.ManagementObjectSearcher("select * from win32_printer");
    results = search.Get();
    //Get Default Printer
    System.Management.ManagementObject defaultPrinter = null;
    foreach (System.Management.ManagementObject foundPrinter in results)
    {
        System.Management.PropertyDataCollection
              propertyDataCollection = foundPrinter.Properties;

         if ((bool)foundPrinter["Default"]) // DEFAULT PRINTER
         {
              System.Diagnostics.Debug.WriteLine(foundPrinter["Name"]);
              System.Diagnostics.Debug.WriteLine(foundPrinter["Location"]);
         }
     }


     //Sets new default Printer
     foreach (System.Management.ManagementObject foundPrinter in results)
     {
         System.Diagnostics.Debug.Print(foundPrinter["Name"].ToString());
         if (foundPrinter["Name"].Equals("PDFCreator"))
         {
             System.Management.ManagementBaseObject outParams =
                   foundPrinter.InvokeMethod("SetDefaultPrinter", null, null);
             if (outParams == null)
                 System.Diagnostics.Debug.WriteLine("Unable to set default printer");
             Int32 retVal = (int)(uint)outParams.Properties["ReturnValue"].Value;
             if (retVal == 0)
                return true;
             else
                return false;
         }
     }

    return false;

}
To create a new Team System Project in Visual Studio 2005, follow these steps:
1. Go to the File Menu. Select New…, and in the New… submenu select Team Project… to start a wizard.

2. The “Specify the Team Project Settings” of the New Team Project wizard appears. Type the Team Project name. For example type MergeExample and click Next
![clip_image002[5]](http://blogs.artinsoft.net/public_img/0d61167332a7_CAF4/clip_image0025_thumb.jpg "clip_image002[5]")
3. In the following page, select the Process Template for the Team Project. We recommend using the Artinsoft Migration Methodology – v0.8 or later. Click Next.
![clip_image002[7]](http://blogs.artinsoft.net/public_img/0d61167332a7_CAF4/clip_image0027_thumb.jpg "clip_image002[7]")
4. In the following page, type the Title for the Team Project Portal. Type MergeExample. The Team Project Portal provides useful information about your project. Click Next
![clip_image002[9]](http://blogs.artinsoft.net/public_img/0d61167332a7_CAF4/clip_image0029_thumb.jpg "clip_image002[9]")
5. In the following page you select your source control settings.
Select the first option “Create an empty source control folder”. Click Next
![clip_image002[11]](http://blogs.artinsoft.net/public_img/0d61167332a7_CAF4/clip_image00211_thumb.jpg "clip_image002[11]")
6. In the following page a summary of your Team Project settings is presented. Click Finish
![clip_image002[17]](http://blogs.artinsoft.net/public_img/0d61167332a7_CAF4/clip_image00217_thumb.jpg "clip_image002[17]")
7. In the following page the a process bar appears while the project is created. Just wait until the process is done. It normally takes between 3 and 5 minutes.
![clip_image002[19]](http://blogs.artinsoft.net/public_img/0d61167332a7_CAF4/clip_image00219_thumb.jpg "clip_image002[19]")
Recently an user of the ExtendedBrowser v2 commented that he needed access to the NewWindow3 event.
The NewWindow3 event is raised when a new window is to be created. It extends NewWindow2 with additional information about the new window.
Syntax
Private Sub object_NewWindow3( _
	ByRef ppDisp As Object, _
	ByRef Cancel As Boolean, _
	ByVal dwFlags As Long, _
	ByVal bstrUrlContext As String, _
	ByVal bstrUrl As String)
Parameters
object Object expression that resolves to the objects in the Applies To list. ppDisp Object expression that, optionally, receives a new, hidden WebBrowser or InternetExplorer object with no URL loaded. Cancel A Boolean value that determines whether the current navigation should be canceled. true Cancel the navigation. false Do not cancel the navigation. dwFlags The flags from the NWMFenumeration that pertain to the new window.
typedef enum NWMF
{
NWMF_UNLOADING = 0x00000001,
NWMF_USERINITED = 0x00000002,
NWMF_FIRST = 0x00000004,
NWMF_OVERRIDEKEY = 0x00000008,
NWMF_SHOWHELP = 0x00000010,
NWMF_HTMLDIALOG = 0x00000020,
NWMF_FROMDIALOGCHILD = 0x00000040,
NWMF_USERREQUESTED = 0x00000080,
NWMF_USERALLOWED = 0x00000100,
NWMF_FORCEWINDOW = 0x00010000,
NWMF_FORCETAB = 0x00020000,
NWMF_SUGGESTWINDOW = 0x00040000,
NWMF_SUGGESTTAB = 0x00080000,
NWMF_INACTIVETAB = 0x00100000
} NWMF;
bstrUrlContext The URL of the page that is opening the new window. bstrUrlThe URL that is opened in the new window.
Please notice:
Note The NewWindow3 event is only fired when a new instance of Internet Explorer is about to be created. Calling showModalDialog or showModelessDialog does not trigger an event because they are not new instances of Internet Explorer. They are implemented as MSHTML host windows, which allows them to render and display HTML content but not hyperlinks between documents.
You can download from here
DOWNLOAD CODE HERE v3_1
ExtendedBrowserExampleVBNET.zip (92.56 kb)
This post describes an an interesting workaround that you can use to support the migration of ActiveX Documents with the Artinsoft Visual Basic Upgrade Companion which is one of the Artinsoft \ Mobilize.NET tools you can use to modernize your Visual Basic, Windows Forms and PowerBuilder applications.
Currently the Visual Basic Upgrade Companion does not allow you to process ActiveX Document directly, but there is a workaround: in general ActiveX Document are something really close to an User Control which is a element that is migrated automatically by the Visual Basic Upgrade Companion.
This post provides a link to a tool (DOWNLOAD TOOL) that can fix your VB6 projects, so the Visual Basic Upgrade Companion processes them. To run the tool:
1) Open the command prompt
2) Go to the Folder where the .vbp file is located
3) Execute a command line command like:
FixUserDocuments Project1.vbp
This will generate a new project called Project1_modified.vbp. Migrate this new project and now UserDocuments will be supported.
First Some History
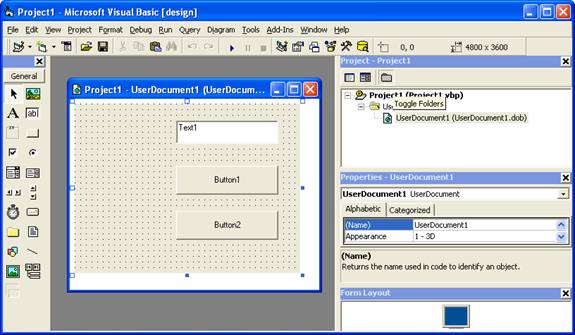
VB6 allows you to create UserDocuments, which can be embedded inside an ActiveX container. The most common one is Internet Explorer. After compilation, the document is contained in a Visual Basic Document file (.VBD) and the server is contained in either an .EXE or .DLL file. During development, the project is in a .DOB file, which is a plain text file containing the definitions of the project’s controls, source code, and so on.
If an ActiveX document project contains graphical elements that cannot be stored in text format, they will be kept in a .DOX file. The .DOB and .DOX files in an ActiveX document project are parallel to the .FRM and .FRX files of a regular Visual Basic executable project.
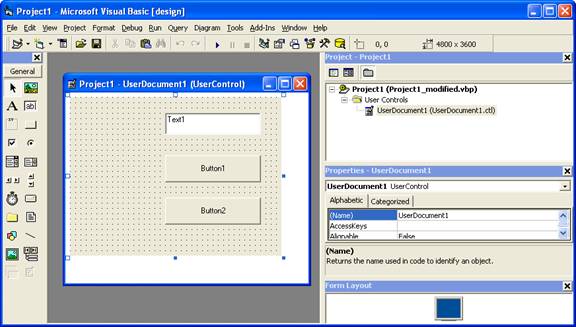
The trick to support ActiveX documents is that in general they are very similar to UserControls, and .NET UserControls can also be hosted in a WebBrowser. The following command line tool can be used to update your VB6 projects. It will generate a new solution where UserDocuments will be defined as UserControls.
If you have an ActiveX document like the following:
Then after running the tool you will have an Project like the following:
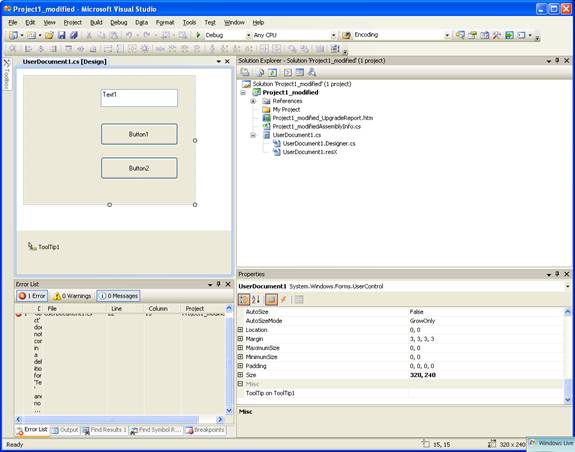
So after you have upgraded the projet with the Fixing tool, open the Visual Basic Upgrade Companion and migrate your project.
After migration you will get something like this:
To use your migrated code embedded in a Web Browser copy the generated assemblies and .pdb to the directory you will publish:
Next create an .HTM page. For example UserDocument1.htm
The contents of that page should be something like the following:
|
<html>
<body>
<p>ActiveX Demo<br> <br></body>
<object id="UserDocument1"
classid="http:<AssemblyFileName>#<QualifiedName of Object>"
height="500" width="500" VIEWASTEXT>
</object>
<br><br>
</html>
For example:
<html>
<body>
<p>ActiveX Demo<br> <br></body>
<object id="UserDocument1"
classid="http:Project1.dll#Project1.UserDocument1"
height="500" width="500" VIEWASTEXT>
</object>
<br><br>
</html>
|
Now all that is left is to publish the output directory.
To publish your WinForms user control follow these steps.
- Create a Virtual Directory:
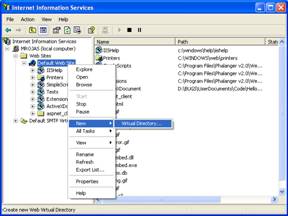
- A Wizard to create a Virtual Directory will appear.

Click Next
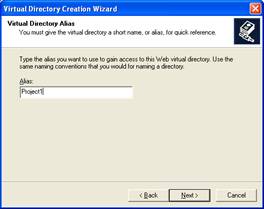
Name the directory as you want. For example Project1. Click Next
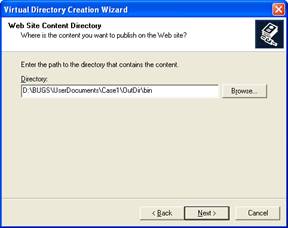
Select the location of your files. Click the Browse button to open a dialog box where you can select your files location. Click Next
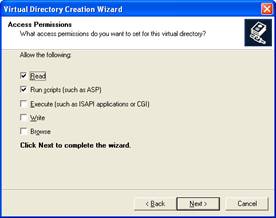
Check the read and run scripts checks and click next
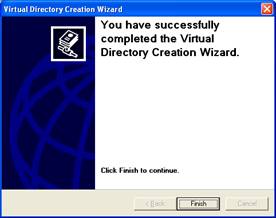
Now Click Finish
- Properties for the Virtual Directory will look like this:
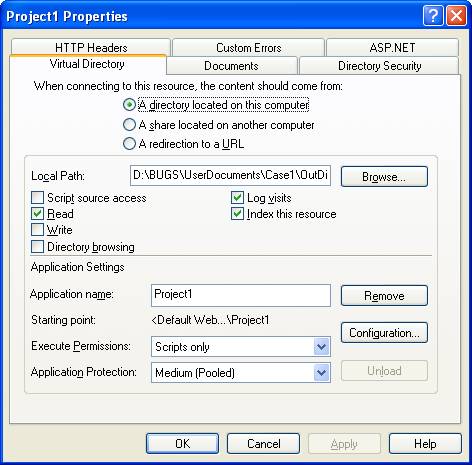
NOTE: to see this dialog right click over the virtual directory
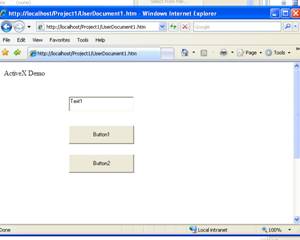
- Now just browse to the address lets say http:\\localhost\Project1\UserDocument1.htm
And that should be all! :)
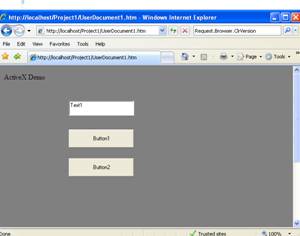
The colors are different because of the Host configuration however a simple CSS like:
<style>
body {background-color: gray;}
</style>
Can make the desired change:
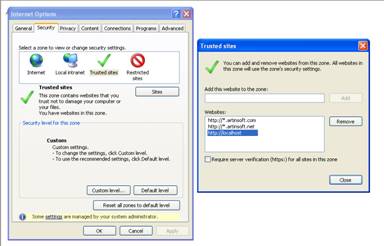
Notice that there will be security limitations, for example for thinks like MessageBoxes.
You can allow restricted operations by setting your site as a restricted site:
For example:
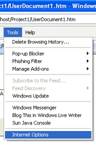
Restrictions
The constraints for this solution include:
* This solutions requires Windows operating system on the client side
* Internet Explorer 6.0 is the only browser that provides support for this type of hosting
* It requires .NET runtime to be installed on the client machine.
* It also requires Windows 2000 and IIS 5.0 or above on the server side
Due to all of the above constraints, it might be beneficial to detect the capabilities of the client machine and then deliver content that is appropriate to them. For example, since forms controls hosted in IE require the presence of the .NET runtime on the client machine, we can write code to check if the client machine has the .NET runtime installed. You can do this by checking the value of the Request.Browser.ClrVersion property. If the client machine has .NET installed, this property will return the version number; otherwise it will return 0.0.
Adding a script like:
<script>
if ((navigator.userAgent.indexOf(".NET CLR")>-1))
{
//alert ("CLR available " +navigator.userAgent);
}
else
alert(".NET SDK/Runtime is not available for us from within " + "your web browser or your web browser is not supported." + " Please check with http://msdn.microsoft.com/net/ for " + "appropriate .NET runtime for your machine.");
</script>
Will help with that.
References:
ActiveX Documents Definitions:
http://www.aivosto.com/visdev/vdmbvis58.html
Hosting .NET Controls in IE
http://www.15seconds.com/issue/030610.htm