How do you write a Windows Service in VB6?
Althought this is not a recommend practice due to the stability issues and VB6 support, if for
any reason you need to do this I provide a guide of how to do that in VB6 and how do the same thing
in VB.NET and C#.
Using the NTSVC.ocx
This is an OCX implement by Mauricio Ordonez some time ago.
It is very simple to use. You just drop it on a form and add some code to your VB6.
Example: VB6 Form with the NTSVC.ocx control
Private Sub Form_Load()
Me.Visible = False
Dim strDisplayName As String
On Error GoTo Err_Load
strDisplayName = NTService1.DisplayName
If Command = "-install" Then
' Enable interaction with desktop.
NTService1.Interactive = True
If NTService1.Install Then
MsgBox strDisplayName & " installed successfully"
Else
MsgBox strDisplayName & " failed to install"
End If
End
ElseIf Command = "-uninstall" Then
If NTService1.Uninstall Then
MsgBox strDisplayName & " uninstalled successfully"
Else
MsgBox strDisplayName & " failed to uninstall"
End If
End
ElseIf Command = "-debug" Then
NTService1.Debug = True
ElseIf Command <> "" Then
MsgBox "Invalid command option"
End
End If
' Connect service to Win32 services controller.
NTService1.StartService
Err_Load:
' Error starting service
End Sub
Private Sub Timer1_Timer()
MsgBox "hola"
End Sub
NOTE: Remember that VB6 is not a supported platform and that even if it is true
that you can still run VB6 code in Windows Vista and Windows 7 MS does not support this
platform anymore.
How can I convert my VB6 service to .NET?
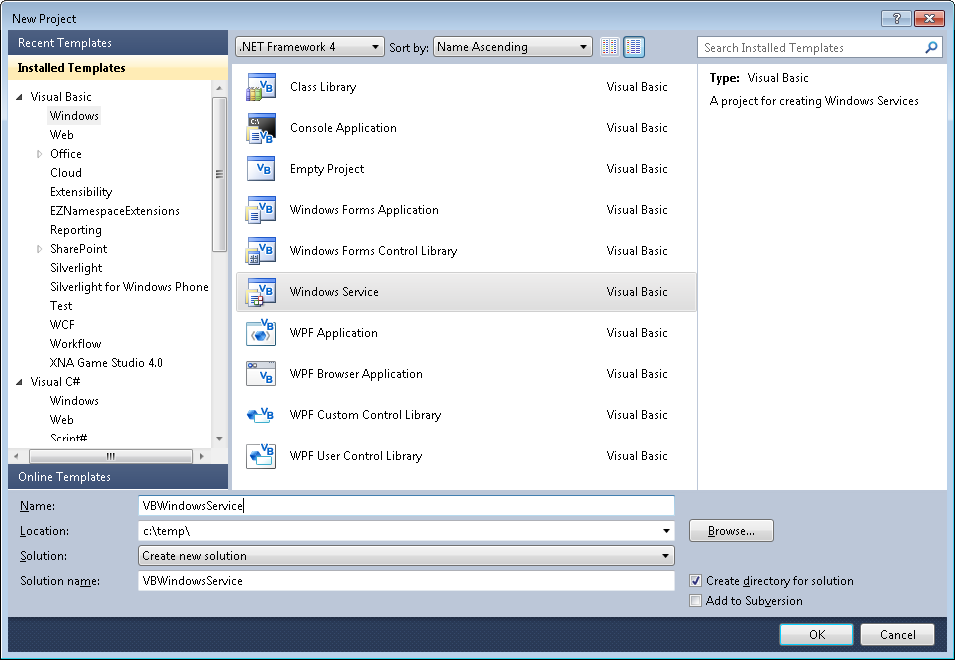
To create a Windows Service in VB.NET follow this steps.
1. First you need to create a Windows Service Project:
a. Open Visual Studio 2010
b. Go to the File\New\Project….
c. Select the Windows Service Template
d. And you just put your code in the OnStart method:
Public Class Service1

    Protected Overrides Sub OnStart(ByVal args() As String)
        ' Add code here to start your service. This method should set things
        ' in motion so your service can do its work.
        ExecuteWindowsServiceCode()
    End Sub

    Protected Overrides Sub OnStop()
        ' Add code here to perform any tear-down necessary to stop your service.
    End Sub

    Private Sub ExecuteWindowsServiceCode()
        'TODO Add Some Code
    End Sub

End Class
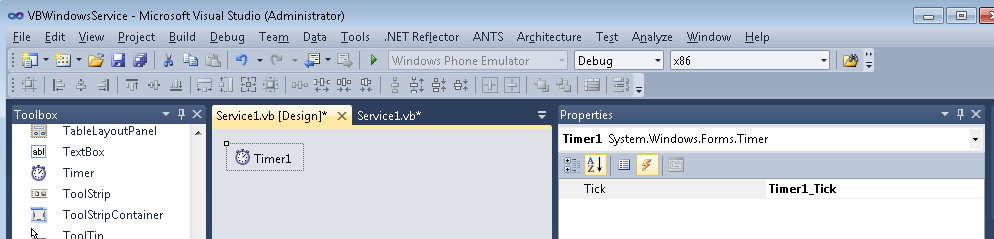
e. Another typical thing to do in Windows Service is to add a Timer Control, you you can have
your windows service performs some actions every number of seconds. To do that, drag a
Timer Control on your Service component, execute the Start method of the timer control on the OnStart method and
handle the Tick event:
Public Class Service1

    Protected Overrides Sub OnStart(ByVal args() As String)
        ' Add code here to start your service. This method should set things
        ' in motion so your service can do its work.
        Timer1.Start()
        ExecuteWindowsServiceCode()
    End Sub

    Protected Overrides Sub OnStop()
        ' Add code here to perform any tear-down necessary to stop your service.
        Timer1.Stop()
    End Sub

    Private Sub ExecuteWindowsServiceCode()
        'TODO Add Some Code
    End Sub

    Private Sub Timer1_Tick(sender As System.Object, e As System.EventArgs) Handles Timer1.Tick
        MsgBox("Viva la vida Loca!")
    End Sub
End Class
If you need to recover some of your code from your VB6 project, download our Visual Basic Conversion Tool VBUC tool.
How do I Install my Windows Service?
In general you just need to use the command line utility installutil.exe for more details see this other post.
On a previous post I was describing how some basic Objective-C elements were mapped to C#.
In particular I showed how the @interface and @implementation definitions are to be mapped in .Net, including basic properties.
In this post I will show a little about how methods are migrated.
There are several things to analyze when moving Objective-C code to C# it might be simple but can be a complicated
task. Objective-C is a language created under the inspiration of SmallTalk. And in Smalltalk programmer do not think of
method calls but instead of message sending and that is something to keep in mind when doing this migration.
Also all methods are virtual and even if there are access restriction in Objective-C I will map those methods to
public for simplicity sake.
In the previous post we had:
FIRSTFIRST
Fraction.h
#import <Foundation/NSObject.h>
@interface Fraction: NSObject {
    int numerator;
    int denominator;
}
-(void) print;
-(void) setNumerator: (int) n;
-(void) setDenominator: (int) d;
-(int) numerator;
-(int) denominator;
@end
And
Fraction.m
#import "Fraction.h"
#import <stdio.h>

@implementation Fraction
-(void) print {
    printf( "%i/%i", numerator, denominator );
}

-(void) setNumerator: (int) n {
    numerator = n;
}

-(void) setDenominator: (int) d {
    denominator = d;
}

-(int) denominator {
    return denominator;
}

-(int) numerator {
    return numerator;
}
@end
And that example shows properties and methods with no parameter. OK. Now lets just focus on methods with 0, 1 and more parameters.
MethodsExample.h
#import <Foundation/NSObject.h>
@interface MethodsExample: NSObject {

}
-(void) print;
-(int) multiplyByTwo: (int) n ;
-(void) multiplyTwoNumers: (int) a andSecondNumber: b;

@end
MethodsExample.m
#import "MethodsExample.h"
#import <stdio.h>

@implementation MethodsExample
-(void) print {
    printf( "Hola mundo\n" );
}

-(int) multiplyByTwo: (int) n {
    return n * 2;
}

-(int) multiplyTwoNumbers: (int) a  andSecondNumber (int) b {
    return a * b;
}
@end
And calling those functions will be:
#import <stdio.h>
#import "MethodsExample.h"

int main( int argc, const char *argv[] ) {
    // create a new instance
    MethodsExample *m = [[MethodsExample alloc] init];
    [m print];
    int result;
    result = [m multiplyByTwo: 1];
    result = [m multiplyTwoNumbers: 1 andSecondNumber: 5];
    // free memory
    [m release];
    return 0;
}
This little example shows some of the particularities of Objective-C.
In Objetive-C all parameters starting from the second parameter can have
what is called a label and labels are similar to namedParameter. Ok lets go ahead and map that class.
using System;

public class MethodsExample
{
    public virtual print() {
        Console.WriteLine("Hola mundo\n");
    }
    public virtual int multiplyByTwo(int n)
    {
      return n * 2;
    }
    //AproachOne
    public virtual int multiplyTwoNumber(int a,int andSecondNumber)
    {
        return a * andSecondNumber;
    }
    //AproachTwo
    //I just renamed as multiplyTwoNumber2 to avoid compilation errors.
    //The idea is that you will choose one of the two aproaches
    //or define a criteria for the instances where aproach one should be used
    //instead of approach two
    public virtual int multiplyTwoNumber(int a,int andSecondNumber)
    {
        int n = andSecondNumber;
        //This aproach will be better if you have a lot of code in the method
        //and you prefer to keep the original arg name
        return a * n;
    }

}
So the thing here is what to use as the parameter name, the label or the argument name.
In the example you can see the two approaches in the multiplyTwoNumbers case.
And calling the methods is simple and the named parameters syntax can be exploited.
using System;

public static class Program
{
    public static int Main(string[] argv ) {
        // create a new instance
        var m = new MethodsExample();
        m.print();
        int result;
        result = m.multiplyByTwo(1);
        result = m.multiplyTwoNumbers(1,andSecondNumber: 5); //using named parameters
        // free memory
        m.release();
        return 0;
    }
}
REMEMBER: This is just a glimpse of some mapping concepts from Objective-C to C#.
There are many subtle details in this kind of migration and is my belief that only
an automated tool is able to process all those details in an effectively and more error-free
than a manual approach. For example in objective-c if m is null that will not cause any error if you
do something like [m print] and in C# that will throw an error. However a migration tool could determine
if the variable will have a value before its use and avoid adding unnecessary if (m!=null) statements.
We will examine this and other details in following posts. I hope this little examples give you enough information

for playing around migrating some Objective-C code. And if it gets too complicated just send me an email!!!
Windows Phone 7 (WP7) is out! and it’s a great platform for developing new Apps. After being involved with Silverlight for a while
I am glad to have now the option to deploy apps to Windows Phone 7.
But we have to recognize that there are tons of great Apps for iPhone already. You might even have some of them.
So it’s porting time. Here at Artinsoft we love to upgrade/port application to all platforms.
So I will provide here some basic thoughts to help you upgrade your code.
For this post let’s discuss a little about applications written for XCode.
XCode applications are written in Objetive-C.Let’s map some examples:
In Objective-C your class will be usually
#import <Foundation/NSObject.h>
#import <Foundation/NSObject.h>

@interface Fraction: NSObject {
    int numerator;
    int denominator;
}

-(void) print;
-(void) setNumerator: (int) n;
-(void) setDenominator: (int) d;
-(int) numerator;
-(int) denominator;
@end
How you should understand that? Well this is just the list of methods in your class something like:
using System;
public class Fraction {
    int _numerator;
    int _denominator;
    public void print() { /* TODO*/}
    public int numerator   { get { /* TODO */ } set { /*TODO*/} }
    public int denominator { get { /* TODO */ } set { /*TODO*/} }
}
The code for these methods will be in the .m file.
#import "Fraction.h"
#import <stdio.h>

@implementation Fraction
-(void) print {
    printf( "%i/%i", numerator, denominator );
}

-(void) setNumerator: (int) n {
    numerator = n;
}

-(void) setDenominator: (int) d {
    denominator = d;
}

-(int) denominator {
    return denominator;
}

-(int) numerator {
    return numerator;
}
@end
So that will complement your class implementation for something like:
using System;
public class Fraction
{
    int _numerator;
    int _denominator;
    public void print()
    {
        Console.Write("{0}/{1}" ,numerator,denominator);
    }
    public int numerator
    {
        get { return _numerator; }
        set { _numerator = value; }
    }
    public int denominator
    {
        get { return _denominator; }
        set { _denominator = value; }
    }
}
Ok An now let’s look at the Objective-C main.m:
#import <stdio.h>
#import "Fraction.h"

int main( int argc, const char *argv[] ) {
    // create a new instance
    Fraction *frac = [[Fraction alloc] init];
    Fraction *frac2 = [[Fraction alloc] init];

    // set the values
    [frac setNumerator: 1];
    [frac setDenominator: 3];

    // combined set
    [frac2 setNumerator: 1 andDenominator: 5];

    // print it
    printf( "The fraction is: " );
    [frac print];
    printf( "\n" );

    // print it
    printf( "Fraction 2 is: " );
    [frac2 print];
    printf( "\n" );

    // free memory
    [frac release];
    [frac2 release];

    return 0;
}
Which can be rewritten in C# as:
using System;
static class ProgramMain{static int Main(string[] argv) {
    // create a new instance
    Fraction frac = new Fraction();
    // set the values frac.Numerator = 1; frac.Denominator = 3;
    // print it
    Console.Write( "The fraction is: " );
    frac.print();    Console.Write( "\n" );
    // free memory frac = null;
    return 0;
}}
Well this is just for warming up. In following posts we will be looking
at more Objective-C \ XCode concept mapping to C#.
I recommend looking at the site http://wp7mapping.interoperabilitybridges.com/
that provides a lot about mapping iOS API
Some time ago Artinsoft participated in the development of a book called “Upgrading Visual Basic 6.0 Applications”.
I quote from that book:
“The upgrade wizard is designed to upgrade Visual Basic 6.0 applications. For
projects written in Visual Basic versions 1.0 through 5.0, it is necessary that you first
upgrade them to Visual Basic 6.0 before upgrading to Visual Basic .NET. To upgrade
a project that was developed in a version earlier than Visual Basic 6.0, simply open
the project in the Visual Basic 6.0 IDE and save it. If Visual Basic 6.0 prompts you to
upgrade controls to Visual Basic 6.0, choose Yes. If the project contains Visual Basic
5.0 ActiveX controls, it is often best to replace these controls with Visual Basic 6.0
versions. This is because these controls use a different threading model than models
used by Visual Basic 6.0 controls. The earlier threading model is not supported in
Windows Forms.
For 16-bit projects written in Visual Basic versions 1.0 through 4.0, you may need to
make extra modifications to the application to convert it to Visual Basic 6.0.
VBX controls will not be automatically converted. You will also have to replace
Win16 Windows APIs with their Win32® counterparts.
Visual Basic versions 2.0 and 3.0 often require an extra step. Visual Basic 6.0 can only
open files in text format, whereas Visual Basic versions 2.0 and 3.0 support two file
formats: binary and text. Before upgrading these projects, ensure the entire applica-
tion is saved in text format by using the following procedure.
To convert Visual Basic 1.0 and 2.0 files to text format
1. On the File menu, click Save As.
2. In the Save dialog box, select the Save As Text check box.
Because Visual Basic 1.0 can only save files in binary format, all of these projects will
first need to be opened in Visual Basic 2.0 or 3.0 and then saved as text before they
can be converted to Visual Basic 6.0. After converting the project to Visual Basic 6.0,
you can begin the process of upgrading it to Visual Basic .NET.”
This book is available for free
from the MSDN
Microsoft Access was (and is still) very used for simple data entry applications.
But Microsoft Access despite all its good is kind of an old technology and there was
no clear alternative for a simple mortal development environment… until Microsoft Lightswitch.
This series of posts illustrates the experiences of migrating Microsoft Access applications to LigthSwitch.
This post shows the result of migrating all Northwind Access example tables:
The following is Microsoft LightSwitch Solution explorer showing all Tables

And these are some of the Northwind tables in LIghtswitch


The migration process is straightforward. Text and Memo fields can be migrated to string, Numbers can be migrated to Int32 or Int64, Currency is map to Money. Yes\No can be mapped to boolean with a Value List.
There is support for specifying a caption (Display ID in Lightswitch), Description, and validation rules.
I will keep posting about Query migration, form migration and also report migration. Stay tuned.
Microsoft has decided that .hlp files are not the best option for your help files.
And you will probably receive an error message like: http://support.microsoft.com/kb/917607
If you still want to run your .hlp help files you still can look for a WinHelp viewer for Vista from Microsoft.
But as someone that has been in the application migration/upgrade bussiness for several year I think automatic migration is a very good option.
For example take a look at the following links:
Good luck! And If you had any other suggestions just leave a comment.
AutoCAD 2010 will not be supporting VBA.
Quoting
“If you utilize VBA macros in your work environment, they will no longer work unless the VBA module is installed on your system. “
“When you run a command that requires VBA, a message dialog box will be displayed stating that VBA is no longer installed with AutoCAD and directing you to a website where you can download the VBA module. “
And also you can see that Autodesk states: “Autodesk is evaluating how long VBA will be supported in Autodesk products in the future. Though supported in the AutoCAD 2010-based products, it may or may not be supported in future releases. Therefore, it is strongly recommended that VB developers develop all new code using VB .NET.”
VBA does not support 64bit systems in a native way.
But If you want some advice from the VB migration experts or help on your migration project from VBA to VB.NET or C# you can us contact Artinsoft Migration Services.
We build the VB Upgrade Wizard that shipped with Visual Studio and have been doing VB migrations for years.
To create a new Team System Project in Visual Studio 2005, follow these steps:
1. Go to the File Menu. Select New…, and in the New… submenu select Team Project… to start a wizard.

2. The “Specify the Team Project Settings” of the New Team Project wizard appears. Type the Team Project name. For example type MergeExample and click Next
![clip_image002[5]](http://blogs.artinsoft.net/public_img/0d61167332a7_CAF4/clip_image0025_thumb.jpg "clip_image002[5]")
3. In the following page, select the Process Template for the Team Project. We recommend using the Artinsoft Migration Methodology – v0.8 or later. Click Next.
![clip_image002[7]](http://blogs.artinsoft.net/public_img/0d61167332a7_CAF4/clip_image0027_thumb.jpg "clip_image002[7]")
4. In the following page, type the Title for the Team Project Portal. Type MergeExample. The Team Project Portal provides useful information about your project. Click Next
![clip_image002[9]](http://blogs.artinsoft.net/public_img/0d61167332a7_CAF4/clip_image0029_thumb.jpg "clip_image002[9]")
5. In the following page you select your source control settings.
Select the first option “Create an empty source control folder”. Click Next
![clip_image002[11]](http://blogs.artinsoft.net/public_img/0d61167332a7_CAF4/clip_image00211_thumb.jpg "clip_image002[11]")
6. In the following page a summary of your Team Project settings is presented. Click Finish
![clip_image002[17]](http://blogs.artinsoft.net/public_img/0d61167332a7_CAF4/clip_image00217_thumb.jpg "clip_image002[17]")
7. In the following page the a process bar appears while the project is created. Just wait until the process is done. It normally takes between 3 and 5 minutes.
![clip_image002[19]](http://blogs.artinsoft.net/public_img/0d61167332a7_CAF4/clip_image00219_thumb.jpg "clip_image002[19]")
.NET has been around for quite a while. According Wikipedia it has been around since on 3 April 2003.
So now there exist applications developed for .NET Framework 1.0 or 1.1 and people
need to migrate them to Framework 2.0 or Framework 3.5.
It is the general impression that there is not a direct path to 3.5.
As Zain Naboulsi explains in his blog you can go from 1.1 to 2.0 then from 2.0 to 3.5.
And From 2.0 to 3.5 the migration is a no-brainer because, both, 3.0 and 3.5 are based on 2.0.
A good reference also is the post of Peter Laudati on migration from 1.1 to 2.0.
Note: Peter’s post seem to have a broken link to the microsoft document about breaking changes in 2.0.
The correct link is this.
A more recent post by The Moth provides more links to breaking changes documents:
- Design time Breaking Changes in .NET Framework 2.0
- Runtime Breaking Changes in .NET Framework 2.0
- Microsoft .NET Framework 1.1 and 2.0 Compatibility
- Compatibility Testing Scenarios
Going from 1.1 to 2.0 or 3.5 can be just as simple as opening the solution in VS and compile
or it can take a lot of effort. Web Projects then to be more difficult due to several changes in ASP.NET.
So good luck.
Tools?
Well there a lot of static analyisis tools we have used
(some internal, some from Third Parties. I particulary like Understand and NDepend)
This post describes an an interesting workaround that you can use to support the migration of ActiveX Documents with the Artinsoft Visual Basic Upgrade Companion which is one of the Artinsoft \ Mobilize.NET tools you can use to modernize your Visual Basic, Windows Forms and PowerBuilder applications.
Currently the Visual Basic Upgrade Companion does not allow you to process ActiveX Document directly, but there is a workaround: in general ActiveX Document are something really close to an User Control which is a element that is migrated automatically by the Visual Basic Upgrade Companion.
This post provides a link to a tool (DOWNLOAD TOOL) that can fix your VB6 projects, so the Visual Basic Upgrade Companion processes them. To run the tool:
1) Open the command prompt
2) Go to the Folder where the .vbp file is located
3) Execute a command line command like:
FixUserDocuments Project1.vbp
This will generate a new project called Project1_modified.vbp. Migrate this new project and now UserDocuments will be supported.
First Some History
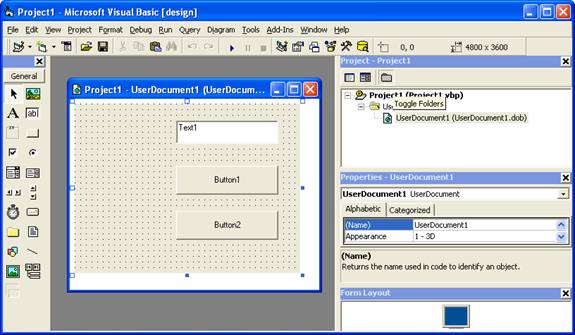
VB6 allows you to create UserDocuments, which can be embedded inside an ActiveX container. The most common one is Internet Explorer. After compilation, the document is contained in a Visual Basic Document file (.VBD) and the server is contained in either an .EXE or .DLL file. During development, the project is in a .DOB file, which is a plain text file containing the definitions of the project’s controls, source code, and so on.
If an ActiveX document project contains graphical elements that cannot be stored in text format, they will be kept in a .DOX file. The .DOB and .DOX files in an ActiveX document project are parallel to the .FRM and .FRX files of a regular Visual Basic executable project.
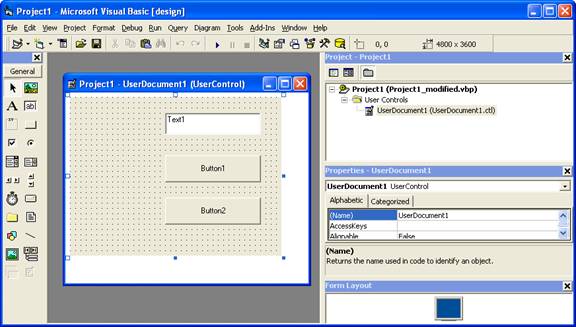
The trick to support ActiveX documents is that in general they are very similar to UserControls, and .NET UserControls can also be hosted in a WebBrowser. The following command line tool can be used to update your VB6 projects. It will generate a new solution where UserDocuments will be defined as UserControls.
If you have an ActiveX document like the following:
Then after running the tool you will have an Project like the following:
So after you have upgraded the projet with the Fixing tool, open the Visual Basic Upgrade Companion and migrate your project.
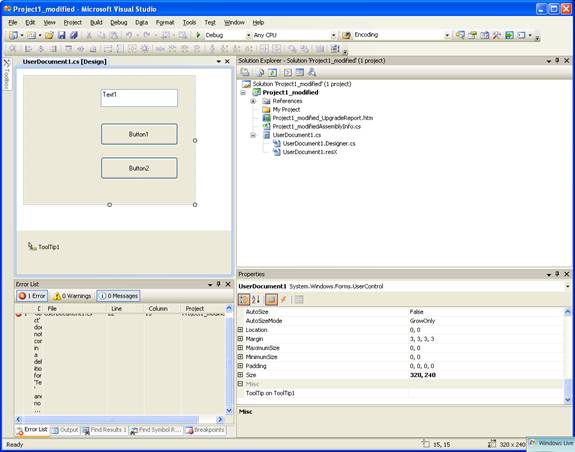
After migration you will get something like this:
To use your migrated code embedded in a Web Browser copy the generated assemblies and .pdb to the directory you will publish:
Next create an .HTM page. For example UserDocument1.htm
The contents of that page should be something like the following:
|
<html>
<body>
<p>ActiveX Demo<br> <br></body>
<object id="UserDocument1"
classid="http:<AssemblyFileName>#<QualifiedName of Object>"
height="500" width="500" VIEWASTEXT>
</object>
<br><br>
</html>
For example:
<html>
<body>
<p>ActiveX Demo<br> <br></body>
<object id="UserDocument1"
classid="http:Project1.dll#Project1.UserDocument1"
height="500" width="500" VIEWASTEXT>
</object>
<br><br>
</html>
|
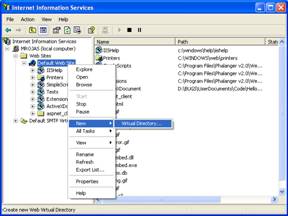
Now all that is left is to publish the output directory.
To publish your WinForms user control follow these steps.
- Create a Virtual Directory:
- A Wizard to create a Virtual Directory will appear.

Click Next
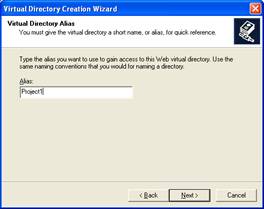
Name the directory as you want. For example Project1. Click Next
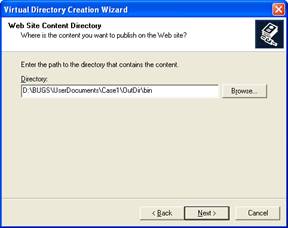
Select the location of your files. Click the Browse button to open a dialog box where you can select your files location. Click Next
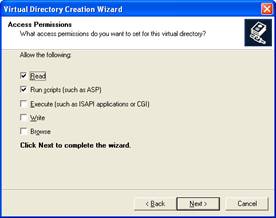
Check the read and run scripts checks and click next
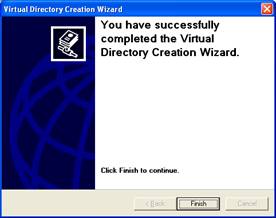
Now Click Finish
- Properties for the Virtual Directory will look like this:
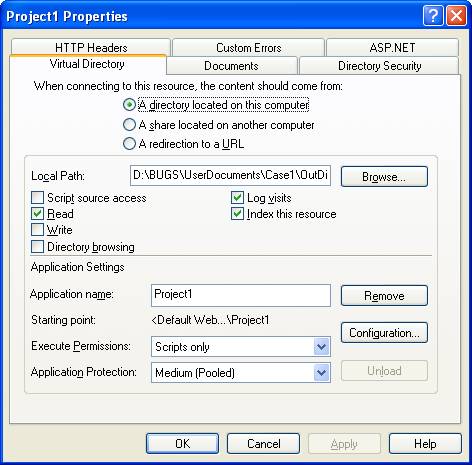
NOTE: to see this dialog right click over the virtual directory
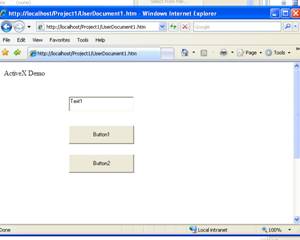
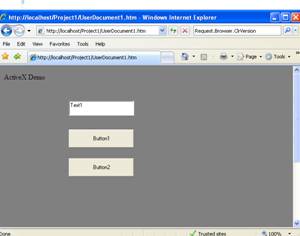
- Now just browse to the address lets say http:\\localhost\Project1\UserDocument1.htm
And that should be all! :)
The colors are different because of the Host configuration however a simple CSS like:
<style>
body {background-color: gray;}
</style>
Can make the desired change:
Notice that there will be security limitations, for example for thinks like MessageBoxes.
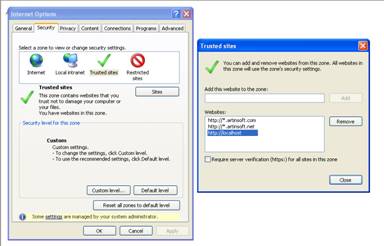
You can allow restricted operations by setting your site as a restricted site:
For example:
Restrictions
The constraints for this solution include:
* This solutions requires Windows operating system on the client side
* Internet Explorer 6.0 is the only browser that provides support for this type of hosting
* It requires .NET runtime to be installed on the client machine.
* It also requires Windows 2000 and IIS 5.0 or above on the server side
Due to all of the above constraints, it might be beneficial to detect the capabilities of the client machine and then deliver content that is appropriate to them. For example, since forms controls hosted in IE require the presence of the .NET runtime on the client machine, we can write code to check if the client machine has the .NET runtime installed. You can do this by checking the value of the Request.Browser.ClrVersion property. If the client machine has .NET installed, this property will return the version number; otherwise it will return 0.0.
Adding a script like:
<script>
if ((navigator.userAgent.indexOf(".NET CLR")>-1))
{
//alert ("CLR available " +navigator.userAgent);
}
else
alert(".NET SDK/Runtime is not available for us from within " + "your web browser or your web browser is not supported." + " Please check with http://msdn.microsoft.com/net/ for " + "appropriate .NET runtime for your machine.");
</script>
Will help with that.
References:
ActiveX Documents Definitions:
http://www.aivosto.com/visdev/vdmbvis58.html
Hosting .NET Controls in IE
http://www.15seconds.com/issue/030610.htm