This post shows a way to calculate the number of weeks.
Remember that this calculation is culture-dependant
For example the GetWeekOfYear methods requires a criteria to determine
how to determine the first week and which day to consider as FirstDayOfWeek for more info see here:
CalendarWeekRule.FirstDay
Supported by the .NET Compact Framework.
Indicates that the first week of the year starts on the first day of the year and ends before the following designated first day of the week. The value is 0.
CalendarWeekRule.FirstFourDayWeek
Indicates that the first week of the year is the first week with four or more days before the designated first day of the week. The value is 2.
CalendarWeekRule.FirstFullWeek
Indicates that the first week of the year begins on the first occurrence of the designated first day of the week on or after the first day of the year. The value is 1.
Sample Code
        Dim x As Date
        Dim currentCulture As System.Globalization.CultureInfo
        currentCulture = CultureInfo.CurrentCulture
        Dim weekNum = currentCulture.Calendar.GetWeekOfYear(x, CalendarWeekRule.FirstFourDayWeek, DayOfWeek.Monday)
If you have your ASP.NET application for example in c:\inetpub\wwwroot\WebApplication1 and you want to programmatically get that path just use something like:
string AppPath = Request.PhysicalApplicationPath;
In the VB6 world it was very common to use “Resizer” OCXs that you just put on your forms and that they handle all the proportional resizing needed if you changed your form.
It was very simple and easy.
However when I started looking for something like that in .NET it was quite hard to find. So finally I got to ComponentSource and found some alternatives and I evaluated them:
| Component | Vendor | Pricing | URL |
| Component One Sizer For .NET | Component ONE | I think you have to buy the Component One Studio. That’s $800 ($1000 with more support)
and I think is one license per developer, runtime-free | http://www.componentone.com/SuperProducts/StudioWinForms/ |
| .NET Forms Resize | Softgroup | 380$ per developer
from ComponentSource
if you buy directly from them you can get the component for 180$
Each copy is licensed on a per developer basis. A developer may use the license on multiple CPUs as long as they are not used concurrently nor used by another developer. Run-time royalty free. | http://www.soft-group.it/net/index.php?c=3a&id=11
|
| Resize OCX/.NET | Larcom and Young | 95$-100$ per license
one license per developer, runtime-free | http://www.lyoung.com/ |
All of them seem to work. So it really up to your company preferences, budget and the level of support you desire. I haven't made tests like how it behaves if you have thirdparty components or activex ??? maybe I'll review that later.
Most of our clients come from a medium-size to a big enterprise level. In these scenarios is very common to have different department using different technologies to solve their business needs.
These different technologies can be on a very homogeneous platform like .NET where you can easily interact between your VB.NET and C# assemblies, or they could be on differente technologies like ASP, Classic VB, C++, or Powerbuilder.
This post is about PowerBuilder, and in order to interact with PowerBuilder I think the easiest way is to expose your assemblies thru COM Interop.
So if there is some .NET functionality that you want to expose to PowerBuilder you just need to expose that functionality with a class in a ClassLibrary project with COM attributes.
Let’s begin with a simple program to show how to comunicate Powerbuilder with C#.
NOTE: If you don’t have Powerbuilder you can get a trial version from: http://www.sybase.com/detail?id=1052162
- Open Microsoft Visual Studio
- On the File Menu, choose the New option, and in the File submenu choose Project….

Figure 1. Visual Studio File Menu. Choosing the option for a new project
- When you choose that option a dialog window will shown with the available options for new projects. In the option for C# Projects choose “Class Library”

Figure 2. New Project dialog window
You must introduce the new project name, location and solution name. Type something like ClassLibrary1, D:\PowerBuilder, ClassLibrary1.
1. When you finish creating your project you will have a code file called Class1.cs.
2. Change that code for something like :
using System;
using System.Collections.Generic;
using System.Text;

namespace SimpleClass
{
    public class Class1
    {
        public int AddTenToParameter(int param1)
        {
            return param1 + 10;
        }

        public void SayHi()
        {
            System.Windows.Forms.MessageBox.Show("Hello World!");
        }

        public String GiveMeDate()
        {
            return DateTime.Now.ToLongDateString();
        }
    }
}
This will allow to test things like parameter passing, using different return types like strings or integers. But Before you continue you must add a reference to System.Windows.Forms to be able to use the MessageBox.

Figure 3. Adding a reference

Figure 3. Reference to System.Windows.Forms
3. Right click on the solution file and select properties:

Figure 4. Option to change project properties
4. Select the Register for COM Interop checkbox

Figure 5. Project properties window
5. Return to Class1.cs code file
6. Add an using statement after the existing using lines on Class1.cs file:
using System.Runtime.InteropServices;
7. Add the following attributes to the class:
[ComVisible(true)]

[ClassInterface(ClassInterfaceType.AutoDual)]

[ProgId("ClassLibrary1.Class1")]
Note: the ProgId is very important, because these value will be use in PB to comunicate with the this code
8. Now you must edit the AssemblyInfo.cs

Figure 6. AssemblyInfo.cs File
Now make sure to establish the COM settings in this file with statements like the following:
// Setting ComVisible to false makes the types in this assembly not visible
// to COM components. If you need to access a type in this assembly from
// COM, set the ComVisible attribute to true on that type.
[assembly: ComVisible(true)]
// The following GUID is for the ID of the typelib if this project is exposed to COM
[assembly: Guid("69efac5b-d887-40f4-a7e9-2721ac3c1598")]
The Guid is also very important, because this is used to differentiate this component and it must be unique.
To generate a new GUID you can got to the Tools Menu and choose the option Create GUID

Figure 7. Option menu to create a GUID
In the Create Guid dialog box, choose the fourth option and press Copy to put the contents on the Clipboard. Later, copy that value in the GUID attribute but remove the “{“ y “}”.
Now we are set. You only need to build the solution and the DLL. The build process with register the COM component.
If you will use the component on another computer you need to create an instalation program.
Using your program from Powerbuilder
Using your program from Powerbuilder is very easy. You just need code like the following:

Figure 8. PB Code to call a C# class thru COM
When you execute this program you will have 3 messageboxes :
- Hello World!
- 30
- Monday, March 02, 2009 (this message will change depending of the day, locale and regional settings)
Creating an instalation program
- Right click the solution and in the context menu choose Add and then new project.

Figure 9. Context Menu to add a new project
On the dialog box for Add New projec, look for the Other Project Types section and the choose Setup Project.

Figure 10. Creating a setup project
In this dialog bos indicate the name and location of the setup project. For example Setup1 and D:\Powerbuilder\ClassLibrary1.
Later, add a project to the setup program. To do that rigth click on the setup project and select Add, and in the submenu choose Project Output.

Figure 11. Adding a project to the setup project.
A dialog box will be shown with a combo that allow you to select the proyects in the solution. Choose ClassLibrary1 and press OK.

Figure 12. Adding project output to the setup project.
When you build this instalation program two files will be produced:
Release
D:\PowerBuilder\ClassLibrary1\Setup1\Release\Setup.exe
D:\PowerBuilder\ClassLibrary1\Setup1\Release\Setup1.msi
Debug
D:\PowerBuilder\ClassLibrary1\Setup1\Debug\Setup.exe
D:\PowerBuilder\ClassLibrary1\Setup1\Debug\Setup1.msi
When you run the instalation program, this program will handle the instalation of the .NET component and the COM registration.
My good friend Jafet, was recently dealing with an interesting bug in Visual Studio.
He created a simple Visual Studio Project that had just an interface that he exposed thru COM. He’s intention was to compile the Class Library and use the TLB file in other projects, but after building the solution he found out that there was no TLB file generated.
After some tests he finally found out that Visual Studio does not generates a TLB if there are not classes in the Project. So your options are, add a dummy class to your project or invoke the TLB tool from the command line.
:)
Recently I had to deal with targeting an XBAP application that had some Windows Forms controls.
The problem is that those controls can only be used in a trusted environment. If you try to debug an XBAP with some Windows Forms Controls you will get an exception like:
Message: Cannot create instance of 'Page1' defined in assembly 'XBAPWithWinForms, Version=1.0.0.0, Culture=neutral, PublicKeyToken=null'. Exception has been thrown by the target of an invocation. Error in markup file 'Page1.xaml' Line 1 Position 7.
It took me a while to found a solution, and it was thru Scott Landford Blog that I found a way around.
In short what he recommends to do is:
Change your settings to:
Start Action->Start external program = %windir%system32\PresentationHost.exe
In my case (and the case of most people that is: c:\windows\system32\PresentationHost.exe)
Start Options->Command line arguments = -debug "c:\projects\myproject\bin\debug\MyProject.xbap" -debugSecurityZoneUrl "http://localhost:2022"
Copy the value from the Start URL after the –debug argument
Very import for using WinForms components you must run in FULL TRUST

Here is some XBAP code using a WinForms WebBrowser. They designer does not like it a lot but it works:
XBAPWithWinforms.zip
My first language ever was GW-Basic. I was a teenager doing in summer work at a company that made polls about hair products and things like that. At that time I didn’t had a computer. They were tooooo expensive.
And I found a manual for GW-Basic. I stole it, to make a copy, my boss found out and he fired me :(. But then I had the power!! jeje. With my cousin Esteban we started out first programs. And we got our first sale :) :) :). It was the typical POS software for a small video rental company.
Ahhh, and that was just the beginning.
So, I really appreciate basic, with all its strengths and weaknesses. I do most of my development now in C#, I think due to my C++, java years, and know I am more used to its syntax, and I really prefer C#. But I consider Basic a real treasure.
Well recently while digging in the Microsoft Dev Labs I discovered SmallBasic. I was just browsing for some new stuff and I am glad to have found this jewel.
Artinsoft (the company I work for) is a company that has devoted a lot of time in the research of automatic software migration to other platforms.Not for nothing one of our flapship products is Visual Basic Upgrade Companion, so basic in any form is always a delight for me. (I will soon post a brief article about bringing VBScript back to life in VB.NET just wait and see)
Ok. Back to SmallBasic.
First of all. The interface is great!!!
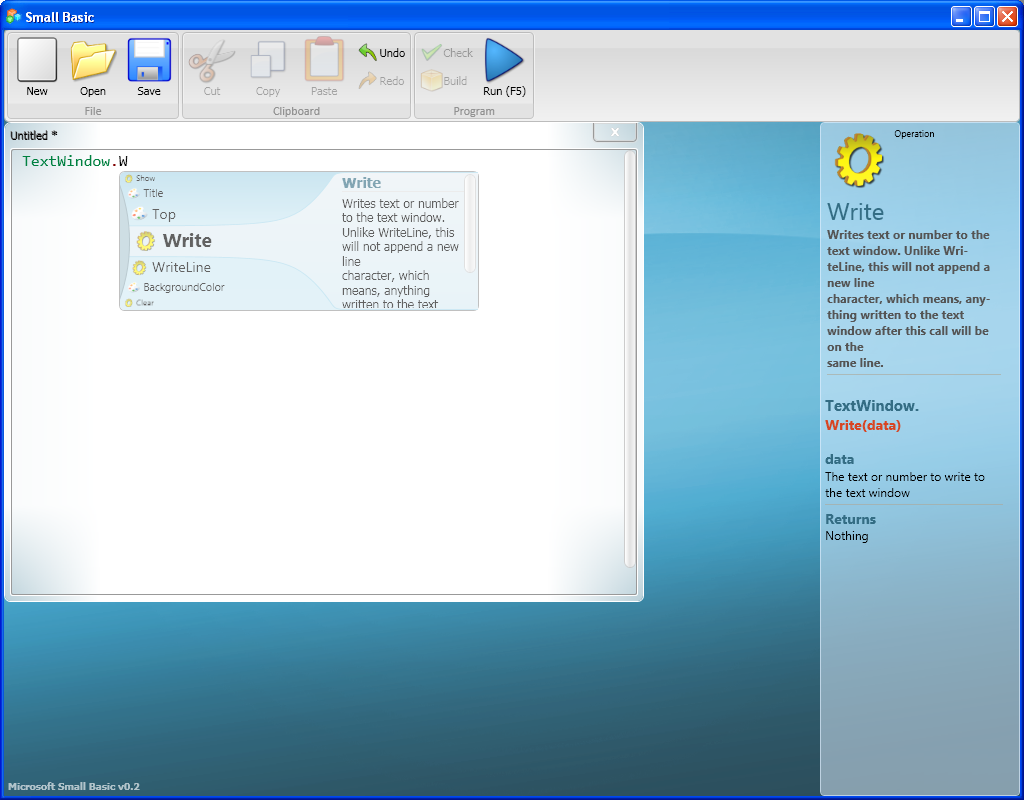
It has a cool intellisense guide and you can even extend it :)
And they even resurrected LOGO!

I just hope to write a cool Turtle Graphics routine soon!
:)
A long long time ago, I faced the problem of installing an assembly on the GAC from code. And I even posted the code in my blog
http://blogs.artinsoft.net/mrojas/archive/2008/04/09/install-assembly-gac-with-c.aspx
Recently Jose Cornejo wrote me on my blog because the code was not working, and he finally showed me the right way to do it. It was sooo easy.
His solution was:
1. Add a reference to System.EnterpriseServices.dll to your project
2. Write code like the following:
            System.EnterpriseServices.Internal.Publish p = new Publish();
            p.GacInstall(@"C:\ClassLibrary1.dll");
            p.GacRemove(@"C:\ClassLibrary1.dll");
Thanks a lot Jose for your help.
These interesting functions have a long history, since the BASIC language, QuickBasic
and earlier versions of Visual Basic. There isn’t much documentation on them but you
can look at very good reference as the one published by Matthew Curland
titled Unofficial Documentation for VarPtr, StrPtr, and ObjPtr
Well enough history, now let’s get back to the the migration part. If you’re reading this
post it might be, because you have VarPtr, StrPtr or ObjPtr calls in your code and you
want to move those calls to C#.
Well we have good and bad news.
Bad news are that the .NET world is a lot different than VB. Remember that your code
is running in the managed sandbox, and to get the address of variable you are probably
dealing with unmanaged memory, so some things might not work.
Good news are that I am one of those that believe that there are no imposibles,
it’s just a matter of the cost of developing the solution :)
Let’s see at some alternatives:
VarPtr can be use to get pointers to vaiables. This can be solved using Unsafe code:
VB6
  Dim l As Long
  Debug.Print VarPtr(l)
C#
    class Program
    {
        [DllImport(@"DllTest1.Dll")]
        static extern void Foo(IntPtr p);
        static void Main(string[] args)
        {
            int l;
            unsafe
            {
                int* pointerToL = &l;
                Foo((IntPtr)pointerToL);
                // Print the address stored in pointerToL:
                System.Console.WriteLine(
                  "The address stored in pointerToL: {0}", (int)pointerToL);
            }

        }
    }
And The implementation for Foo is a C function like:
extern "C"
{
__declspec(dllexport)  void Foo(int* data)
{
    *data = 100;
}
}
Unsafe code like this will work for VarPtr cases where you have primitive types,
like int, short, char variables.
Structures are more tricky and you will require pinning the memory to avoid some
other problems. But in general doing Interop with structures is very tricky and
I will publish another post about this.
Unsafe code must be enabled at the assembly level and the assembly might need to
be signed.
StrPtr is very similar to VarPtr but it mostly to provide efficient marshalling
to Unicode functions. In most of cases like:
  Declare Sub MyUnicodeCall Lib "MyUnicodeDll.Dll" _
      (ByVal pStr As Long)

   Sub MakeCall(MyStr As String)
      MyUnicodeCall StrPtr(MyStr)
   End Sub
The StrPtr declaration is no longer needed because the .NET Interop mechanism can
handle most of this marshaling automatically.
ObjPtr is the most tricky of all because it can be used in COM scenarios to get
pointers to Interfaces implemented by a class.
In .NET scenarios this will involve only using classes that are exposed by COM.
I have use code as the following
for some of those cases:
            Object myComObject = null;
            //..init code
            IntPtr pIUnknown = Marshal.GetIUnknownForObject(myComObject);
            IntPtr pIDesiredInterface = IntPtr.Zero;
            Guid guidToDesiredInterface = new Guid("XXXXXXXX-XXXX-XXXX");
            Marshal.QueryInterface(pIUnknown,
               ref guidToDesiredInterface,out pIDesiredInterface);
As always there are exceptions to the rule. These are just some general solutions.
Directly accessing the memory is really something not desirable in a .NET application and in most
cases you should remove that code for something else, but if you can’t I hope these examples
guide you in this process.
COM
The idea is to make a class or several classes available thru COM. Then the compiled dll or the TLB is used to generate and Interop Assembly and call the desired functions.
With this solution the current C++ code base line can be kept or might require just subtle changes.
Calling a function thru com is involved in a lot of marshalling and can add an additional layer that is not really needed in the architecture of the solution.
Creating a Managed Wrapper with Managed C++
The idea with this scenario is to provide a class in Managed C++ that will be available in C#. This class is just a thin proxy that redirects calls to the Managed object.
Let’s see the following example:
If we have a couple of unmanaged classes like:
class Shape {
public:
Shape() {
nshapes++;
}
virtual ~Shape() {
nshapes--;
};
double x, y;
void move(double dx, double dy);
virtual double area(void) = 0;
virtual double perimeter(void) = 0;
static int nshapes;
};
class Circle : public Shape {
private:
double radius;
public:
Circle(double r) : radius(r) { };
virtual double area(void);
virtual double perimeter(void);
};
The first thing we can try, to expose our classes to .NET it to set the setting for managed compilation:

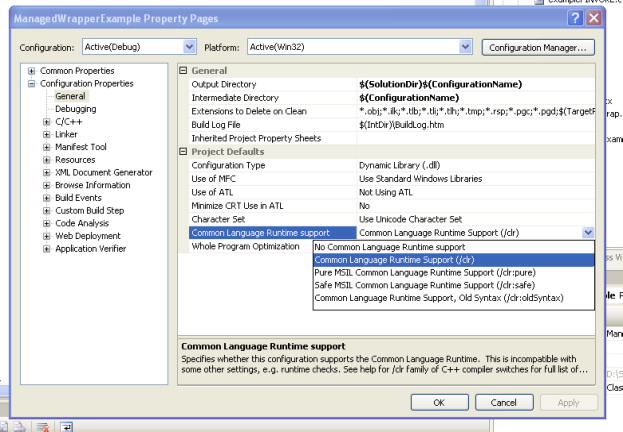
If your project compiles then you are just very close, and what you need is to add some managed classes to your C++ project to expose your native classes:
Let’s see the Shape class:
//We can use another namespace, to avoid name collition.
//In this way we can replicate the structure of our C++ classes.
namespace exposedToNET
{
//Shape is an abstract class so the better thing
// to do is to generate an interface
public interface class Shape : IDisposable
{
public:
//public variables must be exposed as properties
property double x
{
double get();
void set(double value);
}
property double y
{
double get();
void set(double value);
}
//method do not expose any problems
void move(double dx, double dy);
double area();
double perimeter();
//public static variables must
static property int nshapes;
};
//Static methods or variables of abstract class are added here
public ref class Shape_Methods
{
//public static variables must be exposed as static properties
public:
static property int nshapes
{
int get()
{
return ::Shape::nshapes;
}
void set(int value)
{
::Shape::nshapes = value;
}
}
};
}
And for the Circle class we will have something like this:
namespace exposedToNET
{
public ref class Circle : Shape
{
private:
::Circle* c;
public:
Circle(double radius)
{
c = new ::Circle(radius);
}
~Circle()
{
delete c;
}
//public variables must be exposed as properties
property double x
{
virtual double get()
{
return c->x;
}
virtual void set(double value)
{
c->x = value;
}
}
property double y
{
virtual double get()
{
return c->y;
}
virtual void set(double value)
{
c->y = value;
}
}
//method do not expose any problems
virtual void move(double dx, double dy)
{
return c->move(dx,dy);
}
virtual double area()
{
return c->area();
}
virtual double perimeter()
{
return c->perimeter();
}
//public static variables must be exposed as static properties
static property int nshapes
{
int get()
{
return ::Shape::nshapes;
}
void set(int value)
{
::Shape::nshapes = value;
}
}
};
}
DOWNLOAD EXAMPLE CODE
SWIG
SWIG is a software development tool that connects programs written in C and C++ with a variety of high-level programming languages.
This is a great tool used for several languages like Python, Perl, Ruby, Scheme, and even in different platforms.
The exposure mechanism used in this scheme is platform invoke, the issues here are similar to those of COM because there is some marshaling going on. This scheme might be more efficient than the COM one but I haven’t really test it to be completely sure that it is better.
I have reviewed the SWIG code and it might also be possible to modify its code to generate wrappers using managed C++, but this is an interesting exercise that I have to leave for my readers. Sorry I just don’t have enough time.
But how is SWIG used?
In SWIG what you do is that you add a .i file to your project. This file provides directives for some code generation that specify exactly what you want to expose and how.
This can very helpful if you just want to expose some methods.
If you are lazy like me you can just add something like:
/* File : example.i */
%module example
%{
#include "example.h" ß you put here includes with the definitions for your classes
%}
/* Let's just grab the original header file here */
%include "example.h" ß add alse the include here
And SWIG will add a file like example_wrap.cxx that you have to compile with the rest of your C++ code.
It will also generate a set of C# classes that you use in your C# application, so it seams to your program that all the code is just C#.
SWIG is a great tool and has been testing in a lot of platforms.
Most people migrating their application want to move ahead and take advantage of new technologies and new operating systems.
So if you had a VB6 application and you migrated it with us to .NET we will recommend and automate the process to use ADO.NET.
Why?
You can still use ODBC but i will list some compelling reasons:
* There a very fast ADO.NET drivers available. Using ODBC implies addind an interop overhead that can affect performance.
* Some vendors do not support and/or certify the use of ODBC drivers for .NET. So in those cases if you use ODBC your are on your own.
During my consulting experience I have seen several problems using ODBC drivers ranging from just poor performance, problems with some SQL statements, stored procedures calls, database specific features or complete system inestability.
* and also problems running in 64-bit.
This last one is very concerning. If you made all the effort to migrate an application to .NET and run it on for example on a Windows 2003 64 bit server it wont be able to use your 32-bit ODBC drivers unless you go to the the Build tab, and set Platform Target to "x86".
This is very sad because your application cannot take advantage of all the 64 bit resources.
If you are lucky enough you might find a 64 bit version of your ODBC driver but I will really recommend going straigth to 64-bit and use ADO.NET. And that's exactly what we can really help you to do specially in our version 2.2 of the VBUC.
This post describes an an interesting workaround that you can use to support the migration of ActiveX Documents with the Artinsoft Visual Basic Upgrade Companion which is one of the Artinsoft \ Mobilize.NET tools you can use to modernize your Visual Basic, Windows Forms and PowerBuilder applications.
Currently the Visual Basic Upgrade Companion does not allow you to process ActiveX Document directly, but there is a workaround: in general ActiveX Document are something really close to an User Control which is a element that is migrated automatically by the Visual Basic Upgrade Companion.
This post provides a link to a tool (DOWNLOAD TOOL) that can fix your VB6 projects, so the Visual Basic Upgrade Companion processes them. To run the tool:
1) Open the command prompt
2) Go to the Folder where the .vbp file is located
3) Execute a command line command like:
FixUserDocuments Project1.vbp
This will generate a new project called Project1_modified.vbp. Migrate this new project and now UserDocuments will be supported.
First Some History
VB6 allows you to create UserDocuments, which can be embedded inside an ActiveX container. The most common one is Internet Explorer. After compilation, the document is contained in a Visual Basic Document file (.VBD) and the server is contained in either an .EXE or .DLL file. During development, the project is in a .DOB file, which is a plain text file containing the definitions of the project’s controls, source code, and so on.
If an ActiveX document project contains graphical elements that cannot be stored in text format, they will be kept in a .DOX file. The .DOB and .DOX files in an ActiveX document project are parallel to the .FRM and .FRX files of a regular Visual Basic executable project.
The trick to support ActiveX documents is that in general they are very similar to UserControls, and .NET UserControls can also be hosted in a WebBrowser. The following command line tool can be used to update your VB6 projects. It will generate a new solution where UserDocuments will be defined as UserControls.
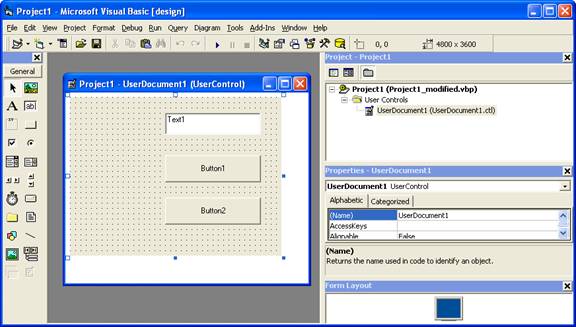
If you have an ActiveX document like the following:
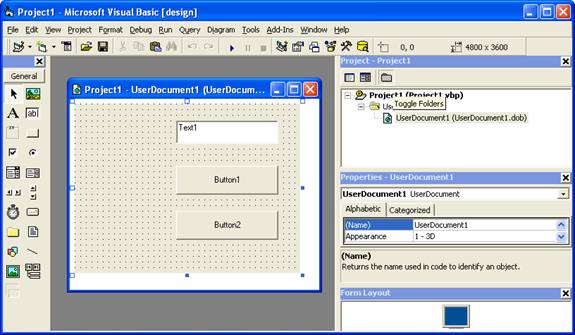
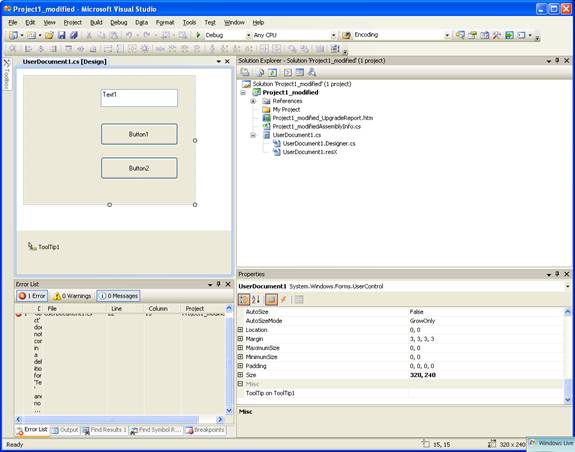
Then after running the tool you will have an Project like the following:
So after you have upgraded the projet with the Fixing tool, open the Visual Basic Upgrade Companion and migrate your project.
After migration you will get something like this:
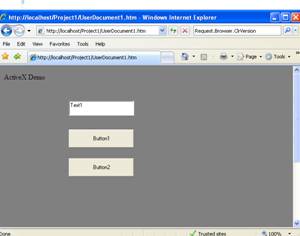
To use your migrated code embedded in a Web Browser copy the generated assemblies and .pdb to the directory you will publish:
Next create an .HTM page. For example UserDocument1.htm
The contents of that page should be something like the following:
|
<html>
<body>
<p>ActiveX Demo<br> <br></body>
<object id="UserDocument1"
classid="http:<AssemblyFileName>#<QualifiedName of Object>"
height="500" width="500" VIEWASTEXT>
</object>
<br><br>
</html>
For example:
<html>
<body>
<p>ActiveX Demo<br> <br></body>
<object id="UserDocument1"
classid="http:Project1.dll#Project1.UserDocument1"
height="500" width="500" VIEWASTEXT>
</object>
<br><br>
</html>
|
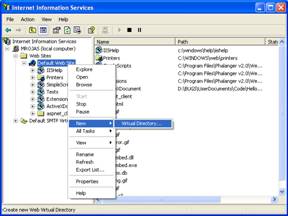
Now all that is left is to publish the output directory.
To publish your WinForms user control follow these steps.
- Create a Virtual Directory:
- A Wizard to create a Virtual Directory will appear.

Click Next
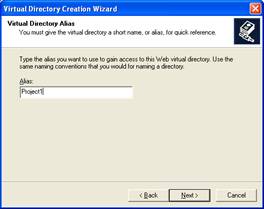
Name the directory as you want. For example Project1. Click Next
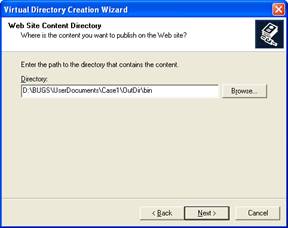
Select the location of your files. Click the Browse button to open a dialog box where you can select your files location. Click Next
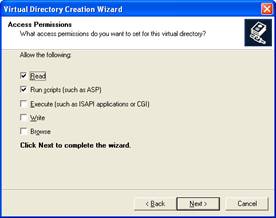
Check the read and run scripts checks and click next
Now Click Finish
- Properties for the Virtual Directory will look like this:
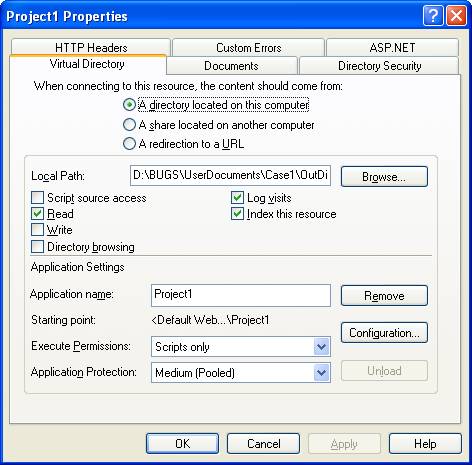
NOTE: to see this dialog right click over the virtual directory
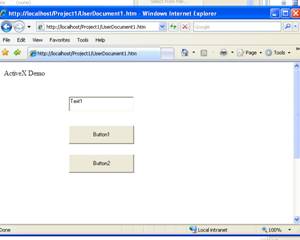
- Now just browse to the address lets say http:\\localhost\Project1\UserDocument1.htm
And that should be all! :)
The colors are different because of the Host configuration however a simple CSS like:
<style>
body {background-color: gray;}
</style>
Can make the desired change:
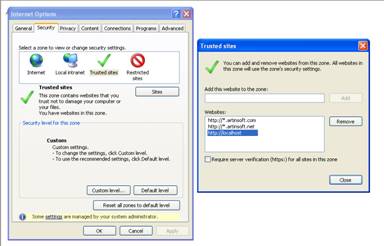
Notice that there will be security limitations, for example for thinks like MessageBoxes.
You can allow restricted operations by setting your site as a restricted site:
For example:

Restrictions
The constraints for this solution include:
* This solutions requires Windows operating system on the client side
* Internet Explorer 6.0 is the only browser that provides support for this type of hosting
* It requires .NET runtime to be installed on the client machine.
* It also requires Windows 2000 and IIS 5.0 or above on the server side
Due to all of the above constraints, it might be beneficial to detect the capabilities of the client machine and then deliver content that is appropriate to them. For example, since forms controls hosted in IE require the presence of the .NET runtime on the client machine, we can write code to check if the client machine has the .NET runtime installed. You can do this by checking the value of the Request.Browser.ClrVersion property. If the client machine has .NET installed, this property will return the version number; otherwise it will return 0.0.
Adding a script like:
<script>
if ((navigator.userAgent.indexOf(".NET CLR")>-1))
{
//alert ("CLR available " +navigator.userAgent);
}
else
alert(".NET SDK/Runtime is not available for us from within " + "your web browser or your web browser is not supported." + " Please check with http://msdn.microsoft.com/net/ for " + "appropriate .NET runtime for your machine.");
</script>
Will help with that.
References:
ActiveX Documents Definitions:
http://www.aivosto.com/visdev/vdmbvis58.html
Hosting .NET Controls in IE
http://www.15seconds.com/issue/030610.htm
During migratio of a simple project, we found an interesting migration details.
The solution has a project with two Forms. Form1 and Form2. Form1 has a command button and in the Click for that command button it performs a code like UnLoad Form2.
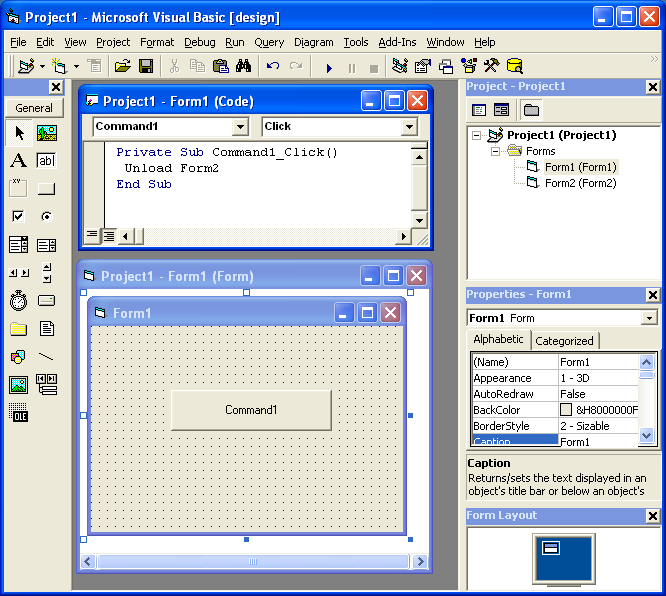
But it could happen that Form2 has not been loaded but in VB6 it is not a problem. In .NET the code will be something like form2.Close() and it could cause problems.
A possible fix is to add some flag that indicates if the form was instanciated and the call the event.
Recenlty following a post in an AS400 Java Group, someone asked about a method for signing and verifying a file with PGP.
I though, "Damn, that seems like a very common thing, it shouldn't be that difficult", and started google'ing for it.
I found as the poster said that the Bouncy Castle API can be used but it was not easy.
Well so I learned a lot about PGP and the Bouncy Castle and thanks god, Tamas Perlaky posted a great sample that signs a file, so I didn't have to spend a lot of time trying to figure it out.
I'm copying Tamas Post because, I had problems accesing the site so here is the post just as Tamas published it:
"To build this you will need to obtain the following depenencies. The Bouncy Castle versions may need to be different based on your JDK level.
bcpg-jdk15-141.jar
bcprov-jdk15-141.jar
commons-cli-1.1.jar
Then you can try something like:
java net.tamas.bcpg.DecryptAndVerifyFile -d test2_secret.asc -p secret -v test1_pub.asc -i test.txt.asc -o verify.txt
And expect to get a verify.txt that's the same as test.txt. Maybe.
Here’s the download: PgpDecryptAndVerify.zip"
And this is the original link: http://www.tamas.net/Home/PGP_Samples.html
Thanks a lot Tamas
I had to access an old VSS database and nobody remember any password or the admin password.
The tool from this page http://not42.com/2005/06/16/visual-source-safe-admin-password-reset
This was a lifesaver!
If you have heavy processes in Coldfusion a nice thing is to track them with the JVMSTAT tool.
You can get the JVMStat tool from http://java.sun.com/performance/jvmstat/
And this post shows some useful information of how to use the tool with Coldfusion
http://www.petefreitag.com/item/141.cfm
Just more details about scripting
Using the MS Scripting Object
The MS Scripting Object can be used in .NET applications. But it has several limitations.
The main limitation it has is that all scripted objects must be exposed thru pure COM. The scripting object is a COM component that know nothing about .NET
In general you could do something like the following to expose a component thru COM:
[System.Runtime.InteropServices.ComVisible(true)]
    public partial class frmTestVBScript  : Form
    {
        //Rest of code
    }
NOTE: you can use that code to do a simple exposure of the form to COM Interop. However to provide a full exposure of a graphical component like a form or user control you should use the Interop Form ToolKit from Microsoft http://msdn.microsoft.com/en-us/vbasic/bb419144.aspx
To expose an object in COM. But most of the properties and methods in a System.Windows.Forms.Form class, use native types instead of COM types.
As you could see in the Backcolor property example:
public int MyBackColor
{ get { return System.Drawing.ColorTranslator.ToOle(this.BackColor); } set { this.BackColor = System.Drawing.ColorTranslator.FromOle(value); }}
Issues:
- The problem with properties such as those is that System.Drawing.Color is not COM exposable.
- Your script will expect an object exposing COM-compatible properties.
- Another problem with that is that there might be some name collision.
Using Forms
In general to use your scripts without a lot of modification to your scripts you should do something like this:
- Your forms must mimic the interfaces exposed by VB6 forms. To do that you can use a tool like OLE2View and take a look at the interfaces in VB6.OLB
- Using those interfaces create an interface in C#
- Make your forms implement that interface.
- If your customers have forms that they expose thru com then if those forms add new functionality do this:
- Create a new interface, that extends the basic one you have and
I’m attaching an application showing how to to this.
Performing a CreateObject and Connecting to the Database
The CreateObject command can still be used. To allow compatibility the .NET components must expose the same ProgIds that the used.
ADODB can still be used, and probably RDO and ADO (these last two I haven’t tried a lot)
So I tried a simple script like the following to illustrate this:
Sub ConnectToDB
'declare the variable that will hold new connection object
Dim Connection
'create an ADO connection object Set Connection=CreateObject("ADODB.Connection")
'declare the variable that will hold the connection stringDim ConnectionString
'define connection string, specify database driver and location of the database ConnectionString = "Driver={SQL Server};Server=MROJAS\SQLEXPRESS;Database=database1;TrustedConnection=YES"'open the connection to the database
Connection.Open ConnectionString
MsgBox "Success Connect. Now lets try to get data"
'declare the variable that will hold our new object Dim Recordset
'create an ADO recordset object
Set Recordset=CreateObject("ADODB.Recordset")
'declare the variable that will hold the SQL statement Dim SQL
SQL="SELECT * FROM Employees"
'Open the recordset object executing the SQL statement and return records
Recordset.Open SQL, Connection
'first of all determine whether there are any records
If Recordset.EOF Then
MsgBox "No records returned."
Else
'if there are records then loop through the fields Do While NOT Recordset.Eof
MsgBox Recordset("EmployeeName") & " -- " & Recordset("Salary")
Recordset.MoveNext
Loop
End If MsgBox "This is the END!"
End Sub
|
I tested this code with the sample application I’m attaching. Just paste the code, press Add Code, then type ConnectToDB and executeStatement
I’m attaching an application showing how to do this. Look at extended form. Your users will have to make their forms extend the VBForm interface to expose their methods.
Using Events
Event handling has some issues.
All events have to be renamed (at least this is my current experience, I have to investigate further, but the .NET support for COM Events does a binding with the class names I think there’s a workaround for this but I still have not the time to test it).
In general you must create an interface with all events, rename then (in my sample I just renamed them to <Event>2) and then you can use this events.
You must also add handlers for .NET events to raise the COM events.
     #region "Events"

        public delegate void Click2EventHandler();
        public delegate void DblClick2EventHandler();
        public delegate void GotFocus2EventHandler();

        public event Click2EventHandler    Click2;
        public event DblClick2EventHandler DblClick2;
        public event GotFocus2EventHandler GotFocus2;

        public void HookEvents()
        {
            this.Click += new EventHandler(SimpleForm_Click);
            this.DoubleClick += new EventHandler(SimpleForm_DoubleClick);
            this.GotFocus += new EventHandler(SimpleForm_GotFocus);
        }

        void SimpleForm_Click(object sender, EventArgs e)
        {
            if (this.Click2 != null)
            {
                try
                {
                    Click2();
                }
                catch { }
            }
        }

        void SimpleForm_DoubleClick(object sender, EventArgs e)
        {
            if (this.DblClick2 != null)
            {
                try
                {
                    DblClick2();
                }
                catch { }
            }

        }


        void SimpleForm_GotFocus(object sender, EventArgs e)
        {
            if (this.GotFocus2 != null)
            {
                try
                {
                    GotFocus2();
                }
                catch { }
            }
        }


        #endregion
Alternative solutions
Sadly there isn’t currently a nice solution for scripting in .NET. Some people have done some work to implement something like VBScript in .NET (including myself as a personal project but not mature enough I would like your feedback there to know if you will be interesting in a managed version of VBScript) but currently the most mature solution I have seen is Script.NET. This implementation is a true interpreter. http://www.codeplex.com/scriptdotnet Also microsoft is working in a DLR (Dynamic Languages Runtime, this is the runtime that I’m using for my pet project of VBScript)
The problem with some of the other solutions is that they allow you to use a .NET language like CSharp or VB.NET or Jscript.NET and compile it. But the problem with that is that this process generates a new assembly that is then loaded in the running application domain of the .NET Virtual machine. Once an assembly is loaded it cannot be unloaded. So if you compile and load a lot of script you will consume your memory. There are some solutions for this memory consumption issues but they require other changes to your code.
Using other alternatives (unless you used a .NET implementation of VBScript which currently there isn’t a mature one) will require updating all your user scripts. Most of the new scripts are variants of the Javascript language.
Migration tools for VBScript
No. There aren’t a lot of tools for this task. But you can use http://slingfive.com/pages/code/scriptConverter/
Download the code from: http://blogs.artinsoft.net/public_img/ScriptingIssues.zip
I saw this with Francisco and this is one possible solution:
ASP Source
rs.Save Response, adPersistXML
rs is an ADODB.RecordSet variable, and its result is being written to the ASP Response
Wrong Migration
rs.Save(Response <-- The ASP.NET Response is not COM, ADODB.Recordset is a COM object, ADODB.PersistFormatEnum.adPersistXML);
So we cannot write directly to the ASP.NET response. We need a COM Stream object
Solution
ADODB.Stream s = new ADODB.Stream();
rs.Save(s, ADODB.PersistFormatEnum.adPersistXML);
Response.Write(s.ReadText(-1));
In this example an ADODB.Stream object is created, data is written into it and the it is flushed to the ASP.NET response
In VB6 you could create an OutOfProcess instance to execute some actions. But there is not a direct equivalent for that. However you can run a class in an another application domain to produce a similar effect that can be helpful in a couple of scenarios.
This example consists of two projects. One is a console application, and the other is a Class Library that holds a Class that we want to run like an "OutOfProcess" instance. In this scenario. The console application does not necessary know the type of the object before hand. This technique can be used for example for a Plugin or Addin implementation.
Code for Console Application
using System;
using System.Text;
using System.IO;
using System.Reflection;

namespace OutOfProcess
{
    /// <summary>
    /// This example shows how to create an object in an
    /// OutOfProcess similar way.
    /// In VB6 you were able to create an ActiveX-EXE, so you could create
    /// objects that execute in their own process space.
    /// In some scenarios this can be achieved in .NET by creating
    /// instances that run in their own
    /// 'ApplicationDomain'.
    /// This simple class shows how to do that.
    /// Disclaimer: This is a quick and dirty implementation.
    /// The idea is get some comments about it.
    /// </summary>
    class Program
    {
        delegate void ReportFunction(String message);

        class RemoteTextWriter : TextWriter
        {
            ReportFunction report;
            public RemoteTextWriter(ReportFunction report)
            {
                this.report = report;
            }
            public override Encoding Encoding
            {
                get
                {
                    return new UnicodeEncoding(false, false);
                }
            }

            public override void Flush()
            {
                //Nothing to do here
            }


            public override void Write(char value)
            {
                //ignore
            }

            public override void Write(string value)
            {

                report(value);
            }

            public override void WriteLine(string value)
            {

                report(value);
            }

            //This is very important. Specially if you have a long running process
            // Remoting has a concept called Lifetime Management.
            //This method makes your remoting objects Inmmortals
            public override object InitializeLifetimeService()
            {
                return null;
            }

        }

        static void ReportOut(String message)
        {
            Console.WriteLine("[stdout] " + message);
        }

        static void ReportError(String message)
        {
            ConsoleColor oldColor = Console.ForegroundColor;
            Console.ForegroundColor = ConsoleColor.Red;
            Console.WriteLine("[stderr] " + message);
            Console.ForegroundColor = oldColor;
        }

        static void ExecuteAsOutOfProcess(String assemblyFilePath,String typeName)
        {
            RemoteTextWriter outWriter = new RemoteTextWriter(ReportOut);
            RemoteTextWriter errorWriter = new RemoteTextWriter(ReportError);

            //<-- This is my path, change it for your app


            //Type superProcessType = AspUpgradeAssembly.GetType("OutOfProcessClass.SuperProcess");
            AppDomain outofProcessDomain =
                AppDomain.CreateDomain("outofprocess_test1",
                AppDomain.CurrentDomain.Evidence,
                AppDomain.CurrentDomain.BaseDirectory,
                AppDomain.CurrentDomain.RelativeSearchPath,
                AppDomain.CurrentDomain.ShadowCopyFiles);
            //When the invoke member is called this event must return the assembly

            AppDomain.CurrentDomain.AssemblyResolve += new ResolveEventHandler(outofProcessDomain_AssemblyResolve);
            Object outofProcessObject =
                outofProcessDomain.CreateInstanceFromAndUnwrap(
                assemblyFilePath, typeName);
            assemblyPath = assemblyFilePath;
            outofProcessObject.
                GetType().InvokeMember("SetOut",
                BindingFlags.Public | BindingFlags.Instance | BindingFlags.InvokeMethod,
                null, outofProcessObject, new object[] { outWriter });
            outofProcessObject.
                GetType().InvokeMember("SetError",
                BindingFlags.Public | BindingFlags.Instance | BindingFlags.InvokeMethod,
                null, outofProcessObject, new object[] { errorWriter });
            outofProcessObject.
                GetType().InvokeMember("Execute",
                BindingFlags.Public | BindingFlags.Instance | BindingFlags.InvokeMethod,
                null, outofProcessObject, null);
            Console.ReadLine();

        }

        static void Main(string[] args)
        {
            string testAssemblyPath =
                @"B:\OutOfProcess\OutOfProcess\OutOfProcessClasss\bin\Debug\OutOfProcessClasss.dll";
            ExecuteAsOutOfProcess(testAssemblyPath, "OutOfProcessClass.SuperProcess");

        }

        static String assemblyPath = "";
        static Assembly outofProcessDomain_AssemblyResolve(object sender, ResolveEventArgs args)
        {

            try
            {
                //We must load it to have the metadata and do reflection
                return Assembly.LoadFrom(assemblyPath);
            }
            catch
            {
                return null;
            }
        }

    }


}
Code for OutOfProcess Class
using System;
using System.Collections.Generic;
using System.Text;

namespace OutOfProcessClass
{
    public class SuperProcess : MarshalByRefObject
    {
        public void SetOut(System.IO.TextWriter newOut)
        {
            Console.SetOut(newOut);
        }
        public void SetError(System.IO.TextWriter newError)
        {
            Console.SetError(newError);
        }

        public void Execute()
        {
            for (int i = 1; i < 5000; i++)
            {
                Console.WriteLine("running running running ");
                if (i%100 == 0) Console.Error.Write("an error happened");

            }

        }
    }
}
We found some machines that do not show the "Attach To Process" option.
This is very important for us, specially if you are testing the migration of an VB6 ActiveX EXE or ActiveX DLL to C#.
There is a bug reported by Microsoft http://support.microsoft.com/kb/929664
Just follow the Tool/Import Settings wizard to the end. Close and restart VS and the options will reapper.
Also you might find that the Configuration Manager is not available to switch between Release and Build for example.
To fix this problem just go to Tools -> Options -> Projects and Solutions -> General... make sure the option "Show advanced build configurations" is checked.