I think Silverlight is a great technology that can be use to create great applications, or as a migration target from Visual Basic 6, Powerbuilder or Windows Forms apps which can take advantage of a very simplified deployment approach.
And use Artinsoft/ Mobilize automated solutions (see http://www.artinsoft.com/visual-basic-6-or-csharp-to-the-web.aspx )
Deployment is as simple as just publish your SL application on your intranet and your clients just need to press F5 to have the latest SL version.
Silverlight provides a good balance between ease of development and platform features(XAML and .NET and Visual Studio).
Silverlight can run cross-platform. (On Windows and Mac using the official Microsoft implementation and on Linux using Moonlight.
Support For Silverlight 4

Support For Silverlight 5

NOTE: Moonlight provides support for 32 and 64 bit Linux. It supports Silverlight 2.0, and some features of silverlight 3 and 4, but is not currently an active project.
"In the past, Web developers often used ActiveX controls to provide rich client-side functionality in their Web applications. Now developers can easily build objects using the Microsoft .NET Framework that are more compact, lightweight, secure and can be hosted within Internet Explorer. By hosting .NET Windows Forms controls in Internet Explorer, developers can accomplish many client-side Web development goals..."
This is an excellent introduction from Thiru Thangarathinam article in CodeGuru
In the rest of this article he provides great details on how to accomplish this task.

Figure 1: Example of simple Hello Word Windows Forms App embedded in Browser

Figure 2: Example of a more complex Windows Forms App consuming data from a Web Service
" However before using Windows Forms controls in IE, you need to be aware of the benefits and limitations. The main benefits include:
-
The ability to deliver dynamic rich user experience through the Web
-
Automatic caching of compiled code on the client
-
Seamless integration with .NET Code Access Security that allows you to leverage the .NET security model from within the client side
-
Improved performance over Java applets
-
It requires Windows operating system on the client side
-
Internet Explorer 6.0-9.0 is the only browser that provides support for this type of hosting
-
It requires .NET runtime to be installed on the client machine.
-
It also requires Windows 2000 and IIS 5.0 or above on the server side"
Artinsoft\Mobilize.Net helps legacy application to be modernized using the Windows Forms technology. Doing this upgrade revitalizes your application code and allows you to take advantage of the new platforms features like ClickOnce deployment.
What is ClickOnce deployment?
"ClickOnce is a deployment technology that enables you to create self-updating Windows-based applications that can be installed and run with minimal user interaction. Visual Studio provides full support for publishing and updating applications deployed with ClickOnce technology if you have developed your projects with Visual Basic and Visual C#.
ClickOnce deployment overcomes three major issues in deployment:
-
Difficulties in updating applications. With Microsoft Windows Installer deployment, whenever an application is updated, the user can install an update, an msp file, and apply it to the installed product; with ClickOnce deployment, you can provide updates automatically. Only those parts of the application that have changed are downloaded, and then the full, updated application is reinstalled from a new side-by-side folder.
-
Impact to the user's computer. With Windows Installer deployment, applications often rely on shared components, with the potential for versioning conflicts; with ClickOnce deployment, each application is self-contained and cannot interfere with other applications.
-
Security permissions. Windows Installer deployment requires administrative permissions and allows only limited user installation; ClickOnce deployment enables non-administrative users to install and grants only those Code Access Security permissions necessary for the application.
In the past, these issues sometimes caused developers to decide to create Web applications instead of Windows-based applications, sacrificing a rich user interface for ease of installation. By using applications deployed using ClickOnce, you can have the best of both technologies."
Click Once Deployment Strategies
There are 3 deployment strategies:
- Install from Web or a Network Share
- Install from a CD
- Start from the Web or Network share
For a quick overview of how to use the ClickOnce deployment take a look at Shahar Gvirtz's post http://weblogs.asp.net/shahar/archive/2008/01/29/how-to-use-clickonce-to-deploy-your-applications.aspx
If you ever wonder, if Crystal Reports can be used on the cloud in Windows Azure, well the answer is you can.
These two links provides some guidance on this matter:
http://scn.sap.com/people/coy.yonce/blog/2011/05/02/sap-crystal-reports-and-microsoft-sql-azure (this one is in English)
http://blogs.msdn.com/b/luispanzano/archive/2011/04/11/crystal-reports-en-windows-azure.aspx (this one is in Spanish but Bing and Google Translate do a nice work here ;) )
This issue is mostly cause by timing issues when calling a multi-threaded app.
Some workarounds:
1. Set the application visible property to false. For example if using Word make word visible property false at the start of the method and set it back to true at the end.
This will delay some GUI changes avoiding timing issues.
2. Insert some Thread.Sleep calls (yes this is ugly)
3. Register and IOleMessageFilter. I have copied an implementation from the MSDN
Just copy this class in your code.
At the start of the method call
MessageFilter.Register();
// This registers the IOleMessageFilter to handle any threading
// errors.
And at the end
MessageFilter.Revoke();
public class MessageFilter : IOleMessageFilter
{

        //
        // Class containing the IOleMessageFilter
        // thread error-handling functions.

        // Start the filter.
        public static void Register()
        {
            IOleMessageFilter newFilter = new MessageFilter();
            IOleMessageFilter oldFilter = null;
            CoRegisterMessageFilter(newFilter, out oldFilter);
        }


        // Done with the filter, close it.
        public static void Revoke()
        {
            IOleMessageFilter oldFilter = null;
            CoRegisterMessageFilter(null, out oldFilter);
        }


        //
        // IOleMessageFilter functions.
        // Handle incoming thread requests.
        int IOleMessageFilter.HandleInComingCall(int dwCallType,
        System.IntPtr hTaskCaller, int dwTickCount, System.IntPtr lpInterfaceInfo)
        {

            //Return the flag SERVERCALL_ISHANDLED.
            return 0;
        }


        // Thread call was rejected, so try again.
        int IOleMessageFilter.RetryRejectedCall(System.IntPtr
        hTaskCallee, int dwTickCount, int dwRejectType)
        {

            if (dwRejectType == 2)
            // flag = SERVERCALL_RETRYLATER.
            {
                // Retry the thread call immediately if return >=0 &
                // <100.
                return 99;
            }
            // Too busy; cancel call.
            return -1;
        }


        int IOleMessageFilter.MessagePending(System.IntPtr hTaskCallee,
        int dwTickCount, int dwPendingType)
        {
            //Return the flag PENDINGMSG_WAITDEFPROCESS.
            return 2;
        }


        // Implement the IOleMessageFilter interface.
        [DllImport("Ole32.dll")]
        private static extern int
          CoRegisterMessageFilter(IOleMessageFilter newFilter, out
          IOleMessageFilter oldFilter);
    }


    [ComImport(), Guid("00000016-0000-0000-C000-000000000046"),
    InterfaceTypeAttribute(ComInterfaceType.InterfaceIsIUnknown)]
    interface IOleMessageFilter
    {
        [PreserveSig]
        int HandleInComingCall(
        int dwCallType,
        IntPtr hTaskCaller,
        int dwTickCount,
        IntPtr lpInterfaceInfo);

        [PreserveSig]
        int RetryRejectedCall(
        IntPtr hTaskCallee,
        int dwTickCount,
        int dwRejectType);


        [PreserveSig]
        int MessagePending(
            IntPtr hTaskCallee,
            int dwTickCount,
            int dwPendingType);
    }
Sometimes during migrations from VB6 to VS2010 we have found issues when you tried to add an ActiveX control with the VS2010 winforms designer. The issue is only present in VS2010 not on previous versions.
You usually will see an error in the added Interop references, and messages like a missing VBA or StdLib library.
The error has been reported several times so please vote on Connect to make sure MS will consider fixing it.
https://connect.microsoft.com/VisualStudio/feedback/details/557722/errors-utilizing-activex-controls-in-vs-2010
http://connect.microsoft.com/VisualStudio/feedback/details/568769/aximp-error-with-vb6-activex-control
And possible workarounds are running the Aximp manually from the command line and the add the references. You will then need to add the control by hand in your forms. Do not use the designer to add the component, this will try to regenerate the references and reproduice the issue.
Windows forms is still a great technology, but by default is not as flexible as XAML or HTML where you can very easily modify the style of your controls.
But that is not entirely true.
Let's review which options do we have for customizing the look and feel of Windows Forms Applications.
Custom Look And Feel
Well the idea is simple. Centralize all the settings for your components and make sure to invoke that logic just after the initializeComponent() method call on the Windows Form constructor.
I will implement a very simple example:
First the class the implements the "theming logic":
using System.Windows.Forms;
using System.Drawing;
public class ApplicationLookAndFeel
{
	static void ApplyTheme(TextBox c)
	{
		c.Font = new Font("Arial",12.0f); c.BackColor=Color.Blue; c.ForeColor = Color.White;
	}
	static void ApplyTheme(Label c)
	{
		c.Font = new Font("Arial", 12.0f); c.BackColor = Color.Black; c.ForeColor = Color.White;
	}
	static void ApplyTheme(Form c)
	{
		c.Font = new Font("Arial", 12.0f); c.BackColor = Color.Black; c.ForeColor = Color.White;
	}

	public static void UseTheme(Form form)
	{
		ApplyTheme(form);
		foreach (var c in form.Controls)
		{
			switch(c.GetType().ToString())
			{
				case "System.Windows.Forms.TextBox":
					ApplyTheme((TextBox)c);
					break;
				case "System.Windows.Forms.Label":
					ApplyTheme((Label)c);
					break;


			}
		}
	}
}
As you see is just very simple code that will just update the settings for all controls, and a simple call in all form constructors and your done:
public partial class Form1 : Form
	{
		public Form1()
		{
			InitializeComponent();
			ApplicationLookAndFeel.UseTheme(this);
		}
	}
A form like:
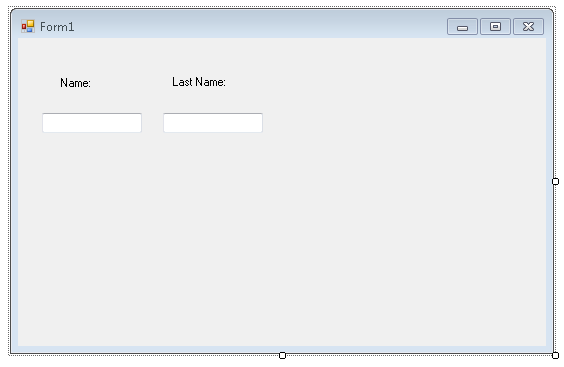
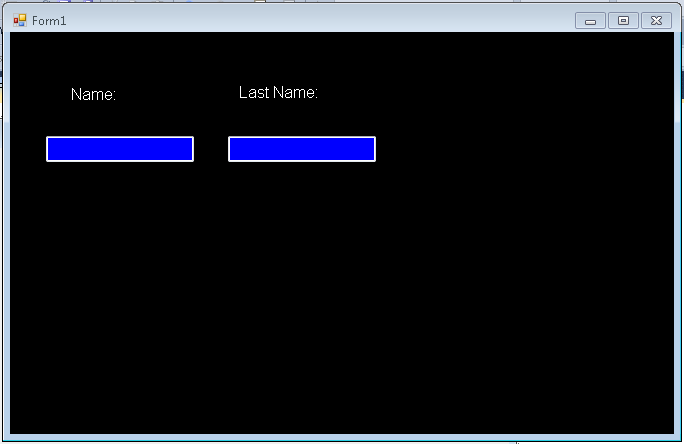
This approach is simple, but could require a lot of work if you have a lot of components, and switching to another look and feel will require a lot of changes, and it does not allow you to customize all of the form.
Customization of non client are (title bar, borders, requires a little more work). You can take a look at Szymon Kobalczyk work in codeplex. There is a lot of information about a setting custom borders for your forms and even a start of a form styling library.
Styling Controls
There are some third-parties that provide some level of Theming/Styling. The main difference is the impact they have on existing applications. I categorize them a Little Changes/Big Changes
Little Changes
Visual Styler.NET from http://www.skin-soft.co.uk/
This is an interesting solution, because it allows you to style your Standard Windows Form controls, with very little changes. You just add a control on you main form and that all. They provide some custom styles and you can built your own. They support styling of ThirdParty Controls but I am not sure how that will work.
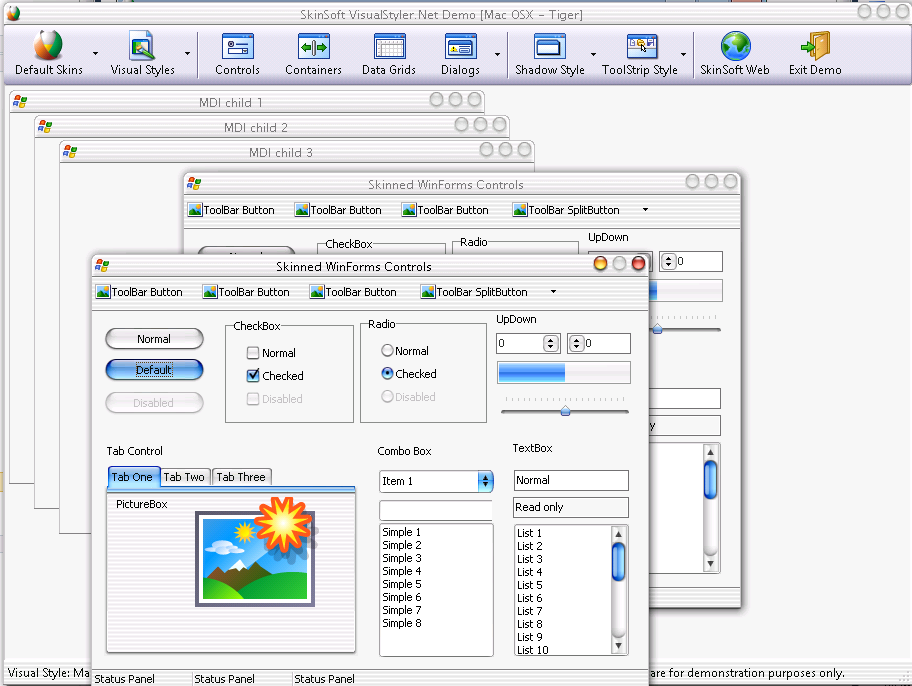
For screen shots and details see: http://www.skin-soft.co.uk/Products/VisualStyler/Overview.aspx
More Changes
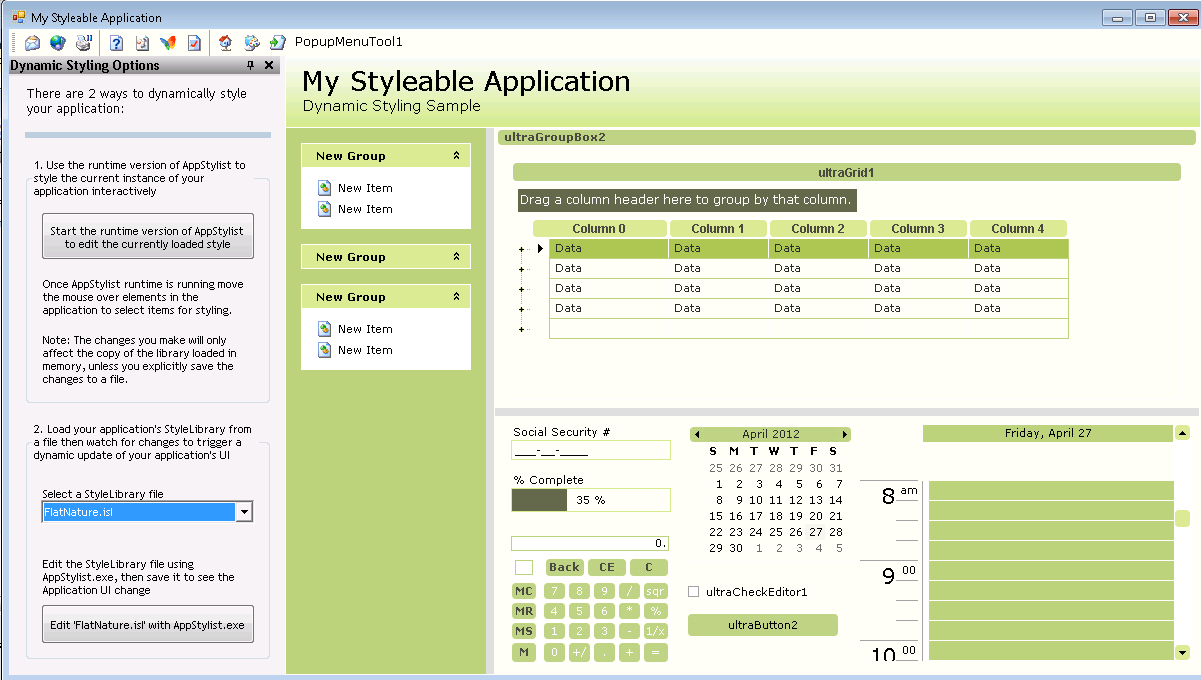
I call this "more changes" because all of them are great styling components but in order to style your application you have to use THEIR components. That is change all your TextBox for RadTextBox in the case of Telerik, Button for RadButton, or change your Label for WinLabel and your Button for WinButton for Infragistics and TextEdit for DevExpress...
So it can be a lot of changes. The end result can be stunning, because all of these companies have very very good components, but it is a lot of changes and can affect your application.
But as you can see, Windows Forms still has a lot to offer
There are many types of ToolStrip<Control> classes.
But how can you create your own customized version. Let’s say you want a control that prefixes a label before your combo box?
Ok that is very simple, you just extend the ToolStripControlHost class
First we create our UserControl:
using System.Windows.Forms;

	public partial class ComboBoxWithLabel : UserControl
	{
		public ComboBoxWithLabel()
		{
			InitializeComponent();
		}

		public string LabelText
		{
			get {return label1.Text;}
			set {label1.Text = value;}
		}

		public ComboBox.ObjectCollection Items
		{
			get
			{
				return comboBox1.Items;
			}
		}
	}

	partial class ComboBoxWithLabel
	{
		/// <summary>
		/// Required designer variable.
		/// </summary>
		private System.ComponentModel.IContainer components = null;

		/// <summary>
		/// Clean up any resources being used.
		/// </summary>
		/// <param name="disposing">true if managed resources should be disposed; otherwise, false.</param>
		protected override void Dispose(bool disposing)
		{
			if (disposing && (components != null))
			{
				components.Dispose();
			}
			base.Dispose(disposing);
		}

		#region Component Designer generated code

		/// <summary>
		/// Required method for Designer support - do not modify
		/// the contents of this method with the code editor.
		/// </summary>
		private void InitializeComponent()
		{
			this.label1 = new System.Windows.Forms.Label();
			this.comboBox1 = new System.Windows.Forms.ComboBox();
			this.SuspendLayout();
			//
			// label1
			//
			this.label1.AutoSize = true;
			this.label1.Dock = System.Windows.Forms.DockStyle.Left;
			this.label1.Location = new System.Drawing.Point(0, 0);
			this.label1.Name = "label1";
			this.label1.Size = new System.Drawing.Size(35, 13);
			this.label1.TabIndex = 0;
			this.label1.Text = "label1";
			//
			// comboBox1
			//
			this.comboBox1.Dock = System.Windows.Forms.DockStyle.Right;
			this.comboBox1.FlatStyle = System.Windows.Forms.FlatStyle.Flat;
			this.comboBox1.FormattingEnabled = true;
			this.comboBox1.Location = new System.Drawing.Point(35, 0);
			this.comboBox1.Name = "comboBox1";
			this.comboBox1.Size = new System.Drawing.Size(134, 21);
			this.comboBox1.TabIndex = 1;
			//
			// ComboBoxWithLabel
			//
			this.AutoScaleDimensions = new System.Drawing.SizeF(6F, 13F);
			this.AutoScaleMode = System.Windows.Forms.AutoScaleMode.Font;
			this.Controls.Add(this.comboBox1);
			this.Controls.Add(this.label1);
			this.Name = "ComboBoxWithLabel";
			this.Size = new System.Drawing.Size(169, 22);
			this.ResumeLayout(false);
			this.PerformLayout();

		}

		#endregion

		public System.Windows.Forms.Label label1;
		public System.Windows.Forms.ComboBox comboBox1;
	}
Next we just create an extension of the ToolStripControlHost
using System;
using System.Collections.Generic;
using System.Linq;
using System.Text;
using System.ComponentModel;
using System.Windows.Forms.Design;
using System.Windows.Forms;
using System.Drawing.Design;

[DefaultProperty("Items")]
[ToolStripItemDesignerAvailability(ToolStripItemDesignerAvailability.All)]
public class MyCustomComboBoxWithLabel : ToolStripControlHost
{
	public MyCustomComboBoxWithLabel()
		: base(new ComboBoxWithLabel())
	{
	}
	[Browsable(false)]
	public ComboBoxWithLabel ComboBoxWithLabel
	{
		get { return base.Control as ComboBoxWithLabel; }
	}


	[Browsable(true)]
	[DefaultValue(false)]
	public string LabelText
	{
		get { return ComboBoxWithLabel.LabelText; }
		set { ComboBoxWithLabel.LabelText = value; }
	}

	[Localizable(true)]
	[DesignerSerializationVisibility(DesignerSerializationVisibility.Content)]
	[Editor("System.Windows.Forms.Design.ListControlStringCollectionEditor, System.Design, Version=4.0.0.0, Culture=neutral, PublicKeyToken=b03f5f7f11d50a3a", typeof(UITypeEditor))]
	public System.Windows.Forms.ComboBox.ObjectCollection Items
	{
		get { return ComboBoxWithLabel.comboBox1.Items; }
		set {
			foreach (var item in value)
			{
				ComboBoxWithLabel.comboBox1.Items.Add(item);
			}
		}
	}
}
And Next ...
Well there is not next. You just used it :) And this is how it looks:

I was recently trying to get the exact width of a string. And I found that the Graphics.MeasureString does not give an exact result.
I finally found Pierre Arnaud
post in Code Project, which gave me a good explaination and solution of what was happening.
You can see in the image Pierre put in his post:

That Graphics.measurestring will return a size that might be bigger that the actual drawn size, this is due some GDI+ details that he explains in that post.
I really like the second proposed solution:
static public int MeasureDisplayStringWidth(Graphics graphics, string text,Font font)
{
System.Drawing.StringFormat format = new System.Drawing.StringFormat ();
System.Drawing.RectangleF rect = new System.Drawing.RectangleF(0, 0,1000, 1000);
System.Drawing.CharacterRange[] ranges = { new System.Drawing.CharacterRange(0, text.Length) };
System.Drawing.Region[] regions = new System.Drawing.Region[1];
format.SetMeasurableCharacterRanges (ranges);
regions = graphics.MeasureCharacterRanges (text, font, rect, format);
rect = regions[0].GetBounds (graphics);
return (int)(rect.Right + 1.0f);
}
This post describes an an interesting workaround that you can use to support the migration of ActiveX Documents with the Artinsoft Visual Basic Upgrade Companion which is one of the Artinsoft \ Mobilize.NET tools you can use to modernize your Visual Basic, Windows Forms and PowerBuilder applications.
Currently the Visual Basic Upgrade Companion does not allow you to process ActiveX Document directly, but there is a workaround: in general ActiveX Document are something really close to an User Control which is a element that is migrated automatically by the Visual Basic Upgrade Companion.
This post provides a link to a tool (DOWNLOAD TOOL) that can fix your VB6 projects, so the Visual Basic Upgrade Companion processes them. To run the tool:
1) Open the command prompt
2) Go to the Folder where the .vbp file is located
3) Execute a command line command like:
FixUserDocuments Project1.vbp
This will generate a new project called Project1_modified.vbp. Migrate this new project and now UserDocuments will be supported.
First Some History
VB6 allows you to create UserDocuments, which can be embedded inside an ActiveX container. The most common one is Internet Explorer. After compilation, the document is contained in a Visual Basic Document file (.VBD) and the server is contained in either an .EXE or .DLL file. During development, the project is in a .DOB file, which is a plain text file containing the definitions of the project’s controls, source code, and so on.
If an ActiveX document project contains graphical elements that cannot be stored in text format, they will be kept in a .DOX file. The .DOB and .DOX files in an ActiveX document project are parallel to the .FRM and .FRX files of a regular Visual Basic executable project.
The trick to support ActiveX documents is that in general they are very similar to UserControls, and .NET UserControls can also be hosted in a WebBrowser. The following command line tool can be used to update your VB6 projects. It will generate a new solution where UserDocuments will be defined as UserControls.
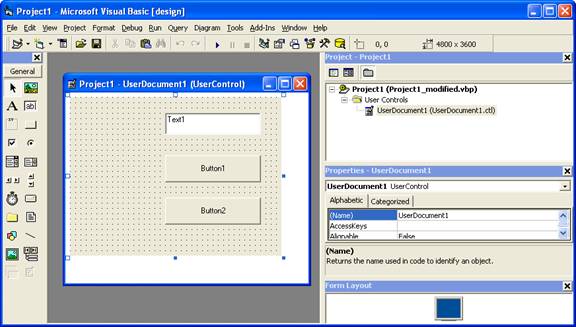
If you have an ActiveX document like the following:
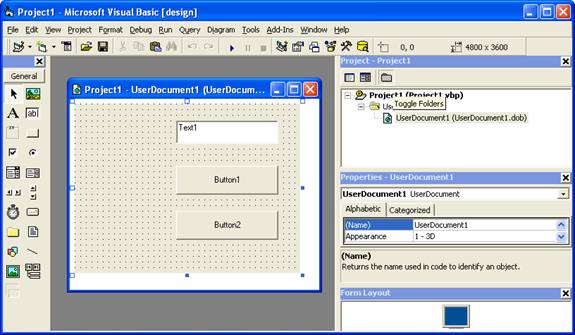
Then after running the tool you will have an Project like the following:
So after you have upgraded the projet with the Fixing tool, open the Visual Basic Upgrade Companion and migrate your project.
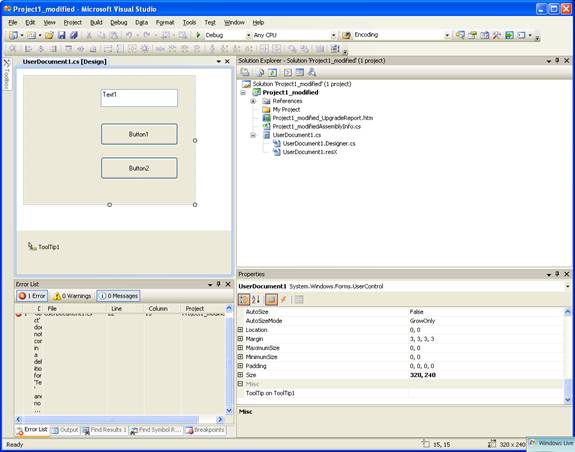
After migration you will get something like this:
To use your migrated code embedded in a Web Browser copy the generated assemblies and .pdb to the directory you will publish:
Next create an .HTM page. For example UserDocument1.htm
The contents of that page should be something like the following:
|
<html>
<body>
<p>ActiveX Demo<br> <br></body>
<object id="UserDocument1"
classid="http:<AssemblyFileName>#<QualifiedName of Object>"
height="500" width="500" VIEWASTEXT>
</object>
<br><br>
</html>
For example:
<html>
<body>
<p>ActiveX Demo<br> <br></body>
<object id="UserDocument1"
classid="http:Project1.dll#Project1.UserDocument1"
height="500" width="500" VIEWASTEXT>
</object>
<br><br>
</html>
|
Now all that is left is to publish the output directory.
To publish your WinForms user control follow these steps.
- Create a Virtual Directory:
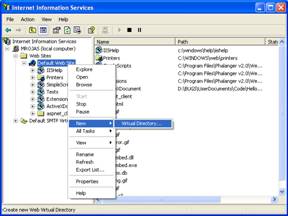
- A Wizard to create a Virtual Directory will appear.

Click Next
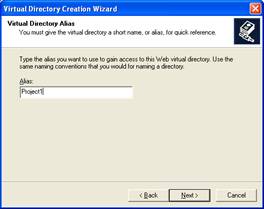
Name the directory as you want. For example Project1. Click Next
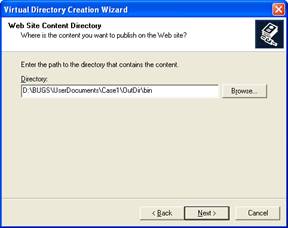
Select the location of your files. Click the Browse button to open a dialog box where you can select your files location. Click Next
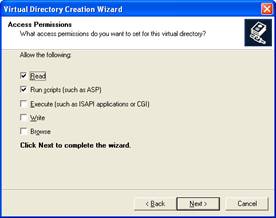
Check the read and run scripts checks and click next
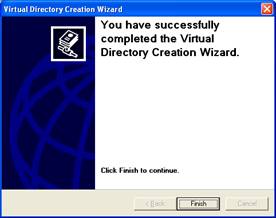
Now Click Finish
- Properties for the Virtual Directory will look like this:
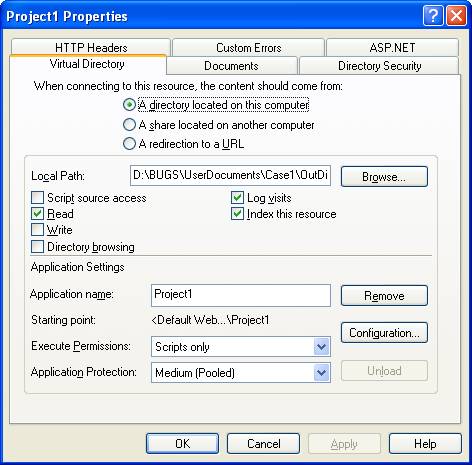
NOTE: to see this dialog right click over the virtual directory
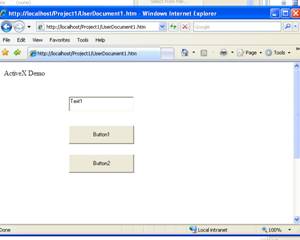
- Now just browse to the address lets say http:\\localhost\Project1\UserDocument1.htm
And that should be all! :)
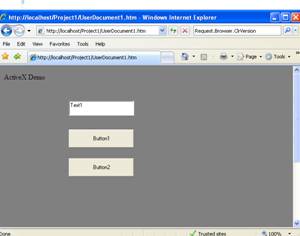
The colors are different because of the Host configuration however a simple CSS like:
<style>
body {background-color: gray;}
</style>
Can make the desired change:
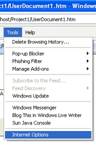
Notice that there will be security limitations, for example for thinks like MessageBoxes.
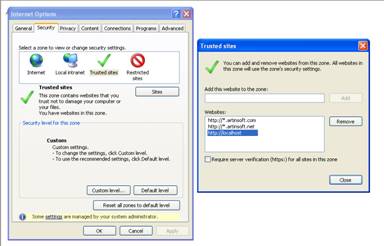
You can allow restricted operations by setting your site as a restricted site:
For example:
Restrictions
The constraints for this solution include:
* This solutions requires Windows operating system on the client side
* Internet Explorer 6.0 is the only browser that provides support for this type of hosting
* It requires .NET runtime to be installed on the client machine.
* It also requires Windows 2000 and IIS 5.0 or above on the server side
Due to all of the above constraints, it might be beneficial to detect the capabilities of the client machine and then deliver content that is appropriate to them. For example, since forms controls hosted in IE require the presence of the .NET runtime on the client machine, we can write code to check if the client machine has the .NET runtime installed. You can do this by checking the value of the Request.Browser.ClrVersion property. If the client machine has .NET installed, this property will return the version number; otherwise it will return 0.0.
Adding a script like:
<script>
if ((navigator.userAgent.indexOf(".NET CLR")>-1))
{
//alert ("CLR available " +navigator.userAgent);
}
else
alert(".NET SDK/Runtime is not available for us from within " + "your web browser or your web browser is not supported." + " Please check with http://msdn.microsoft.com/net/ for " + "appropriate .NET runtime for your machine.");
</script>
Will help with that.
References:
ActiveX Documents Definitions:
http://www.aivosto.com/visdev/vdmbvis58.html
Hosting .NET Controls in IE
http://www.15seconds.com/issue/030610.htm