Visual Basic and Access were a great combination. They allowed the creation of small powerful apps, specially apps for data collection, or just applications that needed a small database that could run standalone.
A good option when you are upgrading your Access database and you do not need a centralized SQL Server (or that is just too much for your environment) is to migrate to other options like SQLite or SQL Server.
SQL Server has now a lot of versions (SQL Server Compact 3.5, SQL Server Compact 4.0, SQL Server Express and now even SQL Server LocalDB) a good table that compares this databases feature by feature can be located here: http://erikej.blogspot.com/2011/01/comparison-of-sql-server-compact-4-and.html)
If what you need is to support a simple, small (less that 4G) standalone database then using SQL Server Compact edition might be for you.
The main version for SQL Compact as at the moment 3.5 and 4.0.
Moving from Access to SQL Compact is not hard. There are many third party tools some free some not: http://erikej.blogspot.com/2009/04/sql-compact-3rd-party-tools.html
Primeworks tools are very easy to use, but you can also use the Microsoft SQL Server Assistant for Access (good links for this tools are in MSDN http://msdn.microsoft.com/en-us/library/hh313039.aspx and also the SSMA Blog http://blogs.msdn.com/b/ssma/)
SQL Server Compact uses the ADO.NET and OLE DB providers, and in many scenarios is just what you need. So take it as an option if you just need a replacement for MS Access
It is very easy to insert rows from one table to the other using an insert into and select * statement but to use this statement you need sometimes to provide the columns list and that is boring :(
So I quick way to do that is use a T-SQL snipped like this:
DECLARE @columns varchar(max)

SELECT @columns = Coalesce(@columns + ', ', '') +  column_name
FROM   information_schema.columns
WHERE  table_schema = 'dbo'
AND    table_name = 'Account'
ORDER
    BY ordinal_position

PRINT @columns
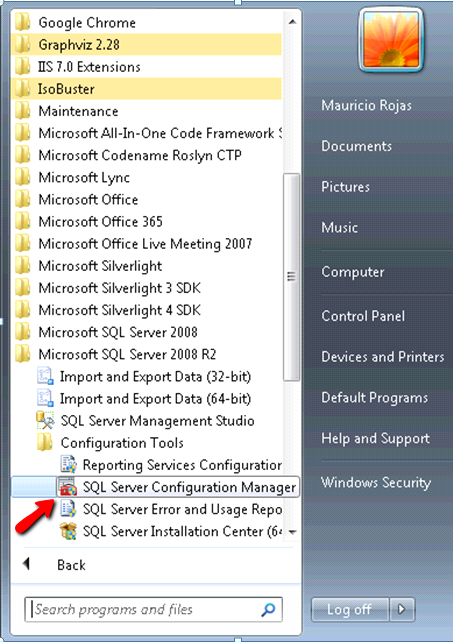
When I use SQLServer 2008 Express for my development tests, I always forget which things I have to do in order to make my SQL Server 2008 Express instance available to other machines over the networks.
So to not forget that again this are the things that you have to check to be able to acces sql server express from other machines:
1. Go to the Start Menu\All Programs\Microsoft SQL Server 2008 R2\ and run SQL Server Configuration Manager
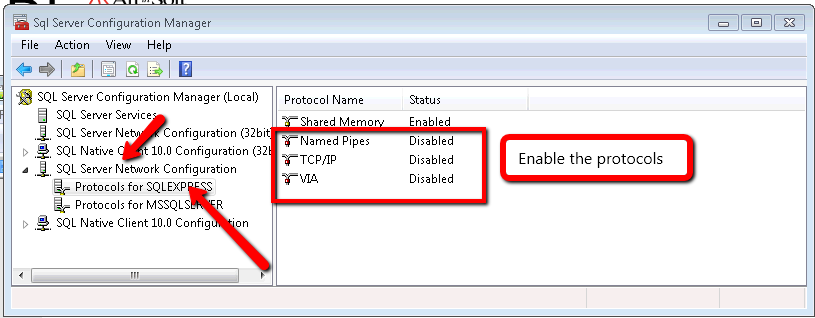
2. In the SQL Server Configuration Manager Window, expand the tree on the left and expand the SQL Server Network configuration element on the tree. Make sure that at least TCP/IP protocol is enabled.
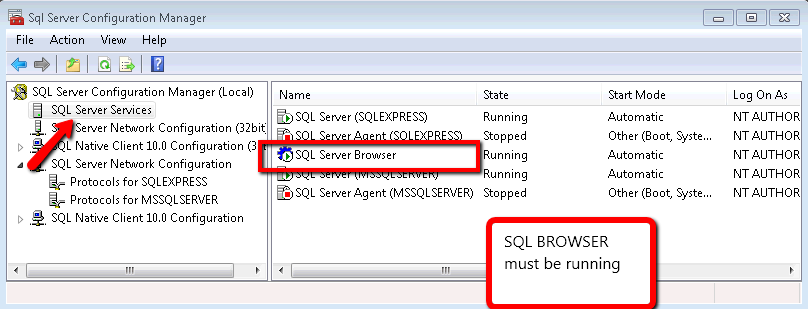
3. Now Click on the SQL Server Services element on the tree and make sure that the SQL Server Browser service is running. It is needed in order to make other computer able to see your server.
I was in an AccessMigration to SQL Server and i needed to open an Access97 database with security (using a system.mdw file).
It took me a while to do, but it is possible to open an Access97 Database in Access2010.
I really thing that it is a little obscure. But these are the steps:
1. First open Access2010
2. After Opening Access2010, press Ctrl + G. That will open the Microsoft Visual Basic for Applications window.
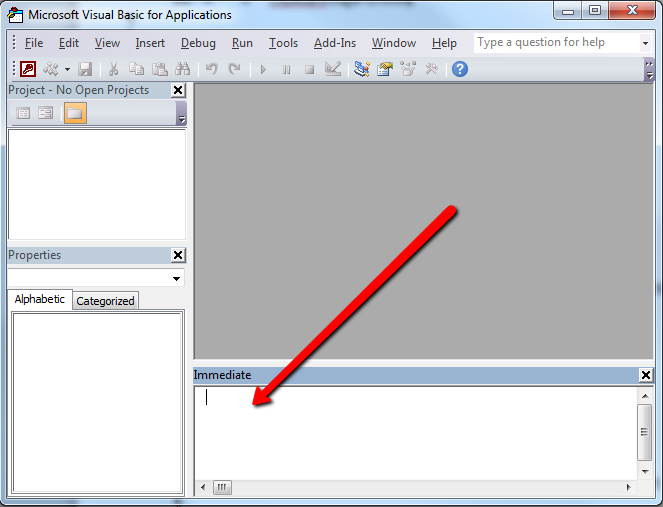
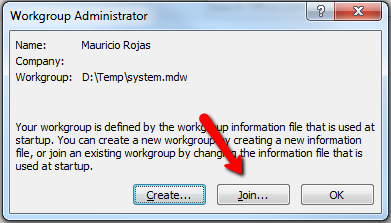
3. On the Immediate Window run this command (to run it just time the command and press Enter): DoCmd.RunCommand acCmdWorkgroupAdministrator
4. Once you run this command you will see a dialog with a title of Workgroup Administrator, press the Join Button
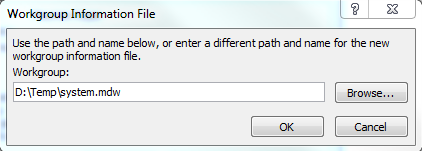
5. When you press the join Button a Dialog with Title Workgroup Information File will prompt Click Browse and find your System.mdw file and press OK. And press Ok on the Workgroup Administrator Dialog
6. Now close Access 2010
7. Open Windows explorer. Find your .mdb file and double click it. Access2010 will prompt for user/password and then will upgrade your database.
Out of the blue, I just started getting this obnoxious exception. Why?? Why meeeeeee!!
Another weird thing is that is was only from my test server. Again Why?>>> Why Meeee!!!
In general when I executed some stored procedures or performed select staments againts the
Oracle database I just got that exception.
ORA-01843: not a valid month
CAUSE:
The source of the problem is that when a table has a date stored in a format that the client is not able
to understand due to format differentes it will throw this message.
For example, if the table is storing dates like ‘DD-MM-YY’, (that is day-month-year european format)
and the client tries to read the date as ‘MM-DD-YY’ or viceversa. In this case we can see that the
month number is confused with the day and it is very likely that there will be dates with a month value
bigger that 12.
SOLUTION:
The solution to this problem is to tell the client the right format to use for dates. This is part of the session values
in oralce. Part of those values can be queries with the following statement:
select * from nls_session_parameters
In the query results, we can see the value of the NLS_DATE_FORMAT that is being used by the client.
You can take several actions.
1. If you are just performing a query on SQL PLUS and is just an isolated query you can just change that value for
your current session by executing:
alter session set NLS_DATE_FORMAT=’DD-MM-RR’
This will take effect ONLY for the actual session. In this example we can see that the format is being changed to
‘day-month-year’. The RR, indicates the year.
2. If you want a more permanent change or at least something that applies to all your session. You can:
2.1. Create an After Logon Trigger something like:
CREATE OR REPLACE TRIGGER LOGINTRG AFTER LOGON ON DATABASE
BEGIN EXECUTE IMMEDIATE 'ALTER SESSION SET NLS_DATE_FORMAT=''DD-MM-RR'''; END LOGINTRG;
2.2. Option 2. Go to the Registry and locate
\\HKEY_LOCAL_ MACHINE\SOFTWARE\ORACLE\KEY_HOMENAME\
For example in my case it was
\\HKEY_LOCAL_MACHINE\SOFTWARE\ORACLE\HOME0
And create an String Key called NLS_DATE_FORMAT and set it to DD-MM-RR
WheWhen you are doing an azure migration, one of the first thing you must do is
collect all the information you can about your database.
Also at some point in your migration process you might consider between migration to
SQL Azure or Azure Storage or Azure Tables.
Do do all the appropriate decisions you need to collect at least basic data like:
- Database Size
- Table Size
- Row Size
- User Defined Types or any other code that depends on the CLR
- Extended Properties
Database Size
You can use a script like this to collect some general information:
create table #spaceused(
databasename varchar(255),
size varchar(255),
owner varchar(255),
dbid int,
created varchar(255),
status varchar(255),
level int)

insert #spaceused (databasename , size,owner,dbid,created,status, level)  exec sp_helpdb

select * from #spaceused for xml raw
drop table  #spaceused
When you run this script you will get an XML like:
<row databasename="master"
size=" 33.69 MB"
owner="sa"
dbid="1"
created="Apr 8 2003"
status="Status=ONLINE, ..."
level="90"/>
<row databasename="msdb"
size=" 50.50 MB"
owner="sa"
dbid="4"
created="Oct 14 2005"
status="Status=ONLINE, ..."
level="90"/>
<row databasename="mycooldb"
size=" 180.94 MB"
owner="sa"
dbid="89"
created="Apr 22 2010"
status="Status=ONLINE, ..."
level="90"/>
<row databasename="cooldb"
size=" 10.49 MB"
owner="sa"
dbid="53"
created="Jul 22 2010"
status="Status=ONLINE, ..."
level="90"/>
<row databasename="tempdb"
size=" 398.44 MB"
owner="sa" dbid="2"
created="Feb 16 2011"
status="Status=ONLINE, ..."
level="90"/>
And yes I know there are several other scripts that can give you more detailed information about your database
but this one answers simple questions like
Does my database fits in SQL Azure?
Which is an appropriate SQL Azure DB Size?
Also remember that SQL Azure is based on SQL Server 2008 (level 100).
80 = SQL Server 2000
90 = SQL Server 2005
100 = SQL Server 2008
If you are migrating from an older database (level 80 or 90) it might be necessary to upgrade first.
This post might be helpful: http://blog.scalabilityexperts.com/2008/01/28/upgrade-sql-server-2000-to-2005-or-2008/
Table Size
Table size is also important.There great script for that:
http://vyaskn.tripod.com/sp_show_biggest_tables.htm
If you plan to migrate to Azure Storage there are certain constraints. For example consider looking at the number of columns:
You can use these scripts: http://www.novicksoftware.com/udfofweek/vol2/t-sql-udf-vol-2-num-27-udf_tbl_colcounttab.htm (I just had to change the alter for create)
Row Size
I found this on a forum (thanks to Lee Dice and Michael Lee)
DECLARE @sql        VARCHAR (8000)
        , @tablename  VARCHAR (255)
        , @delim      VARCHAR (3)
        , @q          CHAR (1)

  SELECT @tablename = '{table name}'
       , @q         = CHAR (39)

  SELECT @delim = ''
       , @sql   = 'SELECT '

  SELECT @sql   = @sql
                + @delim
                + 'ISNULL(DATALENGTH ([' + name + ']),0)'
       , @delim = ' + '
  FROM   syscolumns
  WHERE  id = OBJECT_ID (@tablename)
  ORDER BY colid

  SELECT @sql = @sql + ' rowlength'
              + ' FROM [' + @tablename + ']'
       , @sql =  'SELECT MAX (rowlength)'
              + ' FROM (' + @sql + ') rowlengths'
  PRINT @sql
  EXEC (@sql)
Remember to change the {table name} for the name of the table you need
User Defined Types or any other code that depends on the CLR
Just look at your db scripts at determine if there are any CREATE TYPE statements with the assembly keyword.
Also determine if CLR is enabled with a query like:
select * from sys.configurations where name = 'clr enabled'
If this query has a column value = 1 then it is enabled.
Extended Properties
Look for calls to sp_addextendedproperty dropextendedproperty OBJECTPROPERTY and sys.extended_properties in your scripts.
One of the first steps to put your database in Windows Azure is to put your data on the cloud.
1. The first step is to log in to Azure
1.a) Go to https://windows.azure.com/Cloud/Provisioning/Default.aspx
1.b)Type your user name and password.
1.c) When your are logged in go to SQL Azure option on the left hand menu.
1.d) You will see a list of your projects. Click on the project.

2. You must accept Azure Terms of Use

3. Now create a server. You must indicate an administrator username and password. Azure will set the server name.
Press the Create Server button and continue.

4. Now let’s create a new database.Press the Create Database Button

5. Just type your database name, edition and size. Editions can be Web or Business.
At this moment Size for Web Edition is 1GB or 5GB and for Business is 10GB, 20GB, 30GB, 40GB and 50GB.
Prices varies according to the options that you select.
For my purposes I will select a Web Edition of 1GB

6. You should be able to see your new database in the Databases list.

7. Configure Firewall settings so you can connect to the new database.

7.1 Press the Allow Microsoft Services access to this server checkbox.
That will add a Rule Name that allows access from 0.0.0.0 to 0.0.0.0.
Select the rule and press Edit. You must can type something like 0.0.0.0 to 255.255.255.255 to allow access to all IP Address.
Moving your data to SQL Azure
The easiest way to upload a SQL Server database to SQL Azure is to use
the SQL Azure Migration Wizard this is a great tool that you can download from
CodePlex http://sqlazuremw.codeplex.com/
1. Download the tool. In my case I installed it in D:\SQLAzureTools. Run SQLAzureMW.exe

2. Select SQL Database and press Next

3. Select your database and press connect. That will add your database to a list. Click on your database name and press Next

4. Select the tables and other object that you will move to your SQL Azure database

5. Press Next a Summary is presented with all options

6. The wizard will generate a BCP file and a script for your tables.

You can connect to run your scripts with the following command:
> sqlcmd -S tcp:<servername>.database.windows.net -U <username>@<servername> -P <password> –d <database>
Depending on your configuration you might have problems with BCP. In general you need something like:
To export data:
bcp PhoneBook out c:\temp\Phonebook-c.dat –S <Server> –T –c
-T means a trusted connection and native format
To import data
bcp Phonebook.dbo.Phonebook in c:\temp\Phonebook-c.dat -c -U <username>@<servername> -P <Password> -S tcp:<servername>.database.windows.net -c
After importing your data, you are set to keep on developing your applications on Azure
NOTE:
If you dont know the schema name connect to your database and run something like:
SELECT '['+SCHEMA_NAME(schema_id)+'].['+name+']' AS SchemaTable FROM sys.tables
If you have a .bak file, and all you want is to restore that file to a mdf. Then this is what you can do.
First you need an empty .mdf and .ldf files. The easier way to do that is to create a WebProject in Visual Studio and then In the App_Data folder right click and add new database. That will create an mdf and a .ldf.
Now copy those files to the data directory of your SQLSERVER Express. If it usually under the C:\Program Files\Microsoft SQL Server. In my case it is in C:\Program Files\Microsoft SQL Server\MSSQL.1\MSSQL\Data\
So if your database is PhoneBook just copy:
copy PhoneBook.mdf “C:\Program Files\Microsoft SQL Server\MSSQL.1\MSSQL\Data\PhoneBook.mdf”
copy PhoneBook_log.ldf “C:\Program Files\Microsoft SQL Server\MSSQL.1\MSSQL\Data\PhoneBook_log.ldf”
Now attach your database:
open a Visual Studio 2008 Command Prompt or other prompt (Remember to right click the Run as Administrator, specially if it is Vista)
in the command prompt run:
sqlcmd –S ./SQLEXPRESS
and run the following commands:
CREATE DATABASE Phonebook ON
( FILENAME = N'C:\Program Files\Microsoft SQL Server\MSSQL.1\MSSQL\Data\Phonebook.mdf' ),
( FILENAME = N'C:\Program Files\Microsoft SQL Server\MSSQL.1\MSSQL\Data\Phonebook_log.ldf' )
FOR ATTACH ;
GO
copy your .BAK file to the data directory.
copy PhoneBook.bak “C:\Program Files\Microsoft SQL Server\MSSQL.1\MSSQL\Data\PhoneBook.bak”
NOTE: Why the data directory: It seams that in some installation you can have permitions issues
RESTORE DATABASE PhoneBook
FROM DISK = 'C:\Program Files\Microsoft SQL Server\MSSQL.1\MSSQL\Data\PhoneBook2.BAK'
WITH MOVE 'Phonebook' TO 'C:\Program Files\Microsoft SQL Server\MSSQL.1\MSSQL\Data\Phonebook.mdf',
MOVE 'Phonebook_log' TO 'C:\Program Files\Microsoft SQL Server\MSSQL.1\MSSQL\Data\Phonebook_log.ldf',
REPLACE
After that if everything runs ok then you can detach your database:
1> exec sp_detach_db 'Phonebook'
Now you can copy your mdf files back to where you wanted them
NOTE: If you dont know the name you have to put for Data and Log then Run commands like
RESTORE HEADERONLY FROM DISK ='C:\Program Files\Microsoft SQL Server\MSSQL.1\MSSQL\Data\PhoneBook2.BAK'
RESTORE FILELISTONLY FROM DISK ='C:\Program Files\Microsoft SQL Server\MSSQL.1\MSSQL\Data\PhoneBook2.BAK'
In my case it gives something like:
LogicalName
---------------------------------------------------------------------------------
Phonebook
Phonebook_log
When we migrate from LINC/EAE to Oracle, the migration tool generates an schema an tables form the original ISPECS.
I came across with the problem that I had been playing around with a test database and I didn’t know who was the owner of the table.
Well just as a reminder this is what is needed:
select owner, table_name, tablespace_name from dba_tables where table_name='YOUR_TABLE';
This will return something as:
OWNER TABLE_NAME TABLESPACE_NAME
------------------------------ ------------------------ ------------------------------
THE_OWNER MY_TABLE USERS