So you now have a license of the Visual Basic Upgrade Companion, you open it up, and you don't know what now to do. Well, here are 5 simple steps you can follow to get the most out of the migration:
-
Read the "Getting Started" Guide: This is of course a no brainer, but well, we are all developers, and as such, we only read the manual when we reach a dead end ;). The Getting Started guide is installed alongside the Visual Basic Upgrade Companion, and you can launch it form the same program group in the start menu:

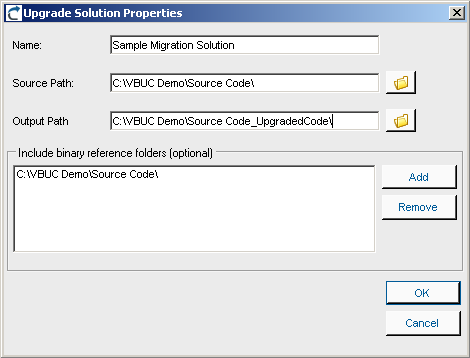
- Create a New Upgrade Solution: the first step for every migration will be to create a new VBUC Migration Solution. In it, you need to select the directory that holds your sources, select where you want the VBUC to generate the output .NET code, and the location of the binaries generated and use by the application. This last bit of information is very important, since the VBUC extracts information from the binaries in order to resolve the references between projects and create a VS.NET solution complete with references between the projects:
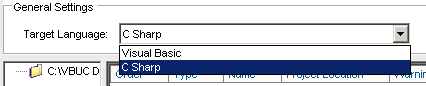
- Select the Target Language: One of the most significant advantages of using the Visual Basic Upgrade Companion is that it allows you to generate Visual Basic.NET or C# code directly. This can be selected using the combo box in the Upgrade Manager's UI:
- Create a Migration Profile: The Visual Basic Upgrade Companion gives a large degree of control to the end users on how the .NET code will be generated. In addition to the option of creating either C# or VB.NET code, there are also a large amount of transformations that can be turned on/off using the profile manager. Starting with version 2.2, the Profile Manager recognizes the components used in the application and adds a green checkmark to the features that apply transformations to those components. This simplifies profile creation and improves the quality of the generated code from the start:

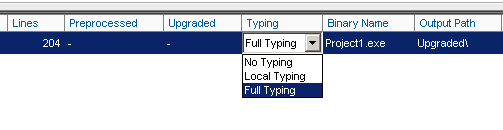
- Select the Code Typing Mechanism: the VBUC is able to determine the data type for variables in the VB6.0 code that are either declared without type or as Variant. To do this, for each project included in the migration solution you can select three levels of typing: Full Typing, Local Typing or No Typing. Full Typing is the most accurate typing mechanism - it infers the type for the variables depending on how they are used throughout the project. This means that it needs to analyze the complete source code in order to make typing decisions, which slows the migration process and has higher memory consumption. Local Typing also infers data types but only within the current scope of the variable. And No Typing leaves the variables with the same data types from the VB6.0 code:
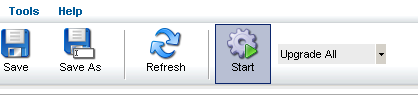
After going through these 5 steps, you will have an Upgrade Solution ready to go that will generate close to optimal code. The next step is just to hit the "Start" button and wait for the migration to finish: