The first step is to download the actual VM Additions. You can read more about the Linux VM Additions here. To download the additions, you need to log into Microsoft Connect, and the look in the available programs for the Virtual Machine Additions for Linux. Once you download and install the file VMAdditionsForLinux32Bit.MSI, you will have an additional ISO file under C:\Program Files\Microsoft Virtual Server\Virtual Machine Additions\, called VMAdditionsForLinux.iso. This ISO file will appear on the Known image files on the virtual machine’s CD/DVD Drive properties:

Once you mount the ISO, installing the additions is straightforward. You only need to change the directory to the CD-ROM drive from a terminal (in this case, /media/cdrom), and run the script vmadd-install.run. This script takes several parameters, depending on what part of the additions you wish to install. You can, for example, only install the SCSI driver, or the X11 driver, or any other component. I installed all of them using the command line ./vmadd-install.run all:
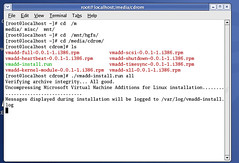
You can also install the additions using the RPM packages, if your distro supports it. Once the additions were installed, the VM worked like a charm. The mouse integration works perfectly, and the performance increase is noticeable.