You can specify the rom boot program to use with a specific machine when using WDS. This allows you to set the machines to always try a PXE boot first, and control its behavior from WDS. WDS comes with three x86 boot roms, each with different functionality (this also applies to x64 and Itanium – since I only have x86 machines available for testing, I’ll use those roms):
- Boot\x86\pxeboot.com: Normal boot ROM. It presents the prompt for F12 and boots from WDS ONLY if F12 is pressed
- Boot\x86\pxeboot.n12: Boots directly from the network (PXE) without waiting for F12 to be pressed
- Boot\x86\abortpxe.com: Aborts the PXE boot process and continues booting from the next boot device
In order to change the boot rom, you need to have the machine pre-staged in Active Directory, and use the wdsutil command line program. You also need to know either the name or the MAC address of the machine. With that information, you can issue the command:
wdsutil.exe /set-device /Device:SERVER01 /BootProgram:Boot\x86\pxeboot.n12
OR
wdsutil.exe /set-device /ID:AA-BB-CC-DD-EE-FF /BootProgram:Boot\x86\pxeboot.n12
The previous lines change the boot rom to pxeboot.n12 of the machine SERVER01.
By using this, when you have to restore an image to a machine, you can just change the boot rom to pxeboot.n12, and the process will take place automatically (depending on how you have it configured). Once it is restored, you can change it back to abortpxe.com, and it will continue booting from the hard drive every time.
Today I finally got a chance to play with Beta 2 of the System Center Virtual Machine Manager. Here are my preliminary impressions:
- First of all, the product has improved significantly. It has tons of new features, and uses tons of new pre-requisites. Fortunately, you can download a pre-configured VHD with SCVMM, ready to go, from Microsoft Connect.
- This version of SCVMM uses the new Windows Remote Management (WinRM) package to manage remote servers. This is a step in the right direction, IMHO, since it is Microsoft’s implementation of the WS-Management Protocol. The downside is that I had to install the WinRM package on the servers, but well, its a nice trade-off for getting a SOAP-based, standard management product.
- One thing I really like about it is the Powershell integration. It is finally included in this version of SCVMM, and the implementation rocks – at the end of most wizard, you get a button that says “View Powershell Script”:
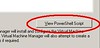
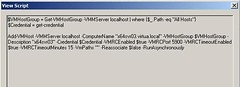
Pressing that button shows you the Powershell script equivalent to the options you selected:
So far I’ve only been able to add hosts and manage the virtual machines on those hosts. I am looking forward to working with the new advanced features, including (and especially) the physical to virtual migration. Overall I think the new features are great, and you should give it a try.
This past two weeks I have been working on a deployment that involves technologies like PXE, WinPE, Windows Deployment Services, the Windows Automated Installation Kit, and others. I was stuck for a while with WinPE, having issues when trying to capture a Windows image using the WDS Capture disk.
Most of the issues I had were driver-related. When I started, neither the network nor the hard drive of the machine (SATA drivers!! argh!!) were available to WinPE.
So, I did the following:
- Get the storage drivers from Intel’s website. You can download them from here. Make sure you download the Vista version of the drivers.
- Unpack them on a temporary directory. In my case I ran:
iata621_enu.exe -A -PF:\intel
- Mount the Capture WinPE 2.0 wim image (generated through the WDS console) to a directory:
imagex /mountrw d:\temp\capture.wim 1 d:\temp\wpe
- Copy the file C:\Program Files\Windows AIK\Tools\x86\imagex.exe to d:\temp\wpe or where you mounted the wim image).
- Now, add the drivers to the WinPE image with the following command:
peimg PF:\intel\*.inf d:\temp\wpe\Windows
- Unmount the WinPE wim image:
imagex /unmount /commit d:\temp\wpe
- Add the WIM image to WDS. On the console, select Windows Deployment Services->Servers->->Boot Images->(Right Click)->Add Boot Image, and browse to the WIM you just unmounted
- Boot the target machine using PXE and make sure it loads the correct WIM image
- Ok, so here is where I had issues:
- First, the WDS Image Capture Wizard didn't list the SATA drives. Turns out the driver loaded correctly, but for some reason it couldn't see the drive.
- If you run into an issue where the driver won't load, try using the drvload command from the WinPE command prompt..
- Because of those issues, I had to fall back to the command line. To do this, press Shift-F10 in the Capture Wizard, and that will open a command prompt.
- Once in the command prompt, create the image using imagex:
imagex /capture c: c:\myimage.wim "My Image" /compress maximum
- With the image created, map a network drive on the server, and copy it back:
net use i: \\\share * /user:
- Copy the image back to the server (I: drive)
- Turn the machine off.
- Enjoy your newly captured image!!!!
Ever since we saw this post over at the Virtual PC Guy’s Weblog, we have been using Dave Whitney's Free Defragmenter on our virtual machines’ dynamic VHDs to improve the compaction process. The results so far have been great – we have managed to shrink dynamic VHD files to levels far beyond what we could with the standard Windows Disk Defragmenter.
This week I decided to do a little spring cleaning on my work laptop. I installed Windows on it around 2 years ago, and have been installing/uninstalling tons of software ever since. The machine, predictably, had become painfully slow.
Yesterday I managed to remove about 3.5GB of old software and files, leaving the hard drive horribly fragmented. So I decided to leave the Whitney’s defrag tool running overnight… today in the morning I am surprised on how responsive it is! Outlook now takes a few seconds to startup (with a multi-GB pst file), compared to over a minute yesterday. And I can’t believe how quickly the Windows Live Messenger and Visual Studio .NET 2005 started up. I was so surprised, I even decided to write about it here! 
HOT TIP: I also recommend an utility called CCleaner to help you optimize your system. It removes all sorts of temporary files and safely cleans up the Registry. I my laptop it freed up around 750MB!
Today I decided to test out the Volume Shadow Copy (VSS) support in Virtual Server 2005 R2. In theory, as I mentioned in an earlier post, with VSS, virtual server can create a consistent “snapshot” of a running virtual machine so other applications, such as backup clients, can use that snapshot without interrupting the virtual machine itself.
The only VSS-aware backup application I had installed was Windows’ very own NTBackup. So, I enabled VSS on the volumes, run NTBackup, and proceed to make a backup of my virtual machine. Everything started out OK, until NTBackup got stuck with the message “Waiting to retry shadow copy…”. Following my standard error-solving checklist, I checked the Event Viewer, and I found this message logged:
Volume Shadow Copy Service error: Error calling a routine on the Shadow Copy Provider {f5dbcc43-b847-494e-8083-f030501da611}. Routine details BeginPrepareSnapshot({f5dbcc43-b847-494e-8083-f030501da611},\\?\Volume{0cb1b616-8ea6-11db-88de-806e6f6e6963}\) [hr = 0x80070002].
We use Acronis imaging solution for deploying our server, and it turns out that Acronis’ VSS Provider has an issue with Microsoft’s VSS provider. Apparently the issue is well-known, and is documented in two forums posts. It is solved in the latest version of Acronis’ products, but I didn’t really had time to perform an upgrade (and Acronis’ products are notoriously stubborn when you try to uninstall them). So, I applied the solution suggested in one of the forum posts. I unregistered Acronis’ VSS provider using the command:
regsvr32 /u \windows\system32\snapapivss.dll
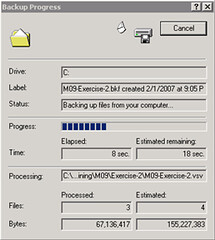
After that, the backup went without problems:
Opening up the log once the backup is complete shows you that all files from the virtual machine were backed up succesfully:
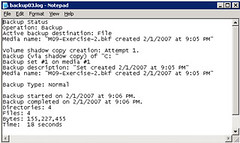
This was done without turning the virtual machine off, taking advantage of the VSS functionality in Virtual Server 2005 R2 SP1 Beta. I performed the same operation on a Windows XP box, disabling NTBackup’s VSS support, and the backup predictably failed.
Here’s some information on VSS: Volume Shadow Copy Service (VSS)
All of you are probably aware that you can download MSDN Pre-Configured Virtual Machine Images and of configurations you can get with the VHD Test Drive. There is another option, though, if you want to evaluate a Windows 2003 R2 installation by itself on a virtual machine or as a host for Virtual Server 2005 R2. You can get a 180–day evaluation of Windows 2003 Server R2 at the trial software page over at Microsoft. This makes it easier to evaluate the performance of the server product, for virtualization, or for any other tasks that you may be considering it.
Link: Windows Server 2003 R2: How to Get Trial Software
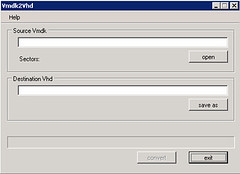
As suggested in this post by Christian, I went ahead and downloaded the vmdk2vhd utility to convert virtual hard drives from VMWare’s VMDK format to Microsoft’s VHD format. To test it out, I also downloaded Red Hat Enterprise Linux trial virtual appliance from VMWare’s site, and ran the converter on it. These are my results.
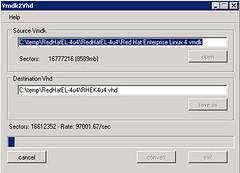
First, running the converter is pretty straightforward. You just launch the utility, and it presents you with a simple UI, where you select the vmdk you want to convert, and the path to the destination VHD.
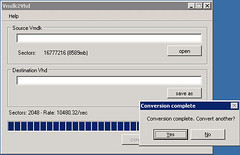
Once you select the vmdk and the vhd, press the convert button to start the conversion process:
The tool shows you a dialog box when it completes the conversion:
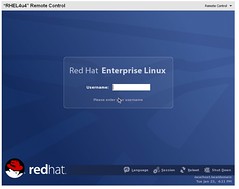
I created a new virtual machine in Virtual Server 2005 R2 SP1 Beta 2 using this newly converted VHD, and, not knowing what to expect, I started it. The redhat OS started the boot up process normally:
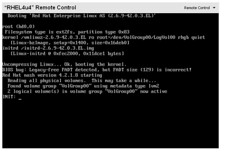
After making some adjustments to the configuration, including the X Server configuration, I finally got the X Windows server to come up. I am currently playing with the OS, and will proceed to install the VM Additions … I will document the process in another post soon.
As you can see, the process for converting a VMWare virtual hard disk to a Virtual Server VHd is very straightforward. This will work, ideally, in a migration scenario, but this also enables a scenario to try out the large amount of Virtual Appliances that you can download from VMWare’s website.
This week I finally manage to sit down and start using the 1.0 release of PowerShell. So far I’m impressed with its capabilities and ease of use. Here are a couple of tips to get you started with PowerShell scripting:
Get-Help
The commands in PowerShell follow the format verb-noun. It is very easy to “guess” a command once you’ve been using PS for a little while. To get the processes on the system, for example, you use the command get-process. To get the contents of a file you use get-contents -path . An so on.
So, guess what command is used to get help? Too easy, isn’t it? get-help is your greatest ally when working with PowerShell. If you are unsure of what a command does or how it works, you just need to invoke the get-help command, followed by the name of the command:
PS C:\> get-help get-process
NAME
Get-Process
SYNOPSIS
Gets the processes that are running on the local computer.
…
Also, get-help supports wildcards, so you can use it to search for commands (in case you’re not 100% positive on the exact command name). So, for example, you can do a:
PS C:\> get-help get-*
Name Category Synopsis
---- -------- --------
Get-Command Cmdlet Gets basic information about cmdlets...
Get-Help Cmdlet Displays information about Windows P...
Get-History Cmdlet Gets a list of the commands entered ...
…
Script Security
PowerShell scripts have the extension *.ps1. To execute scripts, you need to do two things:
- Enable script execution. This is achieved with the command Set-ExecutionPolicy. To learn more about this command, you can type:
PS C:\> get-help set-executionPolicy
- Enter the path to the script. If it is in the local directory, enter .\.ps1. If not, enter the fully qualified path.
Scripting in PowerShell is very easy – the syntax is very C#-like, and it has the power of both the .NET Framework AND COM objects at your disposal.
Use .NET Data Types
PowerShell is built on top of the .NET Framework. Because of that, you can use .NET Data Types freely in your scripts and in the command prompt. You can do things like:
PS C:\> $date = new-object -typeName System.DateTime
PS C:\> $date.get_Date()
Monday, January 01, 0001 12:00:00 AM
Further help
Some great places to get you started with Powershell are:
Windows PowerShell Team blog
Technet’s PowerShell Scripting Center
Just PowerShell it
PowerShell For Fun
Don’t forget to get the Windows PowerShell Help Tool, for free, from Sapien’s website.
Yesterday I blogged about the Code Advisor, that will pinpoint common programming practices that difficult the migration of a VB6 application. Well, another very important tool that you can add to your arsenal is the Visual Basic 6.0 Upgrade Assessment Tool. This tool was developed by ArtinSoft, and creates a spreadsheet with detailed information of actual upgrade issues that will be present in the .NET code after the migration.
This tool is also a free download from Microsoft’s website. You can also check out ArtinSoft Visual Basic to .NET page for more information on upgrading Visual Basic 6.0 applications.
If you are considering to upgrade your Visual Basic 6.0 application to Visual Basic .NET or C#, remember that the recommended first step is to run Microsoft’s Code Advisor. The Code Advisor, according to the website:
The Code Advisor for Visual Basic 6 is an add-in used to review your code to ensure that it meets predetermined coding standards. The coding standards are based on best practices developed by Microsoft to produce robust and easy-to-maintain code.
The Code Advisor detects issues that are not converted automatically during the automatic migration, increasing the manual work required after running the conversion tools. These include Variant variables, late binding, soft binding of different objects, and others.
Check it out: Code Advisor for Visual Basic 6.0