A quick post to tell everyone that the day finally came: Windows Server 2008 was released today. You can find more information about it on the Windows Server 2008 page, and watch the keynote here.
The biggest deal, from my perspective, is Hyper-V. This will have a significant impact on the IT market, by exposing thousands of IT profesionals to a hipervisor-based virtualization solution. Another very interesting technology is RemoteApp, which allows you to use, through Terminal Services, just one application instead of the complete desktop. It solves a deployment issue that required expensive software solutions in the past - and something we run into every once in a while when determining the best deployment strategy for migrated Informix 4GL applications.
Now that Visual Studio 2008 is available, you might wonder what will happen with the Visual Studio 2005 projects generated with the current version of the VB Upgrade Companion (VBUC). For starters, it is worth mentioning that Visual Studio 2008 fully supports projects created in the .NET Framework 2.0, like the ones generated with the VBUC. The newer version of the .NET Framework (3.0, shipped with Vista, and 3.5, shipped with VS2008) keep the same core version of the CLR (2.0) as before, with very few minor changes. There are no compatibility or breaking changes like when upgrading from versions 1.1 to 2.0 of the .NET Framework.
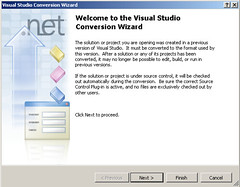
When you open a VS2005 project in VS2008, you are greeted with the new Visual Studio Conversion Wizard:
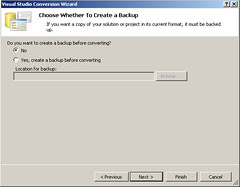
Once you click Next, you can select whether to create a backup of the project or not. I chose to NOT create a backup, since this is a copy of the project, since I will be comparing both .csproj files later on. Press Next.
The next step tells you what will happen during the conversion:
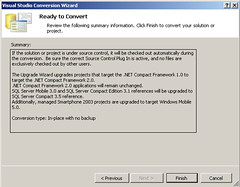
Press Finish, and after a little while, the process will be complete:

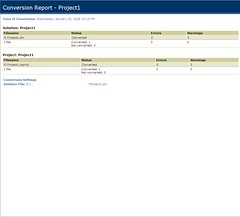
You can check out the Conversion Report afterwards. For most projects, however, the reports should be in blank:
So there you have it. After converting this test VS2005 Windows Form application, I was able to continue working on it without any issues. It is true that the code generated by the VBUC will not take advantage of all the neat features of the .NET Framework 3.5, such as WPF, but you should be able to continue working with the migrated code after moving to Visual Studio 2008 without any problems.
A large percentage of the work I do here at ArtinSoft is related to what we call Ready programs. The Ready program is part of the Ready-Set-Go methodology – a migration project methodology developed here at ArtinSoft that has given us great results.
The Ready assessment program, or Ready, is the first stage of this methodology. As you are probably aware, the more planning you put into a project, the higher the probability that the project will be succesful. Well, with the Ready, we do a an in-depth analysis of the project before we start, and come up with a detailed project plan that takes into account any risks and possible issues with the migration.
The first step in a Ready is a thorough assessment of the size, complexity, migration goals, and testing procedures for your current application. This step involves a 5– to 10– day on-site analysis of an application. During that week(s), we perform interviews with the development, PM and testing teams, to get a feel for the project and gather enough information to proceed with the project. Once we come back to our office, we work alongside the development team to create an accurate estimate of the effort required to perform the migration. This normally includes any customization of the migration tools necessary to minimize the manual effort in the project.
The final product of the Ready program is a detailed written report that includes a fixed-cost proposal for completing the migration. This is usually delivered two or three weeks after the on-site visit. This report, on its own, has tremendous value for the organization. It summarizes the requirements for the migration, and the issues that need to be addressed even if the project is not performed by ArtinSoft. It can also help in justifying the need to modernize outdated applications.
The Ready program is a low-cost, low-risk approach to getting detailed information on your migration project. For more information on the ready, and on the overall methodology, check out the Ready-Set-Go methodology page at ArtinSoft's website.
Sometimes you need to extract one file from an MSI file. A typical example is when you need just one DLL in order to make a project compile, but in order to get it you need to download and install a complete application. The ideal solution is to get the DLL file from the MSI file without having to perform the installation.
Some installers allow you extract the files to create a network installation. This is normally done using the command msiexec /a . Not all of them extract all the files, though.
Well, there is a small utility hilariously called Less MSIérables that allows you to extract files from msi installers. It works great – it has been around for a while, and I’ve used it several times to get me out of tough spots. I definitely recommend that you check it out!!
Recently I kept getting this error when trying to install SQL Server 2005 Express Edition:
An installation package for the product Microsoft SQL Server Native Client cannot be found. Try the installation again using a valid copy of the installation package 'sqlncli.msi'
After re-downloading the installation package and running the setup several times, I found this page. There I found a solution: go to Control Panel->Add or Remove Programs, and UNINSTALL the Microsoft SQL Server Native Client. Run the installation again, and this time it should work correctly.
In order to fully take advantage of the XML source code comments available in C#, you need to use all the features offered by the XML comment system.For this, the best guide I’ve found so far is this: XML Comments Let You Build Documentation Directly From Your Visual Studio .NET Source Files .
Also, in order to extract the XML comments that work as and input to the Sandcastle tools, follow these steps:
- Inside the Visual Studio 2005 Solution Explorer, right click on your C# project
- Select Properties from the popup menu
- Select Build
- Make sure the checkbox XML documentation file is selected. Enter the path and file name where you want the XML file to be generated.
With that setting, the next time you build your application the XML file will be generated for you.
Some time ago we had some issues with the WDS Image Capture Wizard that WDS inserts into WinPE to create capture images . When we got to the screen where you select the drive letter you want, the WDS Image Capture Wizard didn't list the drives, not even the C: drive. We could get to it using the command prompt, though, so we created those test images by running imagex manually.
Well, it turns out that we were just documenting the processes at the time, with a full OS install on the hard disk. In what could be described as a RTFM moment, we finally figured out what was wrong – the WDS Image Capture Wizard only lists Sysprep’d drives. Once we ran Sysprep on the OS installation, everything worked smoothly with the Capture Wizard.
The moral of the story is that sometimes it pays to read the manual (and follow the instructions) before jumping head-first into a project. 
Some time back I blogged about the Sandcastle project over at Microsoft, a tool that allows you to generate MSDN-style documentation from the comments in the .NET code (among other things). I recently downloaded the Sandcastle - June 2007 Community Technology Preview (CTP) to generate some documentation for a project we did with the HPC team at Microsoft. Even though it is still a CTP, it works great – right now I am able to add comments to the code and then generate sufficient documentation semi-automatically, killing two birds with one stone.
If you are interested in using this tools, make sure to check out post Creating a Chm build using Sandcastle at the Sandcastle blog . Remember that Sandcastle will extract and transform the comments from your files, but you still need the HTML Help Workshop to create the actual *.chm file.
Here’s another time-saving tip. If you select Windows Authentication when installing SQL Server Express 2005, and you need to change it so it allows SQL Server Authentication later on, all you need to do is change a registry key. To do this, shutdown all SQL Server-related services, run regedit32, and in the registry key HKEY_LOCAL_MACHINE\SOFTWARE\Microsoft\Microsoft SQL Server\MSSQL.1\MSSQLServer, change the value of LoginMode to 2.
Restart all services, and that should do the trick. You can get more information in this KB article (talks about MSDE/SQL Server 2000, but it also applies to SQL Server Express).
Here’s a tip that should save you some time (I spent several hours trying to figure this one out). When you deploy a .WIM image with Windows Server 2003 using WDS, you can have that machine take on the name you gave to it in Active Directory (when prestaging the computer). To achieve this, do the following:
- Create a copy of the sysprep.inf file on the folder c:\RemoteInstall\Images\\\$OEM$\$1\Sysprep
- Edit this sysprep.inf file and make sure you have the following lines in place:
[UserData]
ComputerName="%MACHINENAME%"
…
[Identification]
DoOldStyleDomainJoin=Yes
- Remove the file c:\Sysprep\sysprep.inf from the image (if necessary, mount it with imagex)
- The next time you re-image the machine, the WDS client will place this sysprep.inf file inside the image, and will grab the name you gave to the machine in Active Directory when you prestaged it.