Either if you migrate your application from VB6 to C# or if you develop a new application in C# something you end up with cases where you need to use your classes in legacy apps. Some of them could have been written in VB6 or could even be VBA macros in Excel applications.
Exposing your .NET classes can be sometimes very easy (you can think is just a matter of putting a ComVisible tag) but in other occasions is not that simple. Specially if your legacy application is using a lot of Late Bound calls like in VBA, so you must make sure that the COM information that you are exposing for your class is exactly what you really want and need.
OK. So I will provide some guidelines or some steps you should follow to provide a consistent COM interface for your .NET Code.
1. First you have to add the [ComVisible(true)] attribute. Don’t think that’s all. Even if in some cases that is enough is better if you take an strict control of want is being generated for your class. Ok Let’s use the following class as an example:
using System;
using System.Runtime.InteropServices;

namespace InteropExamples
{
    [ComVisible(true)]
    public class MyVerySimpleClass
    {
        public Class2 CreateANewClass()
        {  return new Class2()     }

        public int GetMyLuckyNumber() { return 15; }
    }
public class Class2 { }
}
// Generated .IDL file (by the OLE/COM Object Viewer)
//
// typelib filename: <could not determine filename>
[
uuid(370E4AD4-073B-4984-8C7D-5ED027F7B1CA),
version(1.0)
]
library ClassLibrary1
{
// TLib : // TLib : mscorlib.dll : {BED7F4EA-1A96-11D2-8F08-00A0C9A6186D}
importlib("mscorlib.tlb");
// TLib : OLE Automation : {00020430-0000-0000-C000-000000000046}
importlib("stdole2.tlb");
// Forward declare all types defined in this typelib
interface _MyVerySimpleClass;
[
uuid(E03CCE68-2D55-3576-9DB6-019AAA667A5D),
version(1.0),
custom({0F21F359-AB84-41E8-9A78-36D110E6D2F9}, "InteropExamples.MyVerySimpleClass")
]
coclass MyVerySimpleClass {
[default] interface _MyVerySimpleClass;
interface _Object;
};
[
odl,
uuid(D18BEEE1-4425-3AC7-891E-807EC2283731),
hidden,
dual,
oleautomation,
custom({0F21F359-AB84-41E8-9A78-36D110E6D2F9}, "InteropExamples.MyVerySimpleClass")
]
interface _MyVerySimpleClass : IDispatch {
};
};
In this case your class will be expose using all defaults. That is, a progId that will be the <AssemblyName>.ClassName an interface _<ClassName> is generated and the class is exposed only for IDispatch, which would not provide class information if you add the tlb reference to a VB6 or VBA project.
And if you run this code in VB6 you will have a problem like type mismatch when you try to use the method x.CreateAClass because it is returning an object that is not exposed thru COM.
Private Sub Command1_Click()
Dim x As Object
Set x = CreateObject("InteropExamples.MyVerySimpleClass")
MsgBox x.GetMyLuckyNumber
MsgBox x.CreateAClass
End Sub
So my recommendation is to make explicit what you want to expose. Maybe you only need some of the methods to be exposed. Well that is step two.
2. Define a public, ComVisible(true) interface that will define the methods that you want to be exposed thru COM. Sometimes it is better to implement the interface explicitly. I even recommend using partial classes so you isolate the COM stuff from your normal class. If you class is very simple you can leave all COM stuff there.
    //It is better to have an interface, because
    //you are completely sure what you are exposing or not
    [ComVisible(true)]
    public interface _MyVerySimpleClass
    {
        int GetMyLuckyNumber();
    }
3. (Recommedation) This is not an obligatory step but I recommend using partial classes.
    //Using partial classes allow you to separate all the
    //COM plumbing and leave your .NET implementation simple
    public partial class MyVerySimpleClass
    {
        public Class2 CreateAClass()
        {
            return new Class2();
        }

        public int GetMyLuckyNumber() { return 15; }
    }
3. Make sure your partial class has the following attributes:
[ComVisible(true)] <—This is obvious because you want to use your class in COM
[ClassInterface(ClassInterfaceType.None)] <—This is because your want to take charge or what will be generated in your Typelib (tlb)
[ComDefaultInterface(typeof(_MyVerySimpleClass))] <—This is to indicate the interface that holds your COM visible methods.
[ProgId("InteropExamples.MyVerySimpleClass")] <—To establish which will be the progId not have a generated one
[Guid("{029D468C-8BE6-498f-8A57-3B4B0306BA41}")] <—this is important specially if you are trying to accomplish binary compatibility
Optionally add this attribute [IDispatchImpl(IDispatchImplType.CompatibleImpl)] this is currently marked as an obsolete attribute but it still works and I have found scenarios, specially in some VBA applications where you need this attribute in order to make some late bound calls.
4. And Explicitly implement the interface methods. This is important because some of the return values or arguments might need convertions. For example what can you do if your method returns a DataSet and your Excel VBA script is expecting something like a Recordset (more on this on other posts).
So now you will have a class like:
    //Using partial classes allow you to separate all the
    //COM plumbing and leave your .NET implementation simple
    public partial class MyVerySimpleClass
    {
        public Class2 CreateAClass()
        {
            return new Class2();
        }

        public int GetMyLuckyNumber() { return 15; }
    }

    //It is better to have an interface, because
    //you are completely sure what you are exposing or not
    [ComVisible(true)]
    public interface _MyVerySimpleClass
    {
        int GetMyLuckyNumber();
    }

    [ComVisible(true)]
    [ClassInterface(ClassInterfaceType.None)] //This is to make sure that no automatic generation of COM methods is done
    [ComDefaultInterface(typeof(_MyVerySimpleClass))] //This to explicitly establish which is the default interface
    [ProgId("InteropExamples.MyVerySimpleClass")]
    [Guid("{029D468C-8BE6-498f-8A57-3B4B0306BA41}")]
    [IDispatchImpl(IDispatchImplType.CompatibleImpl)]
    partial class MyVerySimpleClass : _MyVerySimpleClass
    {

        #region _MyVerySimpleClass Members
        //Explicit implementation is better because it avoids messing your .NET
        //class specification. Sometimes when you expose thru COM you can have problem with
        //methods overloads. For example you have to have the same method name but differente
        //return type. Or you have a collition with an existing member.
        int _MyVerySimpleClass.GetMyLuckyNumber()
        {
            return GetMyLuckyNumber();
        }

        #endregion
    }
And your TLB is now explicit and exposes ONLY what you really really want.
// Generated .IDL file (by the OLE/COM Object Viewer)
//
// typelib filename: <could not determine filename>
[
uuid(370E4AD4-073B-4984-8C7D-5ED027F7B1CA),
version(1.0)
]
library ClassLibrary1
{
// TLib : // TLib : mscorlib.dll : {BED7F4EA-1A96-11D2-8F08-00A0C9A6186D}
importlib("mscorlib.tlb");
// TLib : OLE Automation : {00020430-0000-0000-C000-000000000046}
importlib("stdole2.tlb");
// Forward declare all types defined in this typelib
interface _MyVerySimpleClass;
[
odl,
uuid(80D00C45-EE10-3D65-A5FF-42AB7D8F8A71),
version(1.0),
dual,
oleautomation,
custom({0F21F359-AB84-41E8-9A78-36D110E6D2F9}, "InteropExamples._MyVerySimpleClass")
]
interface _MyVerySimpleClass : IDispatch {
[id(0x60020000)]
HRESULT GetMyLuckyNumber([out, retval] long* pRetVal);
};
[
uuid(029D468C-8BE6-498F-8A57-3B4B0306BA41),
version(1.0),
custom({0F21F359-AB84-41E8-9A78-36D110E6D2F9}, "InteropExamples.MyVerySimpleClass")
]
coclass MyVerySimpleClass {
interface _Object;
[default] interface _MyVerySimpleClass;
};
};
For more info about BinaryCompatibility see my other posts on Interop.
I love sharepoint and it is very nice and cool. We use it a lot to share information with our clients. But every know and then when I try to open or check out a document IE just crashes.
So I got tired of it and decided to put an end to that annoyance. I pointed my browser to google and found the: http://www.groovypost.com/howto/microsoft/ie/fix-ie-crash-when-opening-documents-in-sharepoint/ This post recommends running the Microsoft Office Diagnostics Tools and it really works.
If you cannot find your Diagnostics Tools use this page: http://office.microsoft.com/en-us/help/HA012340761033.aspx
Sometimes when you do a migration, you still need to “Interop” with legacy applications.
Normally this interop is done thru COM and .NET assemblies can be easily registered with COM.
However the devil is in the details, and there are always subtle details that can be difficult to tackle with
COM Interop.
One of those subtle details is that the tlbexp tool (this is the tool that generates the .tlb for a .NET assembly)
generates a prefix for enum elements.
So if you have something in C# like:
using System;
using System.Runtime.InteropServices;

namespace ClassLibrary1
{
    [ComVisible(true)]
    public enum simpleEnum
    {
     Field1 = 1,
     Field2 = 2,
     Field3 = 3,
     Field4 = 4,
     Field5 = 5
    } ;

}
Sadly that would generate a COM Interface like:
// Generated .IDL file (by the OLE/COM Object Viewer)
//
// typelib filename: <could not determine filename>

[
  uuid(D3DB73ED-08B3-4E2F-AD20-61E44E3FDF17),
  version(1.0)
]
library ClassLibrary1
{
    // TLib :     // Forward declare all types defined in this typelib

    typedef [uuid(9D2C80FF-C124-33D2-9991-676A18DA7CAF), version(1.0)    ,
    custom({0F21F359-AB84-41E8-9A78-36D110E6D2F9}, "ClassLibrary1.simpleEnum")
]
    enum {
        simpleEnum_Field1 = 1,
        simpleEnum_Field2 = 2,
        simpleEnum_Field3 = 3,
        simpleEnum_Field4 = 4,
        simpleEnum_Field5 = 5,
    } simpleEnum;
};
And the problem with that is that your legacy programs are expecting something like:
enum { Field1 = 1, Field2 = 2, Field3 = 3, Field4 = 4, Field5 = 5, } simpleEnum;
Is there a way to solve this?
Well yes there is but it is not a nice one. You have to:
- take the tlb that the tlbexp tool generates,
- generate an .idl file from it
- modify the .idl to correct its syntax
- change the name of the enum fields
- compile the .idl file to tlb with the midl compiler
- use the generated tlb with the legacy application.
Lets see an example. Suppose we have something like:
using System;
using System.Runtime.InteropServices;
using System.Windows.Forms;

namespace ClassLibrary1
{
    [ComVisible(true)]

    public enum simpleEnum
    {
     Field1 = 1,
     Field2 = 2,
     Field3 = 3,
     Field4 = 4,
     Field5 = 5
    } ;

    [ComVisible(true)]
    [ClassInterface(ClassInterfaceType.AutoDual)]
    public class Class1
    {
        public void foo(simpleEnum val)
        {
            switch(val)
            {
                case simpleEnum.Field1:
                    MessageBox.Show("FieldValue1");
                    break;
                case simpleEnum.Field2:
                    MessageBox.Show("FieldValue2");
                    break;
                case simpleEnum.Field3:
                    MessageBox.Show("FieldValue3");
                    break;
                case simpleEnum.Field4:
                    MessageBox.Show("FieldValue4");
                    break;
                case simpleEnum.Field5:
                    MessageBox.Show("FieldValue5");
                    break;
            }
        }
    };

}
When you open that generated IDL with the OLE2VIEW tool:
// Generated .IDL file (by the OLE/COM Object Viewer)
//
// typelib filename: <could not determine filename>

[
  uuid(D3DB73ED-08B3-4E2F-AD20-61E44E3FDF17),
  version(1.0)
]
library ClassLibrary1
{
    // TLib :     // TLib : mscorlib.dll : {BED7F4EA-1A96-11D2-8F08-00A0C9A6186D}
    importlib("mscorlib.tlb");
    // TLib : OLE Automation : {00020430-0000-0000-C000-000000000046}
    importlib("stdole2.tlb");

    // Forward declare all types defined in this typelib
    interface _Class1;

    typedef [uuid(4087FBAF-9633-30D1-8A64-533E37B784B6), version(1.0)    ,
    custom({0F21F359-AB84-41E8-9A78-36D110E6D2F9}, "ClassLibrary1.simpleEnum")
]
    enum {
        simpleEnum_Field1 = 1,
        simpleEnum_Field2 = 2,
        simpleEnum_Field3 = 3,
        simpleEnum_Field4 = 4,
        simpleEnum_Field5 = 5
    } simpleEnum;

    [
      uuid(0D39F056-DF63-3860-9E79-B57F6358FD4D),
      version(1.0),
        custom({0F21F359-AB84-41E8-9A78-36D110E6D2F9}, "ClassLibrary1.Class1")
    ]
    coclass Class1 {
        [default] interface _Class1;
        interface _Object;
    };

    [
      odl,
      uuid(1A87868B-7CE6-3C75-B2FA-71A86F77FC7D),
      hidden,
      dual,
      nonextensible,
      oleautomation,
        custom({0F21F359-AB84-41E8-9A78-36D110E6D2F9}, "ClassLibrary1.Class1")

    ]
    interface _Class1 : IDispatch {
        [id(00000000), propget,
            custom({54FC8F55-38DE-4703-9C4E-250351302B1C}, "1")]
        HRESULT ToString([out, retval] BSTR* pRetVal);
        [id(0x60020001)]
        HRESULT Equals(
                        [in] VARIANT obj,
                        [out, retval] VARIANT_BOOL* pRetVal);
        [id(0x60020002)]
        HRESULT GetHashCode([out, retval] long* pRetVal);
        [id(0x60020003)]
        HRESULT GetType([out, retval] _Type** pRetVal);
        [id(0x60020004)]
        HRESULT foo([in] simpleEnum val);
    };
};
When you use this tlb for example in VB6 look at the member names for the enum:

If you want to be able to use your enum fields unchanged then this is the modified IDL you will have to use. The OLE2View Tool adds an extra “{“ to the IDL custom attribute and the enum name must be put after the enum keyword.
// Generated .IDL file (by the OLE/COM Object Viewer)
//
// typelib filename: <could not determine filename>

[
  uuid(D3DB73ED-08B3-4E2F-AD20-61E44E3FDF17),
  version(1.0)
]
library ClassLibrary1
{
    // TLib :     // TLib : mscorlib.dll : {BED7F4EA-1A96-11D2-8F08-00A0C9A6186D}
    importlib("mscorlib.tlb");
    // TLib : OLE Automation : {00020430-0000-0000-C000-000000000046}
    importlib("stdole2.tlb");

    // Forward declare all types defined in this typelib
    interface _Class1;

    typedef [uuid(4087FBAF-9633-30D1-8A64-533E37B784B6), version(1.0)    ,
    custom(0F21F359-AB84-41E8-9A78-36D110E6D2F9, "ClassLibrary1.simpleEnum")
]
    enum simpleEnum {
        Field1 = 1,
        Field2 = 2,
        Field3 = 3,
        Field4 = 4,
        Field5 = 5
    } simpleEnum;

    [
      uuid(0D39F056-DF63-3860-9E79-B57F6358FD4D),
      version(1.0),
        custom(0F21F359-AB84-41E8-9A78-36D110E6D2F9, "ClassLibrary1.Class1")
    ]
    coclass Class1 {
        [default] interface _Class1;
        interface _Object;
    };

    [
      odl,
      uuid(1A87868B-7CE6-3C75-B2FA-71A86F77FC7D),
      hidden,
      dual,
      nonextensible,
      oleautomation,
        custom(0F21F359-AB84-41E8-9A78-36D110E6D2F9, "ClassLibrary1.Class1")

    ]
    interface _Class1 : IDispatch {
        [id(00000000), propget,
            custom(54FC8F55-38DE-4703-9C4E-250351302B1C, "1")]
        HRESULT ToString([out, retval] BSTR* pRetVal);
        [id(0x60020001)]
        HRESULT Equals(
                        [in] VARIANT obj,
                        [out, retval] VARIANT_BOOL* pRetVal);
        [id(0x60020002)]
        HRESULT GetHashCode([out, retval] long* pRetVal);
        [id(0x60020003)]
        HRESULT GetType([out, retval] _Type** pRetVal);
        [id(0x60020004)]
        HRESULT foo([in] simpleEnum val);
    };
};
Save the modified .idl file as ClassLibrary1.dll and run a command like:
midl ClassLibrary1.idl /tlb ClassLibrary1_new.tlb
and then register the new tlb with:
regtlib ClassLibrary1_new.tlb
NOTE: I you cannot find the regtlib tool you can look for it at: %windir%\Microsoft.NET\Framework\v2.0.50727 it will be there with the name regtlibv12.zip. If you still cannot find it, download it from HERE
Microsoft has decided that .hlp files are not the best option for your help files.
And you will probably receive an error message like: http://support.microsoft.com/kb/917607
If you still want to run your .hlp help files you still can look for a WinHelp viewer for Vista from Microsoft.
But as someone that has been in the application migration/upgrade bussiness for several year I think automatic migration is a very good option.
For example take a look at the following links:
Good luck! And If you had any other suggestions just leave a comment.
When a VB6 COM+ Component is migrated to a ServiceComponent,
you might want to take advantage of the Configuration files of .NET to specify your
connection strings and other important information.
So where should your App.Config go.
There is a slight diference with a ServiceComponent.
Remember that for a ServicedComponent the hosting process is ‘dllhost.exe’.
So your programs will look for config files in %windir%\System32, which is not a very nice solution.
You can instead set the ‘Application Base Directory’ of the COM+ Application.
Follow these steps:
1) Create an application.manifest file and copy it to the directory
that will be used as the base directory for the COM+ application. The file can be like:
<?xml version="1.0" encoding="UTF-8" standalone="yes"?>
<assembly xmlns="urn:schemas-microsoft-com:asm.v1" manifestVersion="1.0"/>
2) Create an app.config file and copy that file to the same :
<?xml version="1.0" encoding="utf-8" ?>
<configuration>
<appSettings>
  <add key="ConfigData" value="My Custom AppSetting!" />
</appSettings>
</configuration>
3) Configure the COM+ Application:
3.1) Open the Component Services MMC
3.2) Find the COM+ Application
3.3) Right Click the Application and go to Properties and Activation Tab
3.4) Find option: ‘Application Root Directory’
3.5) Write the path where the other two files where created.
This blog post was created from an original Blog Post from HeikkiRi.
Today, as part of the Visual Studio 2010 launch, Microsoft published a video of my coworker, Esteban Brenes, doing a brief demo of the latest beta of the Visual Basic Upgrade Companion 4.0. In this video, version 4.0 of the VBUC is used to generate code that works correctly with Visual Studio 2010. This is part of the VSIP Partners CAN DO! series of videos, which can be seen in this link.
Watch the video: VSIP Partners CAN DO! | ArtinSoft Visual Basic Upgrade Companion
I am proud to announce that today ArtinSoft released version 4.0 Beta of its flagship product the Visual Basic Upgrade Companion.
This new release once more collects our learnings from migrating millions and millions of lines of code from Visual Basic 6 to VB.NET and C#.
This release revolves around a number of themes:
1) Visual Studio 2010 compatibility: You can now use the VBUC to create projects that are compatible with Visual Studio 2010.
2) Take advantage of new framework features: The code generated by the VBUC now takes advange of some advanced features of the .NET Framework to improve the quality of the code avoiding dependencies to any third party runtime.
3) Compatibility with Windows 7 and 64 bits system: The platform is evolving and the VBUC is evolving along with it. Now the VBUC is compatible with Win XP, Vista and 7 on both 32 and 64 bits systems.
4) Impoved usability: We are trying to minimize the learning curve to start a VB migration project. There will be even more changes in this theme for the next release. (I am specially excited about this!)
Please read our official press release, learn the specifics of version 4.0 or give it a try!
You can also watch a video demo on the Microsoft site channel 9: http://channel9.msdn.com/posts/VSIPMarketing/VSIP-Partners-CAN-DO--ArtinSoft-Visual-Basic-Upgrade-Companion/
We are very happy to announce the Visual Basic Upgrade Companion 4.0 Beta. You can now download a trial from the Trial Request page. While we complete beta testing, we’ll have both version 3.0 (current release version) and the 4.0 Beta available for download. If you have the chance, we would really appreciate it if you could download the beta, and send us any feedback either through ArtinSoft’s regular support email (support@artinsoft.com) or through my blog Contact Form.
This new version contains a large number of improvements over version 3.0, including:
- Increased productivity for migration projects, with features such as improved conversion of ByRef/ByVal parameters (specially when working with Windows APIs), TypeName/TypeOf support, improved default property conversion, generate code to explicitly release COM objects when required, and hundreds of smaller enhancements and bug fixes that greatly improve the conversion of VB6.0 code.
- Improved the user experience by adding localization/internationalization for German and Japanese and completely redesigned the installation and license process. Installing a license is now a straightforward process (no more copying files!!), and it is now possible to install and execute the VBUC on both 32- and 64-bit versions of Windows Vista and Windows 7, as well as 32-bit Windows XP. The installation requirements were also greatly simplified, so you don’t need Visual Studio installed to install the VBUC (though it is still recommended).
You can now also select the target version of Visual Studio to generate the appropriate Solution file (*.sln). The VBUC can generate Visual Studio Solutions for version 2005, 2008 and 2010.
- Enhanced Grid migration, by mapping the Microsoft Flexgrid and APEX/ComponentOne TrueDBGrid to a grid that extends the native .NET DataGridView. It will no longer be required to purchase a third-party grid solution when moving from these grid to .NET if you wish to move to 100% native .NET code without using COM Interop.
- Improved assessment capabilities, by improving the accuracy of the VBUC Assessment Mode and making additional changes so members without specific mappings are tagged with an EWIs – in the past only members that were explicitly tagged as “Not Mapped” had an EWI.
You can read more details on the new features of version 4.0 in this page: What’s new in VBUC 4.0? Make sure you try out these new features by downloading a trial.
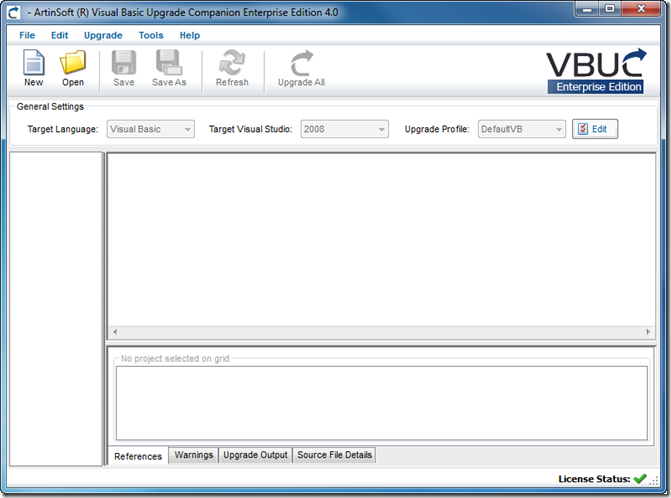 Visual Basic Upgrade Companion 4.0 User Interface. You can now select the target version of Visual Studio,
and also note the license icon at the bottom of the window.
AutoCAD 2010 will not be supporting VBA.
Quoting
“If you utilize VBA macros in your work environment, they will no longer work unless the VBA module is installed on your system. “
“When you run a command that requires VBA, a message dialog box will be displayed stating that VBA is no longer installed with AutoCAD and directing you to a website where you can download the VBA module. “
And also you can see that Autodesk states: “Autodesk is evaluating how long VBA will be supported in Autodesk products in the future. Though supported in the AutoCAD 2010-based products, it may or may not be supported in future releases. Therefore, it is strongly recommended that VB developers develop all new code using VB .NET.”
VBA does not support 64bit systems in a native way.
But If you want some advice from the VB migration experts or help on your migration project from VBA to VB.NET or C# you can us contact Artinsoft Migration Services.
We build the VB Upgrade Wizard that shipped with Visual Studio and have been doing VB migrations for years.
In it March issue, Visual Studio Magazine published an in-depth article about legacy migrations called “Unlocking Legacy Code”. This article talks about the challenges faced by companies migrating from Visual Basic 6.0 to .NET, the drivers behind these migrations and the pros and cons of using an automated migration solution.
The article uses BEMAS Software as a case study for successful migration products. I am incredibly happy they are doing as well as they are with the conversion – they are using our tools, and I visited BEMAS about a year and a half ago to train them on the VBUC and help them plan the migration project. I remember they had a lot of conditional statements (by “a lot”, we are talking thousands of different combinations), as mentioned in the article:
"We also ran into some issues with the conversion tool because early on in the VB code we did a lot of #ifs, which means that the code acts differently depending on how you compile it," Pownall adds. BEMAS worked with ArtinSoft so that VBUC would recognize those instances and convert the code correctly.
It was quite a challenge to get it to convert, since the default behavior of the VBUC is to convert the code inside the conditional statement that evaluates to “TRUE”. Commenting out the conditionals wasn’t going to work either, since that would cause multiple variable declarations and other semantic errors that caused issues during the migration of this particular code. In the end we worked together with BEMAS, and with heavy involvement of the VBUC development team, we managed to modify the tool enough to get the code converted correctly.
Another very interesting item mentioned by Steve Pownall in the article, that I want to talk about some more, is the fact that even though the code came through very cleanly, it didn’t have the .NET architecture they were aiming for so they had to “The dev team had to massage or opted to rewrite the rest of the codebase manually in C# and .NET 3.5 using VS2008.”. This is a very important point, since the overall architecture of the code will remain as it was in VB6.0. The migration, however, gets you quickly to a stable .NET codebase that you can then rework to make it take advantage of the latest features of the .NET Framework. In our experience, this path (migrate, then enhance) is the one with the lowest risk, and it allows you to reduce the time to market for your applications by a wide margin. This is important to keep in mind, since we, as developers, always want to improve the code base – it is part of our professional formation, and I would say, part of our nature – but we sometimes fail to grasp the additional risk this implies. The migration is very controlled process, that gets you predictable results in a short time. Enhancing the application after the migration may seem like duplicating work (and indeed, there are enhancements that can be done during the migration process) but it guarantees that you will get a .NET in the allocated timeframe and budget, not to mention the cost advantage.
Read the complete article, Unlocking Legacy Code at Visual Studio Magazine.
One very common requirement for migration projects is to adapt certain error handling patterns used in a customer’s Visual Basic 6.0 code to the structured error handling provided by .NET, cleaning up the code, improving its maintainability, and, whenever possible, complying with .NET best practices.
The VBUC already converts several commonly used error handling patterns, such as the ones described in this old post. There are, however, situations where the VBUC is not able to recognize a pattern. these usually involve Goto statements, On Error Resume Next, Resume Next or some other construct usually associated with “spaghetti code”. When one of these patterns is encountered, the VBUC does a very basic transformation and generates an EWI so it can be cleaned up through manual intervention later on, such as in the following example:
|
Visual Basic 6.0 Code |
.NET Code |
Private Function <NAME>(<PARAMS>) As <TYPE>
  Const MethodName As String = "<NAME>"
       On Error GoTo ErrorLabel
       <STATEMENTS 1>
       On Error GoTo <LABEL>
       <STATEMENTS 2>
  CleanUp:
       <STATEMENTS 3>
       Exit Function

  <LABEL>:
       <STATEMENTS 4>
       LogError(MethodName)
       Err.Raise 16, , MethodName

   ErrorLabel:
       <STATEMENTS 5>
       LogError(MethodName)
       Err.Raise Err.Number, , MethodName

End Function
|
private <TYPE> <NAME>()
{

const string MethodName = "<NAME>";
//UPGRADE_TODO: (1065)
         Error handling statement
         (On Error Goto) could not be converted.
         More Information:
         http://www.vbtonet.com/ewis/ewi1065.aspx
   NotUpgradedHelper.NotifyNotUpgradedElement(
      "On Error Goto Label (ErrorLabel)");

<STATEMENTS 1>
try
{
       <STATEMENTS 2>
       <STATEMENTS 3>
       return result;
}
catch (Exception ex)
{
       <STATEMENTS 4>
       LogError(MethodName);
       throw new System.Exception(
              ((int) 16).ToString() +
              ", " + String.Empty +
              ", " + MethodName);

ErrorLabel:
       <STATEMENTS 5>
       //UPGRADE_WARNING: (2081)
         Err.Number has a new behavior.
         More Information:
         http://www.vbtonet.com/ewis/ewi2081.aspx
       LogError(MethodName);
       throw new System.Exception(
              Information.Err().Number.ToString() +
              ", " + String.Empty +
              ", " + MethodName);
       return result;
}
} |
Most of the time it is possible to generate a solution that will correctly convert the error handling pattern, maintaining functional equivalence and meeting any additional coding guidelines from our customers. For the previous example, The VBUC can be customized so the generated code looks as follows:
try
{
       try
       {
              <STATEMENTS 1>
       }
       catch (Exception ex){
              <STATEMENTS 5>
              throw;
       }
       try
       {
              <STATEMENTS 2>
       }
       catch (Exception <LABEL>Ex)
       {
              <STATEMENTS 4>
              <LABEL>Ex.Data.Add("ERROR",16);
              throw;
       }
}
finally
{
       <STATEMENTS 3>
}
This example makes some assumptions on the nature of the code and on the intention of the original VB6.0 developer, in particular:
- Errors raised by <STATEMENTS 1> should be handled by <STATEMENTS 5>
- Errors raised by <STATEMENTS 2> should be handled by <STATEMENTS 4>
- <STATEMENTS 3> is cleanup code that should always be executed
- The Exception needs to be thrown again without loosing any information
This is just an example, but the intention is to show what type of customizations can be done. The VBUC transformation engine is very powerful, and, as long as a pattern can be identified, can help you automate the solution to most VB6.0 problems.
During a migration from a FlexGrid to a DataGridView, we encountered a situation where the HorizontalScrollBar did not show.
I found many suggestions like setting a MinimumColWidth value for all columns, etc.
But it wasn’t until my friend Jesus added a line like:
mygrid.DockStyle = DockStyle.Fill
that the HorizontalScrollBar appear.
It might just be that the grid was too big for form but just for the record this is a possible solution.
The LINC/EAE migration tool can automatically generate reports that can be used to extract your data from DMSII to your target database, for example Oracle.
In this scenarios the Oracle SQL Loader tool is used. However you might problems loading the data because the string values can contain the same characters you are using to enclose them.
Let’s see an example, taken from an oracle forum:
C:\ora>type buyer.ctl
LOAD DATA
INFILE 'buyer.data'
truncate into table BUYER
FIELDS TERMINATED BY ',' optionally enclosed by '"' TRAILING NULLCOLS
(
buyer_code,
BUYER_NAME
)
And suppose you have data like:
1,"XYZ IND"
2,"ABC"
3,"XYZ ABC"
4,"Your "offspring""
5,"ATUL"
How can you “escape” the enclosing characters. Well I found the answer in another forum:
If two delimiter characters are encountered next to each other, a single occurrence of the delimiter character is used in the data value. For example, 'DON''T' is stored as DON'T. However, if the field consists of just two delimiter characters, its value is null.
So just use something like:
1,"XYZ IND"
2,"ABC"
3,"XYZ ABC"
4,"Your ""offspring"""
5,"ATUL"
Back when it was first announced I made a couple of posts about Windows 7 XP Mode (available here and here). Now that I’ve been using almost every day for the past few months, I wanted to revisit the topic and write about my hands-on impressions. In this post I’ll show how applications that run under XP Mode integrate with the regular Windows 7 environment.
The integration features of XP Mode work really well, for the most part. Applications installed in the Virtual Machine appear right there on the Start Menu:
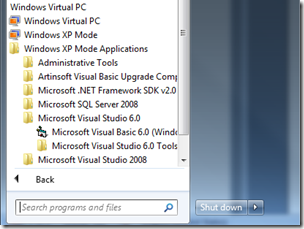
The Start menu gains a “Windows XP Mode Applications” folder under “Windows Virtual PC”,
which holds all apps installed in the XP Mode virtual machine (click picture to enlarge)
And even show up when searching, which is extremely convenient.
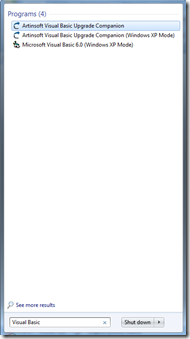
The Quick Search functionality of the Start menu covers
XP Mode Applications. (click picture to enlarge)
When you launch applications, Windows starts up the XP Mode virtual machine behind the scenes, showing a progress toolbar instead of XP’s boot up sequence.
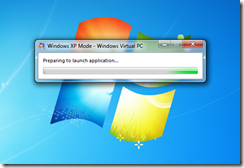
Windows XP Mode virtual machine startup. Notice it is running under
Windows Virtual PC. (click picture to enlarge)
Once the application starts up, you’ll notice it is running on XP Mode since the UI uses XP’s windows, instead of Aero:
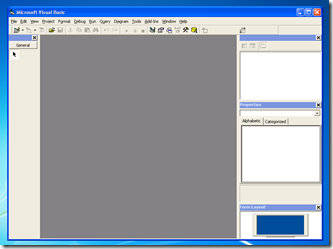
Visual Basic 6.0 on XP mode, complete with default Windows XP “Luna” theme. (click picture to enlarge)
The following screenshot shows this more clearly, by contrasting the Visual Basic 6.0 IDE running under XP Mode and Visual Studio 2008 running directly on the Windows 7 desktop.:

Visual Basic 6.0 on XP mode (Luna theme) vs. Visual Studio 2008
on Windows 7 (Aero Glass theme). (click picture to enlarge)
Another VERY NICE feature is that the "My Documents” folder is transparently mapped to Windows 7’s “Documents” library:
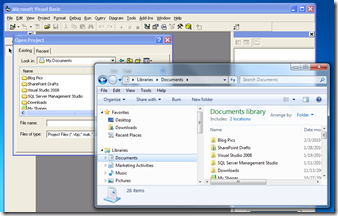
Visual Basic 6.0 on XP mode Open Project dialog showing the My Documents folder.
Notice the same contents on the Documents library in Windows 7. (click picture to enlarge)
These integration features of XP Mode make life much easier for legacy applications, but it is far from perfect. In the next post I’ll mention the annoyances I’ve run into while working with XP Mode.
Linc\EAE used profiles for their queries. Well the profile information is used by our migration tool to generate indexes.
In Java is easy to intercept all SQL statements used by the translated application and analyze them.
To analyse how a query is executed you have to study its explain plan. For go here an excellent guide on EXPLAIN PLAN.
After you read that page, you will find useful the following function, that will shorten the lines that you have to type to see the explain plan:
create OR REPLACE function  ShowPlan return sys_refcursor
  as
      c_test sys_refcursor;
BEGIN
  open c_test for select
  substr (lpad(' ', level-1) || operation || ' (' || options || ')',1,30 ) "Operation",
  object_name "Object"
  from
  sys.plan_table$ start with id = 0 connect by prior id=parent_id;
  return c_test;
END;
SQL>
explain plan for select * from MY_TABLE
SQL> variable rc refcursor
SQL> exec :rc := testfunc()

PL/SQL procedure successfully completed.

SQL> print rc
Operation                      Object
------------------------------ ------------------------------
SELECT STATEMENT ()
 TABLE ACCESS (FULL)           MY_TABLE
When we migrate from LINC/EAE to Oracle, the migration tool generates an schema an tables form the original ISPECS.
I came across with the problem that I had been playing around with a test database and I didn’t know who was the owner of the table.
Well just as a reminder this is what is needed:
select owner, table_name, tablespace_name from dba_tables where table_name='YOUR_TABLE';
This will return something as:
OWNER TABLE_NAME TABLESPACE_NAME
------------------------------ ------------------------ ------------------------------
THE_OWNER MY_TABLE USERS
If you have to write stored procedures for oracle is important
to notice which Java version is supported by your Oracle Database,
A common technique is create a JAVA stored procedure for that:
1. Create a function with an ORACLE SQL statement like:
CREATE OR REPLACE FUNCTION getJavaProperty(myprop IN VARCHAR2)
RETURN VARCHAR2 IS LANGUAGE JAVA
name ‘java.lang.System.getProperty(java.lang.String) return java.lang.String’;
2. Once you created the function you can use it to get the version:
SELECT getJavaProperty(‘java.version’) from dual;
You can see in the attached version that for my Oracle Database 10.1.0.4.2 the Java version is 1.4.2_04 :)

As I developer I usually receive emails with .zip attachments and .xml attachments. When I’m looking for an old email I hate that I have to open the attachment just to see if it has the files I’m looking.

Why isn’t there a built-in preview functionality for .xml and .ZIP files?
So I thought, I’m a developer I can build one. And I found an excellent article about the File Previewers in Outlook 2007 and Windows 7 by Stephen Toub.
I just updated the project files to VS 2008 and removed the dependencies to VJ# replacing them by the SharpZipLib library.

And it works well and does not require you to install anything else!
Below you can see an example of Zip File preview

And and example of XML File Preview

I think is an excellent article and I can know write my own previewers every time I need them.
Download the code from CODE HERE
Download the installer from INSTALLER HERE
A while ago I wrote about the decision that many people face when
starting to consider a migration from Visual Basic 6.0 to the .NET
platform: choosing the target language, mainly between VB.NET and C#. Today I found a great post by John Fuex
on that subject, not inciting the war between both trenches but instead
describing the process he and his company went through to solve the C# versus .NET dilemma.
He basically used the following criteria to qualify each language:
Functionality, Learning Curve, Existing Code, Developer Preferences,
“Street Cred” (for both the developers and products), and Recruiting.
But in the end it reinforces the notion that there’s not a standard
solution, so the selection should always be made case by case.
You can read the whole post here.
I was recently trying to get the exact width of a string. And I found that the Graphics.MeasureString does not give an exact result.
I finally found Pierre Arnaud
post in Code Project, which gave me a good explaination and solution of what was happening.
You can see in the image Pierre put in his post:

That Graphics.measurestring will return a size that might be bigger that the actual drawn size, this is due some GDI+ details that he explains in that post.
I really like the second proposed solution:
static public int MeasureDisplayStringWidth(Graphics graphics, string text,Font font)
{
System.Drawing.StringFormat format = new System.Drawing.StringFormat ();
System.Drawing.RectangleF rect = new System.Drawing.RectangleF(0, 0,1000, 1000);
System.Drawing.CharacterRange[] ranges = { new System.Drawing.CharacterRange(0, text.Length) };
System.Drawing.Region[] regions = new System.Drawing.Region[1];
format.SetMeasurableCharacterRanges (ranges);
regions = graphics.MeasureCharacterRanges (text, font, rect, format);
rect = regions[0].GetBounds (graphics);
return (int)(rect.Right + 1.0f);
}