Microsoft announced that they won’t support the System.Data.OracleClient anymore :(
The message says that it will still be available in .NET 4.0 but “deprecated” and that it wont impact existing applicatoions.
So what are my options?
Well you have to go to a third party. Not now but eventually.
Oracle Data Provider for .NET (ODP.NET) (Oracle states that ODP.NET is Free)
DataDirect ADO.NET Provider for Oracle
dotConnect for Oracle
Migration to ODP.NET
Installation
Microsoft OracleClient to ODP.NET Application Migration: Code Migration
Oracle provide general instructions. In summary you need to:
- Add the references to Oracle.DataAccess
- Change namespaces: System.Data.OracleClient by Oracle.DataAccess.Client; and maybe add “using Oracle.DataAccess.Types”
- Update the connection String (most attributes are the same). Change Integrated Security by "User Id=/", change “Server” attribute to “Data Source” and remove Unicode
- The following is anoying but you have to add after all OracleCommands something like OracleCommand1.BindByName = true;
Deployment
- Oracle Universal Installer (either in normal installation or Silent Install)
- XCopy (I like this :) ) just remember to download the ODAC xcopy version
Recently an user of the ExtendedBrowser v2 commented that he needed access to the NewWindow3 event.
The NewWindow3 event is raised when a new window is to be created. It extends NewWindow2 with additional information about the new window.
Syntax
Private Sub object_NewWindow3( _
	ByRef ppDisp As Object, _
	ByRef Cancel As Boolean, _
	ByVal dwFlags As Long, _
	ByVal bstrUrlContext As String, _
	ByVal bstrUrl As String)
Parameters
object Object expression that resolves to the objects in the Applies To list. ppDisp Object expression that, optionally, receives a new, hidden WebBrowser or InternetExplorer object with no URL loaded. Cancel A Boolean value that determines whether the current navigation should be canceled. true Cancel the navigation. false Do not cancel the navigation. dwFlags The flags from the NWMFenumeration that pertain to the new window.
typedef enum NWMF
{
NWMF_UNLOADING = 0x00000001,
NWMF_USERINITED = 0x00000002,
NWMF_FIRST = 0x00000004,
NWMF_OVERRIDEKEY = 0x00000008,
NWMF_SHOWHELP = 0x00000010,
NWMF_HTMLDIALOG = 0x00000020,
NWMF_FROMDIALOGCHILD = 0x00000040,
NWMF_USERREQUESTED = 0x00000080,
NWMF_USERALLOWED = 0x00000100,
NWMF_FORCEWINDOW = 0x00010000,
NWMF_FORCETAB = 0x00020000,
NWMF_SUGGESTWINDOW = 0x00040000,
NWMF_SUGGESTTAB = 0x00080000,
NWMF_INACTIVETAB = 0x00100000
} NWMF;
bstrUrlContext The URL of the page that is opening the new window. bstrUrlThe URL that is opened in the new window.
Please notice:
Note The NewWindow3 event is only fired when a new instance of Internet Explorer is about to be created. Calling showModalDialog or showModelessDialog does not trigger an event because they are not new instances of Internet Explorer. They are implemented as MSHTML host windows, which allows them to render and display HTML content but not hyperlinks between documents.
You can download from here
DOWNLOAD CODE HERE v3_1
ExtendedBrowserExampleVBNET.zip (92.56 kb)
Next Monday, August 17, I will be presenting a Webinar along with Microsoft for the Latin America region on how you can use several options to get your VB6.0 applications to run on Windows 7 AND get the Windows 7 logo. The webinar will be in Spanish, and covers the business reasons for the migration, the benefits of using in the .NET Framework, alternatives, and information (+demo) of the VBUC.
Here’s the link so you can register for the Webinar:
Actualiza tus apliaciones y consigue el logo de Windows 7
Fecha: 17 de agosto 05:00 p.m. Ciudad de México
Register for the Webinar
A quick post to let everybody know that you can now follow us on twitter. To do so, you just need to follow @artinsoft, or add “artinsoft” in your favorite Twitter client. In this account we are posting news and articles related to software migrations, and you can also use it to communicate directly with us in case you have any question or want to give us any feedback.
ArtinSoft Twitter page
We just posted a new case study about how an Italian company, Wolters Kluwer Italia, managed to successfully migrate its flagship Accounting and Financial services product from VB6.0 to Visual Basic .NET, using a customized version of the Visual Basic Upgrade Companion.
This Wolters Kluwer is a case where the VBUC customizations performed by ArtinSoft helped them achieve two very important goals: first, to radically speed up the overall migration project, by having the VBUC do particular transformations that otherwise would have required manual changes, and second, to meet very specific requirements for the migration, such as using having the VBUC generate .NET code that used their own controls, do additional refactoring to the code, and other architectural customizations made possible by the VBUC engine.
Read the case study: Wolters Kluwer licenses the Visual Basic Upgrade Companion to quickly and cost-effectively modernize its flagship Accounting/Fiscal software product
Using ArtinSoft’s
powerful VB to .NET migration tool to convert their 3,000,000 lines of code
Sistema Professionista to VB.NET, Wolters Kluwer Italia saved 2 years of work,
while increasing developer productivity and ensuring continued application evolution.
Based in Milan, Italy,
IPSOA is part of Wolters Kluwer, a leading global information services and
publishing company. Their Accounting/Fiscal client/server system was a suite of
applications developed in Microsoft Visual Basic 6.0 that required deployment
on a per-customer basis, using an installer for each workstation. IPSOA
required a more sophisticated deployment approach for its thousands of clients,
plus ensuring continued support from Microsoft and application evolution while
maintaining the current architecture, so they licensed ArtinSoft’s Visual Basic Upgrade
Companion to migrate the flagship application to VB.NET. ArtinSoft’s VB to .NET migration product was
able to comply with very explicit requirements, like using COM Interoperability
to interact with the libraries and controls used in the original system,
mapping of the Datafield property of some controls to a new generated class,
precise solutions for the conversion of the Recordset Source Property, While
statement, Redim and Control Arrays, and implementing support for additional
third-party controls
Through a phased
upgrade approach recommended by ArtinSoft, the customer was able to reduce even
further the risk and amount of allocated resources on the migration project,
while keeping in parallel the development and maintenance of the VB 6.0 code.
Overall, the migration to the .NET platform will strengthen the technological
advantage over competing products and will open the possibilities for quick
application enhancement, with highly increased developer productivity.
As Roberto Fusè, lead resource at IPSOA for the VB migration project said, “ArtinSoft is a qualified company that has
made of the intelligent automation one of its prerogatives of core business. By
using the Visual Basic Upgrade Companion, IPSOA was able to save 2 years of
work, receiving from ArtinSoft’s the support necessary to customize the tool, which
allowed the evolution of the product using the features of Microsoft’s .NET
Framework and the new development tools”.
Read
the complete Wolters Kluwer Italia VB to .NET migration case study.
One question commonly asked by our customers is how both duplicate (same file copied in several projects) and shared files (one copy of the file referenced from multiple projects) are counted. If you create a migration solution using the VBUC, it counts the lines of code in a project (Lines column):

This number displayed in the VBUC includes all the lines of code from files referenced in the *.vbp project. This means that it counts shared files and duplicate files each time they appear. This may increase the final amount of lines of code of the total solution. If you do need to find out the number of lines of code counting these files once, we offer you two options:
The first one is to download and run our new Visual Basic 6.0 and ASP Assessment Tool. This brand-new assessment tool considers both Shared and Duplicate files and counts both accordingly in separate columns. As shown in the screenshot below, the Assessment Tool identifies “Potential Duplicates”, which are files that have the same name and the same amount of effective (code + design) lines of code. In practice, they are normally the same file copied over several projects. You should note, however, that there may be small changes that keep the same amount of code (assignments, calls to different functions, etc), so there is no guarantee they are exactly the same. FYI, this was done to speed up the analysis process. In the future we will add additional heuristics to eliminate the possibility of false positives.
The second option is to use the same VBUC, but run a detailed analysis using the “Assessment” option. This can be executed from the main menu by selecting Upgrade->Assessment:
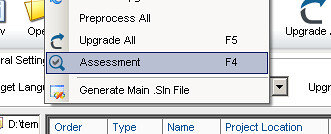
This is a more exhaustive assessment than the one executed by the VB6.0/ASP Assessment Tool, and takes much longer to execute. This assessment will not create an HTML report (like the VB6.0/ASP Assessment Tool), but you can open the detailed line count report produced (Assessment_LOC_Report.xml) using MS Excel 2003 or higher.
We
have partnered with Microsoft to deliver another VB6 to .NET migration webcast
next Tuesday, August 04, 2009 at 11:00 AM Pacific Time (US & Canada). Presented
by Esteban Brenes, Migration Specialist at ArtinSoft,
this 1-hour live presentation addresses concerns about the termination of all
development support for Visual Basic 6 and other business and technical
drivers, providing a detailed explanation on how to move ahead while preserving
the capital invested in applications in the most cost-effective way.
Register now for this free VB migration webcast
We’ve just released a new VB6
and ASP Assessment Tool, which analyzes Visual Basic 6.0 and ASP projects in
order to obtain an inventory of the code, components and their relationships. It
generates a group of HTML and Excel reports that can be used as the basis for
further calculations related to the effort and cost of converting the application
to Visual Basic .NET, C#, and ASP.NET. The tool is free to download,
very simple to install and run, and
you can use the results to obtain a quick
ballpark for a turn-key project performed by ArtinSoft or find out how
much will a license of our Visual Basic Upgrade Companion will cost (use the number of code plus design lines in
both cases).
I was looking for a “.net” way of detecting the CapsLock state, but almost all the references pointed to pinvoke code like:
<DllImport("user32.dll")> _
Public Shared Function GetKeyState(VirtKey As Integer) As Integer
End Sub
And I finally found two ways:
1) You can call methods from the System.Console class:
You can use the System.Console.CapsLock property and if you want the NumLock state use: System.Console.NumberLock
or
2) You can call make an instance of Microsoft.VisualBasic.Devices.Keyboard. (For this if you are in C# you need to add a reference to Microsoft.VisualBasic.dll)
For example:
Microsoft.VisualBasic.Devices.Keyboard key = new Microsoft.VisualBasic.Devices.Keyboard();
and use properties like:
key.CapsLock
key.NumLock
key.ScrollLock
key.ShiftKeyDown
key.CtrlKeyDown
key.AltKeyDown
This post discusses and provides the implementation of a helper class to add support
for printing the formatted contents of a richtextbox control.
The print model in .NET is a little different than one used in VB6.
For example see: http://support.microsoft.com/kb/146022.
Public Sub PrintRTF(RTF As RichTextBox, LeftMarginWidth As Long, _
   TopMarginHeight, RightMarginWidth, BottomMarginHeight)
   Dim LeftOffset As Long, TopOffset As Long
   Dim LeftMargin As Long, TopMargin As Long
   Dim RightMargin As Long, BottomMargin As Long
   Dim fr As FormatRange
   Dim rcDrawTo As Rect
   Dim rcPage As Rect
   Dim TextLength As Long
   Dim NextCharPosition As Long
   Dim r As Long

   ' Start a print job to get a valid Printer.hDC
   Printer.Print Space(1)
   Printer.ScaleMode = vbTwips

   ' Get the offsett to the printable area on the page in twips
   LeftOffset = Printer.ScaleX(GetDeviceCaps(Printer.hdc, _
      PHYSICALOFFSETX), vbPixels, vbTwips)
   TopOffset = Printer.ScaleY(GetDeviceCaps(Printer.hdc, _
      PHYSICALOFFSETY), vbPixels, vbTwips)

   ' Calculate the Left, Top, Right, and Bottom margins
   LeftMargin = LeftMarginWidth - LeftOffset
   TopMargin = TopMarginHeight - TopOffset
   RightMargin = (Printer.Width - RightMarginWidth) - LeftOffset
   BottomMargin = (Printer.Height - BottomMarginHeight) - TopOffset

   ' Set printable area rect
   rcPage.Left = 0
   rcPage.Top = 0
   rcPage.Right = Printer.ScaleWidth
   rcPage.Bottom = Printer.ScaleHeight

   ' Set rect in which to print (relative to printable area)
   rcDrawTo.Left = LeftMargin
   rcDrawTo.Top = TopMargin
   rcDrawTo.Right = RightMargin
   rcDrawTo.Bottom = BottomMargin

   ' Set up the print instructions
   fr.hdc = Printer.hdc   ' Use the same DC for measuring and rendering
   fr.hdcTarget = Printer.hdc  ' Point at printer hDC
   fr.rc = rcDrawTo            ' Indicate the area on page to draw to
   fr.rcPage = rcPage          ' Indicate entire size of page
   fr.chrg.cpMin = 0           ' Indicate start of text through
   fr.chrg.cpMax = -1          ' end of the text

   ' Get length of text in RTF
   TextLength = Len(RTF.Text)

   ' Loop printing each page until done
   Do
      ' Print the page by sending EM_FORMATRANGE message
      NextCharPosition = SendMessage(RTF.hWnd, EM_FORMATRANGE, True, fr)
      If NextCharPosition >= TextLength Then Exit Do  'If done then exit
      fr.chrg.cpMin = NextCharPosition ' Starting position for next page
      Printer.NewPage                  ' Move on to next page
      Printer.Print Space(1) ' Re-initialize hDC
      fr.hdc = Printer.hdc
      fr.hdcTarget = Printer.hdc
   Loop

   ' Commit the print job
   Printer.EndDoc

   ' Allow the RTF to free up memory
   r = SendMessage(RTF.hWnd, EM_FORMATRANGE, False, ByVal CLng(0))
End Sub
The VBCompanion provides excellent helpers that provide a lot fo the VB6 Printer object functionality, so you dont have to change any of your actual code, but in some cases, you might just want to remove that code, specially for very specific things like printing a RichTextBox.
So here I’m providing a .NET simplified helper that allows you to print the contents of a RichTextBox control. This helper is just based on the code published by Martin Muller in http://msdn.microsoft.com/en-us/library/ms996492.aspx. It provides an extension method for VS 2008 user so all you have to do is call RichTextBox.Print.
The implementation is simple. The RichTextBoxPrintHelper creates or receives an instance of a PrintDocument object, and event handlers are added to it for the BeginPrint, PrintPage and EndPrint events.
    private int m_nFirstCharOnPage;

    private void printDocument_BeginPrint(object sender, System.Drawing.Printing.PrintEventArgs e)
    {
        // Start at the beginning of the text
        m_nFirstCharOnPage = 0;
    }

    private void printDocument_PrintPage(object sender, System.Drawing.Printing.PrintPageEventArgs e)
    {
        // To print the boundaries of the current page margins
        // uncomment the next line:
        //e.Graphics.DrawRectangle(System.Drawing.Pens.Blue, e.MarginBounds);

        // make the RichTextBoxEx calculate and render as much text as will
        // fit on the page and remember the last character printed for the
        // beginning of the next page
        m_nFirstCharOnPage = FormatRange(false,
            e,
            m_nFirstCharOnPage,
            control.TextLength);

        // check if there are more pages to print
        if (m_nFirstCharOnPage < control.TextLength)
            e.HasMorePages = true;
        else
            e.HasMorePages = false;
    }

    private void printDocument_EndPrint(object sender, System.Drawing.Printing.PrintEventArgs e)
    {
        // Clean up cached information
        FormatRangeDone();
    }
The FormatRange method is called. This method will use the fill out some structures
with page information and use the RichTextBox handle to send messages that will render
the control contents to the Printer’s HDC.
 /// <summary>
    /// Calculate or render the contents of our RichTextBox for printing
    /// </summary>
    /// <param name="measureOnly">If true, only the calculation is performed,
    /// otherwise the text is rendered as well</param>
    /// <param name="e">The PrintPageEventArgs object from the
    /// PrintPage event</param>
    /// <param name="charFrom">Index of first character to be printed</param>
    /// <param name="charTo">Index of last character to be printed</param>
    /// <returns>(Index of last character that fitted on the
    /// page) + 1</returns>
    public int FormatRange(bool measureOnly, PrintPageEventArgs e,
        int charFrom, int charTo)
    {
        // Specify which characters to print
        STRUCT_CHARRANGE cr;
        cr.cpMin = charFrom;
        cr.cpMax = charTo;

        // Specify the area inside page margins
        STRUCT_RECT rc;
        rc.top = HundredthInchToTwips(e.MarginBounds.Top);
        rc.bottom = HundredthInchToTwips(e.MarginBounds.Bottom);
        rc.left = HundredthInchToTwips(e.MarginBounds.Left);
        rc.right = HundredthInchToTwips(e.MarginBounds.Right);

        // Specify the page area
        STRUCT_RECT rcPage;
        rcPage.top = HundredthInchToTwips(e.PageBounds.Top);
        rcPage.bottom = HundredthInchToTwips(e.PageBounds.Bottom);
        rcPage.left = HundredthInchToTwips(e.PageBounds.Left);
        rcPage.right = HundredthInchToTwips(e.PageBounds.Right);

        // Get device context of output device
        IntPtr hdc = e.Graphics.GetHdc();

        // Fill in the FORMATRANGE struct
        STRUCT_FORMATRANGE fr;
        fr.chrg = cr;
        fr.hdc = hdc;
        fr.hdcTarget = hdc;
        fr.rc = rc;
        fr.rcPage = rcPage;

        // Non-Zero wParam means render, Zero means measure
        Int32 wParam = (measureOnly ? 0 : 1);

        // Allocate memory for the FORMATRANGE struct and
        // copy the contents of our struct to this memory
        IntPtr lParam = Marshal.AllocCoTaskMem(Marshal.SizeOf(fr));
        Marshal.StructureToPtr(fr, lParam, false);

        // Send the actual Win32 message
        int res = SendMessage(control.Handle, EM_FORMATRANGE, wParam, lParam);

        // Free allocated memory
        Marshal.FreeCoTaskMem(lParam);

        // and release the device context
        e.Graphics.ReleaseHdc(hdc);

        return res;
    }
Using the RichTextBox is even more simple. You add a richtextbox to a form and call the Print method:

        private void printToolStripMenuItem_Click(object sender, EventArgs e)
        {
            richTextBox1.Print();
        }
I’m attaching the source code for the helper an this sample application so you can use this.
DOWNLOAD SOURCE CODE
When either testing the trial version of the VBUC or actually running the migration tool on your project, there are a few things that you should check to ensure the best possible conversion. These are:
- Project root: Make sure all projects are stored under a one “root” common directory. The VBUC migrates all Visual Basic 6.0 projects (*.vbp) found in a directory structure, including subdirectories, from one common root. You can read more information about setting up the folder structure in the VBUC Quick Start Guide.
- Third-party Components: The VBUC requires that all third party components are correctly registered. Also, very important, ensure you correctly install all licenses for the components. Not including these licenses will not allow the VBUC to load and identify the PMEs (Properties, Methods and Events) and correctly either apply the necessary maps or generate the corresponding COM Interop wrappers.
- Compile all projects: Make sure all projects compile correctly and that all the references between the output (EXE/DLL/OCX) of a project and the referenced component in another project match up. This will allow the VBUC pick up the references automatically, reducing the amount of migration warnings and thus minimize the work required to set up the migration solution. The VBUC Quick Start Guide contains additional details on the importance of this step.
In the last couple of months we’ve done several significant updates to the website that I think are worth commenting about. Here is a quick rundown of what has changed:
- Visual Basic Upgrade Companion Online Documentation: Back with the release of version 3.0 we also went live with the vbtonet.com website, a centralized resource for all information about the VBUC. It contains useful information such as a description of the features of the VBUC, a knowledge base with solutions to common migration problems, the VBUC Quick Start Guide, several How-To’s and other general information about the tool and migration projects in general.
- Updated Services offering: We completely revamped the Migration Services website. You can now get a general overview of our migration services offering, obtain a quick VB Migration Project Ballpark estimate and check out the necessary steps for engaging our services. The ballpark can obviously vary, and sometimes significantly as requirements for a migration are further refined and all applications are different, but normally migrations projects are within the same order of magnitude as the numbers produced by this page.
- Visual Basic Upgrade Companion Trial download: You can download, as before, a fully functional trial of the Visual Basic Upgrade Companion Developer Edition, limited to 10,000 Lines of Code with migration solutions up to 2,000 Lines of Code in size, or request a personalized trial of the Visual Basic Upgrade Companion Enterprise Edition.
- Purchase Licenses Online: The biggest addition we’ve done to the site is that now it is possible to purchase licenses for both the VBUC Developer and Enteprise Editions up to 150,000 lines of code directly, online, from this link. This was motivated by the success we’ve had with selling licenses for the VBUC DE on the web since January. Given the requests of our customers, we decided to both expand the amount of offerings in terms of lines of code allowed per migration with the Developer Edition (from 50,000 to a max of 150,000, plus a 25,000 LOC option) and to make available licenses of the Enterprise Edition in that LOC range as well.
We hope you find this new information we published useful, and please add a comment to this post or send me a message with your thoughts on the new changes and if there’s anything you would like to see on our site.
Here is a quick way to know if a binary file (*.exe, *.dll, *.ocx, …) has a dependency on the Visual Basic 6.0 Runtime. The trick is to use the Dependency Walker tool to see its dependencies. The dependency you are looking for is the Visual Basic 6.0 runtime library (msvbvm60.dll), and it appears on the tree if you are dealing with a VB6.0 binary:
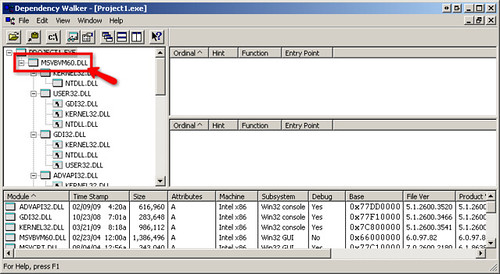
If you are concerned about the VB6.0 runtime not being supported after Windows Server 2008 and Windows 7, this is a trick that can help you decide whether to keep a particular third party ActiveX component in your application through COM Interop after migrating to the .NET Framework or to start looking for a replacement in case the runtime is no longer available (and thus the component will no longer work).
Dependency Walker is a freeware tool that was included with Visual Studio 6.0, is included in the Windows Support Tools and can be downloaded from the Dependency Walker homepage.
This past couple of week I’ve been contacted by a couple of developers concerned with Microsoft’s decision to stop supporting the Visual Basic 6.0 IDE, but to continue support for the Visual Basic runtime and some support libraries in Windows 7 and 2008. This made me think about revisiting the topic with new information and changes since February, when I wrote this post.
It is obvious that Microsoft has been trying to drop support for VB6.0 for a while now. They have extended it a couple of times, and they say they are committed to "make sure the IDE works" for the lifetime of Vista and Windows 2K8. But here is an important part of the support statement that is worth highlighting:
“VB6 runtime will ship and will be supported in Windows 7 for the lifetime of the OS. Developers can think of the support story for Vista being the same as it is for Windows 7. However there are no plans to include VB6 runtime in future versions of Windows beyond Windows 7.”
This means that the next version of Windows will very likely not include the VB6.0 runtime files. This has obvious implications if you have a large application that will require several person-years of effort to migrate (or rewrite, if you decide to go that path). There are also some additional implications on the components you are using, since they may have a dependency on the VB6.0 runtime and thus may not work, even if the rest of you application is already in .NET and using these components through COM Interoperability. Just to be sure I’m not spreading unnecessary panic, Windows 7 is not even out yet, and it will be covered by Microsoft’s OS support policies, so you are good for at least the next five years. If you think the effort to move away from this platform will take longer than (or at least close to) this timeframe, make sure you start evaluation your options soon.
Another important thing to keep in mind is that the VB6.0 runtime files are 32-bit only. Starting with Windows Server 2008 R2, 32-bit mode (WOW64) is optional, and the next version of Windows Server (tentatively due in 2011-2012) will be 64-bit only. This affects both server-side components, ASP, and client-side applications running on the server through Terminal Services, Citrix, or any other remote access technology (though they may able to run using WOW64, albeit requiring an extra configuration step).
A big change since I wrote the last post is that now Windows 7 includes a complete XP virtual machine to run legacy apps, known as XP Mode. I already made a couple of posts on this, and basically, this seems to be a good intermediate steps to “buy some time” before companies move their applications to supported platforms.
As I recommended in the previous post, you should read the "Support Statement for Visual Basic 6.0 on Windows Vista, Windows Server 2008 and Windows 7". Also, the Microsoft Product Lifecycle details the specific dates when support ended for VB6.0.
This is a very simple configuration option that can really help you speed up the process of reviewing all migration EWIs (Errors, Warnings and Issues) when working with migrated code. In Visual Studio, you can use the Task List panel to keep track of a list of items (tasks) you need to go through. This Task List can be configured to show migration EWIs, as shown in the following screenshot:

For this to work, in the Visual Studio IDE, select Tools->Options from the main menu. In the Options window, navigate to Environment->Task List. Here, you’ll need to add the four types of EWIs inserted by the VBUC, along with their priority:
- UPGRADE_ISSUE: Issues appear when there is some migrated code that is very likely to cause a compilation error. My recommendation is that you add it with Normal priority
- UPGRADE_NOTE: Notes are basically information messages. For example, if the VBUC detects dead code, it will comment it out and add an UPGRADE_NOTE comment to make sure the developer understand why it was removed. This can be added as Low priority, since they very rarely require manual intervention after the migration.
- UPGRADE_TODO: Partially upgraded code. These EWIs should be added as high priority, since they indicate the developer needs to perform some additional work to complete the migration.
- UPGRADE_WARNING: Warnings appear when there is a difference in behavior between the VB6 code and its .NET equivalent. The solution provided normally works, but there are some scenarios where additional manual intervention may be required (most likely from runtime errors). I normally add them to the Task List as Normal priority.

With this configuration, you can very easily and quickly browse through all the EWIs in a file, and determine which ones actually require you to perform some manual work, and which ones can be either removed because the line they are tagging will work, or if their verification will be deferred until functional testing takes place.
You can read more about VBUC’s Errors, Warnings and Issues here, and about Visual Studio’s Task List at this link.
JRockIt is an interesting Java Virtual Machine. I really admire the technology used in it. Well following Mike’s post about Memory Leaks in Coldfusion http://www.schierberl.com/cfblog/index.cfm/2006/10/12/ColdFusion_memoryLeak_profiler I was trying to configure the JRockit JVM to do some profiling on an important application.
But alas. Time just flies and things have change a lot since Mike wrote that post. So this is basically an update:
1) JRockit must be downloaded from: http://www.oracle.com/technology/software/products/jrockit/index.html You must accept the license and also have an OTN Account (this is a free process). Download the right version for your platform. I tried the x86 version on my 64 bit server and it didn;t work, so use the version that fits better to your platform. However there is no 64 bit client version of Memory Leak and all the other nice client tools. But dont worry. Download both version 64 and 32 bits versions. You will use the 64 version for your server and the 32 bit version for monitoring.
2) Stop coldfusion server
3) Modify the jvm.config file. In my case it was in: C:\ColdFusion8\runtime\bin\jvm.config
comment out old java.home and add a new line like:
java.home=C:/Program Files/Java/jrmc-3.1.0-1.6.0/jre
In the java.args setting, remove parameter –Xbatch (dont know why, it just didnt work)
add a parameter like:
-Xmanagement:ssl=false,authenticate=false,autodiscovery=true
*In my case I also had to disable security in C:\Program files\Java\jrmc-3.1.0-1.6.0\jre\management\management.properties with a line like:
com.sun.management.jmxremote.authenticate=false
4) Re start coldfusion
Someone recently made me remind an old technology called DDE.
“Dynamic Data Exchange (DDE) is a technology for communication between multiple applications under Microsoft Windows or OS/2”
“The primary function of DDE is to allow Windows applications to share data. For example, a cell in Microsoft Excel could be linked to a value in another application and when the value changed, it would be automatically updated in the Excel spreadsheet. The data communication was established by a simple, three-segment model. Each program was known to DDE by its "application" name. Each application could further organize information by groups known as "topic" and each topic could serve up individual pieces of data as an "item". For example, if a user wanted to pull a value from Microsoft Excel which was contained in a spreadsheet called "Sheet1" in the cell in the first row and first column, the application would be "Excel", the topic "Sheet1" and the item "r1c1".
Note: In DDE, the application, topic and item are not case-sensitive.”
So in VB6 you can have something like:
Private Sub Form_Load()
Text1.LinkMode = 0
Text1.LinkTopic = "Excel|Sheet1"
Text1.LinkItem = "R1C1"
Text1.LinkMode = 1
End Sub
How can you do that in .NET. Is it possible in C#? Well I started looking around and found several forums explaining about all the API calls and I was just about to write my own solution when I found NDDE. This project hosted in CodePlex “provides a convenient and easy way to integrate .NET applications with legacy applications that use Dynamic Data Exchange (DDE)” :)
So this is a nice example of how to do the previous lines in C#:
        //This class provides the infraestructure for DDE comunication
        NDde.Client.DdeClient ddeClient_TextBox1 = null;

        private void Form1_Load(object sender, EventArgs e)
        {
            //I initialize the DDEClient object. Application is Excel and Topic is Sheet1. I'm using the
            //the TextBox as the syncronization object
            ddeClient_TextBox1 = new NDde.Client.DdeClient("Excel", "Sheet1", textBox1);
            //Connect to the DDE Server
            ddeClient_TextBox1.Connect();
            //Start the Advise Loop
            ddeClient_TextBox1.StartAdvise("R1C1", 1, true, 60000);
            //Setup the Advise Method
            ddeClient_TextBox1.Advise += new EventHandler<NDde.Client.DdeAdviseEventArgs>(ddeClient_TextBox1_Advise);
            //Setup a method to Poke the Server for TextBox cahnges
            textBox1.TextChanged += new EventHandler(textBox1_TextChanged);

        }

        void textBox1_TextChanged(object sender, EventArgs e)
        {
            //Syncronous Poking the server
            ddeClient_TextBox1.Poke("R1C1", textBox1.Text + "\0", 4000);
        }

        const string DDE_postFix = "\r\n\0";
        void ddeClient_TextBox1_Advise(object sender, NDde.Client.DdeAdviseEventArgs e)
        {
            //Advise only if needed
            if (e.Text.Length >=DDE_postFix.Length && textBox1.Text + DDE_postFix != e.Text)
                textBox1.Text = e.Text.Substring(0,e.Text.Length-3);
        }
NOTE: Remember that you need to download NDDE and add a reference to this library
This is very good library, you can also set up a lot of Async calls to even improve performance. I have even thought of making an extender as the ToolTip control to add LinkTopic, LinkMode and LinkItem properties for Winforms controls or provide extensions methods to make all the syntax easier, but that is for a future post. Good Luck.
How can I migrate property pages? Well that is a common question when migrating VB6 Activex controls.
Property Pages where commonly used in VB6 to provide a mechanism for your user controls to edit values.
.NET provides even more mechanisms for editing your control properties. You can provide an editor for each one of your component properties or you can provide a ComponentEditor for all the component, this is very similar to the VB6 concept.
In .NET the ComponentEditor can be actived in the designer selecting Properties from the context menu when you right click over the control.
This is from the MSDN documentation:
“A component editor is used to edit a component as a whole and can be used to implement a
user interface similar to that of the property pages. You associate a component editor with a
component by using the EditorAttribute attribute.” From: ComponentEditor Class
The VBUC does not process out of the box, your PropertyPages, but I developed a tool that can be
used so the VBUC can help you migrate those property pages. This tool will modify your VB6 project,
and VB6 PropertyPages source code to make those VB6 PropertyPages look like VB6 UserControls.
This will allow the VBUC migration tool to recover some of the VB6 PropertyPages code and appearance
and with some manual changes you can get your property pages to work again.
Use the following link to downlaod the tool: DOWNLOAD TOOL
So these are the steps to migrate a VB6 Project that has Property Pages with the VB6.
1) Make a backup copy of your source code.
2) Run the TOOL with your project file. For example if your project file is Project1.vbp then run the tool like this:
FixPropertyPages Project1.vbp
This will generate a new VB6 Project file called ModifiedProject1.vbp
3) Open the VBUC, and migrate the new project file ModifiedProject1.vbp
4) Open the migrated solution in Visual Studio.
5) All your property pages will be migrated to .NET UserControls. You might need to go thru some changes to make them completely functional. Remeber to add the [ToolboxItem(false)] to these property pages because they do not need to be visible in your toolbox.
6) Now, to associate those property pages with your UserControl do this:
6.1) Add a new code file to your migrated solution. We are going to create a ComponentEditor, that will hold all the pages and associate that to the migrated control. Lets say the control is named Control1 and the property pages are PropertyPage1 and PropertyPage2.
We will call the ComponentEditor ComponentEditorToAssociatePagesForMyControl.
In this ComponentEditor we will add an internal class for each PropertyPage. This class will inherit from ComponentEditorPage. We will call this internal classes Page1, and Page2. And we will associate those classes with the ComponentEditorToAssociatePagesForMyControl in the GetComponentEditorPages().
The resulting code will be like:
C#using System.Windows.Forms.Design;
using WindowsFormsApplication1;
using System.Drawing;
using System.ComponentModel;
[ToolboxItem(false)]
public class ComponentEditorToAssociatePagesForMyControl : WindowsFormsComponentEditor
{
// Methods
public override bool EditComponent(ITypeDescriptorContext context, object component)
{
return false;
}
class Page1 : ComponentEditorPage
{
// Methods
public Page1()
{
PropertyPage1ForControl1 page1 = new PropertyPage1ForControl1();
Size mysize = new Size(400, 250);
this.Size = mysize;
this.Text = "Page 1 for Control1";
this.Controls.Add(page1);
}
protected override void LoadComponent() { }
protected override void SaveComponent() { }
}
class Page2 : ComponentEditorPage
{
// Methods
public Page2()
{
PropertyPage2ForControl1 page2 = new PropertyPage2ForControl1();
Size mysize = new Size(400, 250);
this.Size = mysize;
this.Text = "Page 2 for Control1";
this.Controls.Add(page2);
}
protected override void LoadComponent() { }
protected override void SaveComponent() { }
}
protected override System.Type[] GetComponentEditorPages()
{
return new System.Type[] { typeof(Page1),typeof(Page2) };
}
protected override int GetInitialComponentEditorPageIndex()
{
return 0;
}
}
VB.NET
<ToolboxItem(False)> _
Public Class ComponentEditorToAssociatePagesForMyControl
    Inherits WindowsFormsComponentEditor
    ' Methods
    Public Overrides Function EditComponent(ByVal context As ITypeDescriptorContext, ByVal component As Object) As Boolean
        Return False
    End Function

    Protected Overrides Function GetComponentEditorPages() As Type()
        Return New Type() { GetType(Page1), GetType(Page2) }
    End Function

    Protected Overrides Function GetInitialComponentEditorPageIndex() As Integer
        Return 0
    End Function


    ' Nested Types
    Private Class Page1
        Inherits ComponentEditorPage
        ' Methods
        Public Sub New()
            Dim page1 As New PropertyPage1ForControl1
            Dim mysize As New Size(400, 250)
            MyBase.Size = mysize
            Me.Text = "Page 1 for Control1"
            MyBase.Controls.Add(page1)
        End Sub

        Protected Overrides Sub LoadComponent()
        End Sub

        Protected Overrides Sub SaveComponent()
        End Sub

    End Class

    Private Class Page2
        Inherits ComponentEditorPage
        ' Methods
        Public Sub New()
            Dim page2 As New PropertyPage2ForControl1
            Dim mysize As New Size(400, 250)
            MyBase.Size = mysize
            Me.Text = "Page 2 for Control1"
            MyBase.Controls.Add(page2)
        End Sub

        Protected Overrides Sub LoadComponent()
        End Sub

        Protected Overrides Sub SaveComponent()
        End Sub

    End Class
End Class
7) After creating the ComponentEditor you must associate the component Editor to your new component editors. This can be done with something like:
C#
[Editor(typeof(ComponentEditorToAssociatePagesForMyControl), typeof(ComponentEditor))]
public class Control1 : UserControl
|
VB.NET
<Editor(GetType(ComponentEditorToAssociatePagesForMyControl), GetType(ComponentEditor))> _
Public Class Control1
|
8) Now to use this property pages, go to the designer screen and open the context menu and select properties. And editor with your properties pages will appear :)
9) You still need to write some code for saving the property values that is something you have to add to the LoadComponent and SaveComponent methods of the internal classes in your ComponentEditor (ComponentEditorToAssociatePagesForMyControl in our previous example).
I hope this helps to get your code faster in .NET. I'm attaching a C# sample if you want to try it out.
Some time ago Jose Aguilar had blogged about the Interesting Behavior of TabIndex in Migrated Applications. As he explained at the time there are functional differences between the TabIndex behaviour in VB6
If you look at Figure1.

Figure 1. This image show a VB6 form, the TabIndex values and the way the form navigates when you press Tab.
If you migrate that form with the VBUC and activate the TabOrder option in View\TabOrder you will see something like:

As you can see by the 0.1 and 0.3 and 5.4 and 5.2 values. TabOrder in .NET is hierarquical. When you press tab you will navigate to the next control in the container, and when you get to the last in that container then you will switch to the next one in the following container. This is different from the VB6 world when you would have switched from 0.1 to 5.2.
How can we fix this without a lot of manual corrections. Well you can override the ProcessTabKey method to navigate controls following the tabIndex without taking into account the containers.
The code you will need to add is:
        /// <summary>
        /// holds a list of controls for tab navigation
        /// </summary>
        List<Control> controls = new List<Control>();
        /// <summary>
        /// Populates the list used for tab navigation
        /// </summary>
        /// <param name="c">Control to use to populate list</param>
        protected void BuildOrder(Control c)
        {
            if (c.TabStop)
                controls.Add(c);
            if (c.Controls.Count > 0)
            {
                foreach (Control child in c.Controls)
                    BuildOrder(child);
            }
        }
        /// <summary>
        /// Transversers all form controls to populate a list ordered by TabIndex
        /// that will be used to follow tabindex ignoring containers
        /// </summary>
        protected void BuildOrder()
        {
            if (controls.Count == 0)
            {

                foreach (Control c in this.Controls)
                {
                    BuildOrder(c);
                }
                controls.Sort(
                delegate(Control c1, Control c2) { return c1.TabIndex.CompareTo(c2.TabIndex); });
            }
        }
        /// <summary>
        /// Overrides default tabIndex behaviour
        /// </summary>
        /// <param name="forward"></param>
        /// <returns></returns>
        protected override bool ProcessTabKey(bool forward)
        {
            BuildOrder();
            if (ActiveControl != null)
            {
                int index = controls.IndexOf(ActiveControl);
                if (index != -1)
                {
                    if (forward)
                        controls[(index + 1) % controls.Count].Select();
                    else
                        controls[index==0?controls.Count-1:index-1].Select();

                    return true;
                }

                else
                    return false;
            }
            else
                return base.ProcessTabKey(forward);
        }
After adding this code just run your project and it will fix the tabIndex issues.