A common doubt when using you want to use Azure Connect is which platforms does it support.
Remember that in order to establish a VPN between your On-Premises computer and a Web/Worker Role
you need to install a client pieces of software.
But which are the supported platforms.
Normally what you can do is just download it and then if you get something like
”Not a valid Win32 application” it means that it is not supported.
From the MSDN site (http://msdn.microsoft.com/en-us/library/gg508836.aspx in the Prerequisites section ) it is stated that:
Windows Azure Connect supported platforms:
Windows 2003 and Windows XP are not supported.
It is supported in Windows Vista, Windows 7, Windows 2008 and Windows 2008 R2
If you were in VB6 HelpContextID will be familiar for you (http://msdn.microsoft.com/en-us/library/aa267690(v=vs.60).aspx). In those sweet VB6 days all you had to do was:
Private Sub Form_Load ()
   App.HelpFile = "VB.HLP"
   Frame1.HelpContextID = 21004
   Text1.HelpContextID = 21001
   Form1.HelpContextID = 21005
End Sub
And each time you pressed the F1 button your application will have opened the .hlp file and show you the Help Topic corresponding to that ID. After migration from VB6 to WinForms Help you now have the HelpProvider.SetHelpKeyword http://msdn.microsoft.com/en-us/library/system.windows.forms.helpprovider.sethelpkeyword.aspx And you had to do something like:
internal System.Windows.Forms.HelpProvider HelpProvider1;
...
HelpProvider1.HelpNamespace = "sample.chm";
HelpProvider1.SetHelpKeyword(TextBox1, "1007.html");
HelpProvider1.SetHelpNavigator(TextBox1, HelpNavigator.Topic);
HelpProvider1.SetHelpKeyword(ListBox1, "1006.html");
HelpProvider1.SetHelpNavigator(ListBox1, HelpNavigator.Topic);
And all that seems nice. But, what can you do when you cross over to SilverlightjQuery15205164761650376022_1357918518660? Well, in general there are several systems that allow you to author your help files in html or convert your .hlp or .chm files to html, but how do you link your components to that help system in order to provide context-sensitive help???? Ok. So one of the possible solutions is very very simple. In general, the solution that I will show in this post is this: 1) First implement an attached property for adding a HelpKeyword to Silverlight components 2) Set the helpkeyword in the desired components 3) Provide logic that will open the appropiate help file. Ok. So let's implement a Silverlight Attached property. An attached propery is like adding a new property to your controls. This new attached property will be called Helpkeyword
using System;
using System.Windows.Shapes;
namespace System.Windows.Controls
{
    public class HelpProvider
    {
        public static readonly DependencyProperty HelpKeyword =
            DependencyProperty.RegisterAttached("HelpKeyword", typeof(string), typeof(HelpProvider), new PropertyMetadata(null));
        public static void SetHelpKeyword(UIElement element, string keyword)
        {
            element.SetValue(HelpKeyword, keyword);
        }

        public static string GetHelpKeyword(UIElement element)
        {
            return (string)element.GetValue(HelpKeyword);
        }
    }
}
Ok. So once we have the attached property we have to use it, and set it on the code: To set it on the code we must add a namespace:
<UserControl x:Class="SilverlightApplication.MainPage"
    xmlns="http://schemas.microsoft.com/winfx/2006/xaml/presentation"
    ...
    xmlns:help="clr-namespace:System.Windows.Controls"
    mc:Ignorable="d"
    ....>
And apply the attribute to components
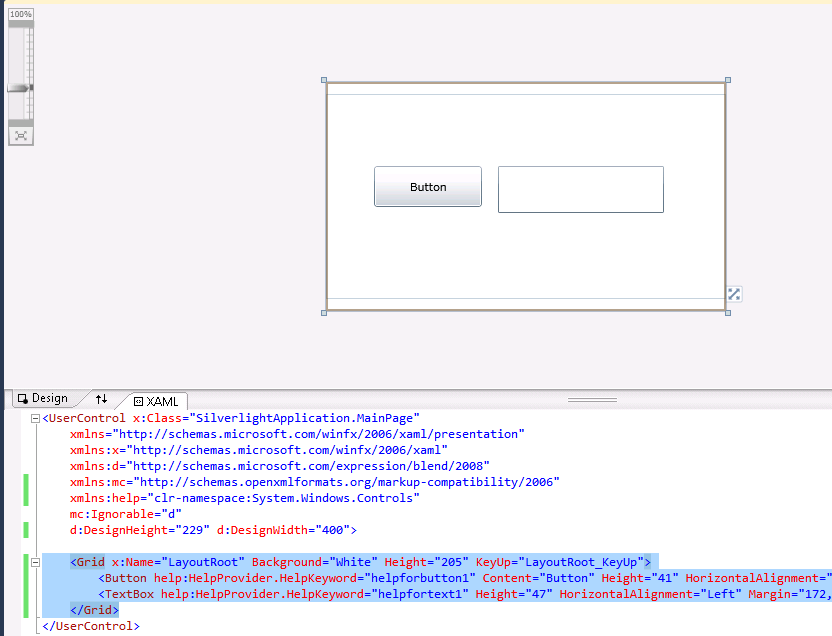
<Button help:HelpProvider.HelpKeyword="helpforbutton1" Content="Button" ...  />
<TextBox help:HelpProvider.HelpKeyword="helpfortext1" Height="47" ... />
So that almost everything, now we just need to trigger the appropiate logic, to do that we will add a KeyUp handler to the top most element, in this example a grid. NOTE: if Silverlight is running on the browser F1 is not an option. I just used F2 here as an example.
<Grid x:Name="LayoutRoot" Background="White" Height="205" KeyUp="LayoutRoot_KeyUp">
<Button help:HelpProvider.HelpKeyword="helpforbutton1" ...  />
<TextBox help:HelpProvider.HelpKeyword="helpfortext1" ... />
</Grid>
using System;
using System.Windows;
using System.Windows.Controls;
using System.Windows.Input;
using System.Windows.Browser;

namespace SilverlightApplication
{
    public partial class MainPage : UserControl
    {
        public MainPage()
        {
            InitializeComponent();
        }

        private void LayoutRoot_KeyUp(object sender, KeyEventArgs e)
        {
            //check for the specific key. For now use F2 as the Help Shortcut
            if (e.Key==Key.F2) {
                    var uielement = FocusManager.GetFocusedElement() as UIElement;
                    if (uielement!=null)
                    {

                        var keyword = HelpProvider.GetHelpKeyword(uielement);
                        var host = HtmlPage.Document.DocumentUri.Host;
                        var port = HtmlPage.Document.DocumentUri.Port;
                        var url = string.Format("http://{0}:{1}/help/{2}.html", host,port,keyword);
                        HtmlPage.Window.Navigate(new Uri(url),"_blank");
                    }
            } // else ignore the keystroke
        }
    }
}
This property can be used on the IDE:
On code
var uielement = FocusManager.GetFocusedElement() as UIElement;
if (uielement!=null) {
var keyword = HelpProvider.GetHelpKeyword(uielement);
}
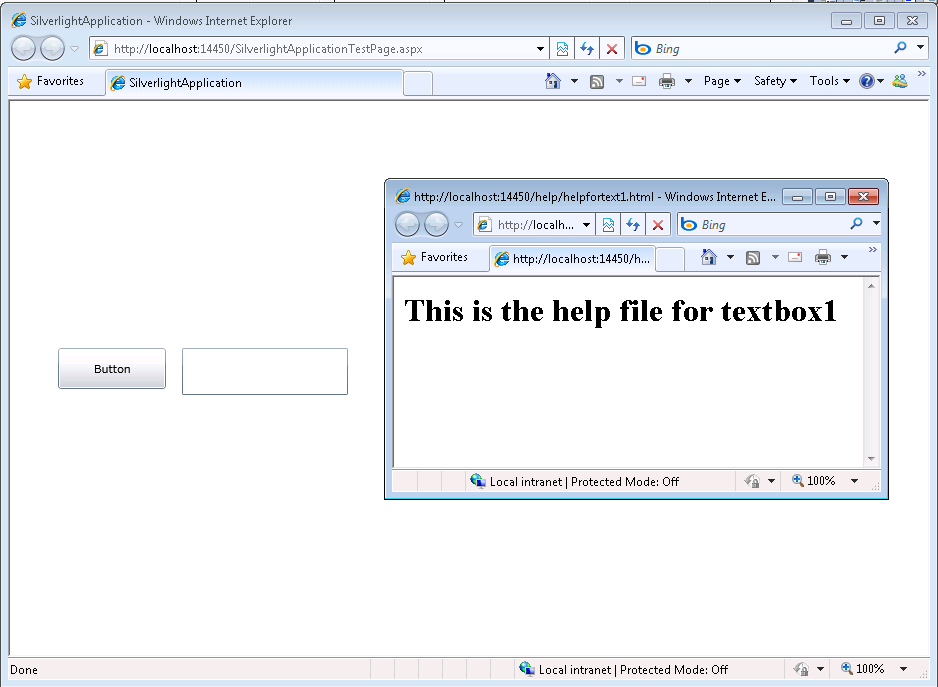
This is an image of the application running.
And you can download the code from: CODE
If you have any questions or would like more info on Silverlight migration check www.silverlightmigration.com
On a previous post I was describing how some basic Objective-C elements were mapped to C#.
In particular I showed how the @interface and @implementation definitions are to be mapped in .Net, including basic properties.
In this post I will show a little about how methods are migrated.
There are several things to analyze when moving Objective-C code to C# it might be simple but can be a complicated
task. Objective-C is a language created under the inspiration of SmallTalk. And in Smalltalk programmer do not think of
method calls but instead of message sending and that is something to keep in mind when doing this migration.
Also all methods are virtual and even if there are access restriction in Objective-C I will map those methods to
public for simplicity sake.
In the previous post we had:
FIRSTFIRST
Fraction.h
#import <Foundation/NSObject.h>
@interface Fraction: NSObject {
    int numerator;
    int denominator;
}
-(void) print;
-(void) setNumerator: (int) n;
-(void) setDenominator: (int) d;
-(int) numerator;
-(int) denominator;
@end
And
Fraction.m
#import "Fraction.h"
#import <stdio.h>

@implementation Fraction
-(void) print {
    printf( "%i/%i", numerator, denominator );
}

-(void) setNumerator: (int) n {
    numerator = n;
}

-(void) setDenominator: (int) d {
    denominator = d;
}

-(int) denominator {
    return denominator;
}

-(int) numerator {
    return numerator;
}
@end
And that example shows properties and methods with no parameter. OK. Now lets just focus on methods with 0, 1 and more parameters.
MethodsExample.h
#import <Foundation/NSObject.h>
@interface MethodsExample: NSObject {

}
-(void) print;
-(int) multiplyByTwo: (int) n ;
-(void) multiplyTwoNumers: (int) a andSecondNumber: b;

@end
MethodsExample.m
#import "MethodsExample.h"
#import <stdio.h>

@implementation MethodsExample
-(void) print {
    printf( "Hola mundo\n" );
}

-(int) multiplyByTwo: (int) n {
    return n * 2;
}

-(int) multiplyTwoNumbers: (int) a  andSecondNumber (int) b {
    return a * b;
}
@end
And calling those functions will be:
#import <stdio.h>
#import "MethodsExample.h"

int main( int argc, const char *argv[] ) {
    // create a new instance
    MethodsExample *m = [[MethodsExample alloc] init];
    [m print];
    int result;
    result = [m multiplyByTwo: 1];
    result = [m multiplyTwoNumbers: 1 andSecondNumber: 5];
    // free memory
    [m release];
    return 0;
}
This little example shows some of the particularities of Objective-C.
In Objetive-C all parameters starting from the second parameter can have
what is called a label and labels are similar to namedParameter. Ok lets go ahead and map that class.
using System;

public class MethodsExample
{
    public virtual print() {
        Console.WriteLine("Hola mundo\n");
    }
    public virtual int multiplyByTwo(int n)
    {
      return n * 2;
    }
    //AproachOne
    public virtual int multiplyTwoNumber(int a,int andSecondNumber)
    {
        return a * andSecondNumber;
    }
    //AproachTwo
    //I just renamed as multiplyTwoNumber2 to avoid compilation errors.
    //The idea is that you will choose one of the two aproaches
    //or define a criteria for the instances where aproach one should be used
    //instead of approach two
    public virtual int multiplyTwoNumber(int a,int andSecondNumber)
    {
        int n = andSecondNumber;
        //This aproach will be better if you have a lot of code in the method
        //and you prefer to keep the original arg name
        return a * n;
    }

}
So the thing here is what to use as the parameter name, the label or the argument name.
In the example you can see the two approaches in the multiplyTwoNumbers case.
And calling the methods is simple and the named parameters syntax can be exploited.
using System;

public static class Program
{
    public static int Main(string[] argv ) {
        // create a new instance
        var m = new MethodsExample();
        m.print();
        int result;
        result = m.multiplyByTwo(1);
        result = m.multiplyTwoNumbers(1,andSecondNumber: 5); //using named parameters
        // free memory
        m.release();
        return 0;
    }
}
REMEMBER: This is just a glimpse of some mapping concepts from Objective-C to C#.
There are many subtle details in this kind of migration and is my belief that only
an automated tool is able to process all those details in an effectively and more error-free
than a manual approach. For example in objective-c if m is null that will not cause any error if you
do something like [m print] and in C# that will throw an error. However a migration tool could determine
if the variable will have a value before its use and avoid adding unnecessary if (m!=null) statements.
We will examine this and other details in following posts. I hope this little examples give you enough information

for playing around migrating some Objective-C code. And if it gets too complicated just send me an email!!!
This problem appear to web because I opened some forms with
Expression Web 4.0 and it seems to have modified my project files.
I finally found that to solve it all I have to do is to:
1. Open the .csproj with a text editor
2. Look for the ToolsVersion an change it from 4.0 to 3.5
And that’s all.
The actual Isolated Storage location is fixed but depends on the operating system where the Silverlight application is running:
From: http://msdn.microsoft.com/en-us/library/3ak841sy.aspx#isolated_storage_locations
| Operating system | Location in file system |
| Windows 98, Windows Me - user profiles not enabled | Roaming-enabled stores =
<SYSTEMROOT>\Application Data
Non Roaming stores = WINDOWS\Local Settings\Application Data |
| Windows 98, Windows Me - user profiles enabled | Roaming-enabled stores =
<SYSTEMROOT>\Profiles\<user>\Application Data
Non roaming stores = Windows\Local Settings\Application Data |
| Windows NT 4.0 | <SYSTEMROOT>\Profiles\<user>\Application Data |
| Windows NT 4.0 - Service Pack 4 | Roaming-enabled stores =
<SYSTEMROOT>\Profiles\<user>\Application Data
Non roaming stores =
<SYSTEMROOT>\Profiles\<user>\Local Settings\Application Data |
| Windows 2000, Windows XP, Windows Server 2003 - upgrade from Windows NT 4.0 | Roaming-enabled stores =
<SYSTEMROOT>\Profiles\<user>\Application Data
Non roaming stores =
<SYSTEMROOT>\Profiles\<user>\Local Settings\Application Data |
| Windows 2000 - clean installation (and upgrades from Windows 98 and Windows NT 3.51) | Roaming-enabled stores =
<SYSTEMDRIVE>\Documents and Settings\<user>\Application Data
Non roaming stores =
<SYSTEMDRIVE>\Documents and Settings\<user>\Local Settings\Application Data |
| Windows XP, Windows Server 2003 - clean installation (and upgrades from Windows 2000 and Windows 98) | Roaming-enabled stores =
<SYSTEMDRIVE>\Documents and Settings\<user>\Application Data
Non roaming stores =
<SYSTEMDRIVE>\Documents and Settings\<user>\Local Settings\Application Data |
| Windows Vista | Roaming-enabled stores =
<SYSTEMDRIVE>\Users\<user>\AppData\Roaming
Non roaming stores =
<SYSTEMDRIVE>\Users\<user>\AppData\Local |
The amount of data that you can put on the isolated storage is limited by the UserQuota property.
By default an application has 1MB of storage space.
(see http://msdn.microsoft.com/en-us/library/system.io.isolatedstorage.isolatedstoragefile.increasequotato(VS.95).aspx)
If more space is needed the user can call the method increaseQuotaTo() that will allow prompting the user for permision to increase the amount of storage.
This will show a prompt dialog like:

To define policies I recommed looked at the Group Policy settings page
http://www.microsoft.com/GetSilverlight/resources/documentation/grouppolicysettings.aspx#isolated-storage and we might see more details about that in another post.
Some people ofter forget about this (even me  ) So that;’s why I’m posting about this.
In my work (at Artinsoft) we are currently performing a lot of Winforms and VB6
migration to Silverlight. And a common problem is “What can I do with the user settings!!!”.
In VB6 you had your INI files and in Winforms you probably used something like the App settings.
But when you move to Silverlight what can you do!.
You need a set of initial values and you probably wont want to “burn” those inicial values in your XAP file.
It would be nicer if those values can just be set in the Web.Config file.
So a common way to solve this, is develop a simple helper class. This helper class will use a service that will
collect your initial ini files or appsettings values and store them in your Isolated Storage.
You can even use some kind of basic cryptography if you feel that your date is sensitive.
And then you can use the helpful IsolatedStorageSettings class. For example see this code,
that I borrowed from this post: http://wildermuth.com/2008/10/21/Using_Isolated_Storage_Settings_in_Silverlight_2
const string FAVCOLORNAME = "favoriteColor";
public Color? FavoriteColor
{
  get
  {
    if (IsolatedStorageSettings.ApplicationSettings[FAVCOLORNAME] != null)
    {
      Color? colorSetting =         IsolatedStorageSettings.ApplicationSettings[FAVCOLORNAME] as Color?;
      if (colorSetting != null) return colorSetting;
    }

    // If we can't find a favorite color, return a null color
    return new Color?();
  }
  set
  {
    IsolatedStorageSettings.ApplicationSettings[FAVCOLORNAME] = value;
  }
}
As you can see is very easy to save and recover simple settings from the Silverlight Isolated Storage
Specially if you are working with Silverlight and Azure you will end up in situation where you would
like to redirect your WCF Endpoint dinamically ( I don’t think you can guess the GUID that Azure will generate
for your staging enviroment).
Out of the box the silverlight behaviour is that the WCF endpoints are hardcoded in a config file called
ServicesClient.config embedded in the .xap file.
This can be problematic at least for Azure deployment infraestructure because you can deploy to different sites:
Staging and Production.
Each of this Web Sites will have differente URLs.For example phonebook.cloudapp.net or asdf-asdf-asdf-dasxxx.cloudapp.net
So an easy workaround is:
In WCF when a channel is created in code you can specify the endpoint,
so we only need to created different endpoints depending of the site where the the .xap file was download.
The proposed changes will be:
For example if you create services in your App.xaml.cs method Application_Startup
Then you can change your code for something like:
string url = "http://" + HtmlPage.Document.DocumentUri.Host + "/MyService.svc";
EndpointAddress endpoint = new EndpointAddress(url);
var service = new MyService(new ChannelFactory<IMyService>("*").CreateChannel(endpoint)));
This will allow you to just deploy your application to either Staging or Production environment
in Azure with no more code or config file changes.
While developing some user controls in Silverlight I have come with a situation,
for example when dragging a Chart control in the Visual Studio 2010 designer where I get something like:
Error HRESULT E_FAIL has been returned from a call to a COM component
I have been looking for a solution but have not found anything yet.
The only workaround has been:
a) Close all windows. Do a Clean and a Rebuild or Close Visual Studio and open it again.
Today I found this excellent post:
http://smehrozalam.wordpress.com/2009/01/29/retrieving-huge-amount-of-data-from-wcf-service-in-silverlight-application/
and I was the key to solve a problem I had with a WCF service.
I had made some changes to an application to send a text file to the server
for batch processing, everything was working fine until I started sending big files.
I just received one of those obnoxious Not Found error.
So what could I do? Well as any respectable WCF developer would I started tracing the WCF messages with Fiddler, and I found this:
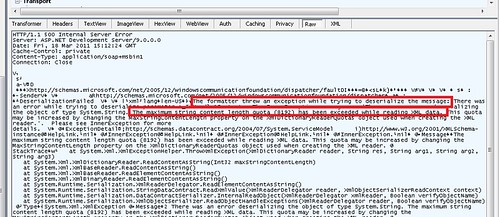
If you cannot read it from the image the message was:
DeserializationFailed… The formatter threw an exception while trying to deserialize the message:
There was an error while trying to deserialize parameter :_xxxxxx.
The InnerException message was 'There was an error deserializing the object of type System.String.
The maximum string content length quota (8192) has been exceeded while reading XML data.
This quota may be increased by changing the MaxStringContentLength property on the XmlDictionaryReaderQuotas
object used when creating the XML reader.
I was a little confused but thanks to that post I was able to just add:
          <binaryMessageEncoding maxWritePoolSize="16" maxSessionSize="8192">
            <readerQuotas maxDepth="2147483647" maxStringContentLength="2147483647" maxArrayLength="2147483647"
                                   maxBytesPerRead="2147483647" maxNameTableCharCount="2147483647" />
          </binaryMessageEncoding>
And got everything working again!
Is very common that a user calls you to report a bug,
but it takes you a long time to understand what really happened.
Well Windows 7 has a great tool call the Problem Step Recorder.
This post will provide a good intro using this tool: http://www.blog.jbi.in/tipsntricks/how-to-use-problem-steps-recorder-in-windows-7/