Some time ago Artinsoft participated in the development of a book called “Upgrading Visual Basic 6.0 Applications”.
I quote from that book:
“The upgrade wizard is designed to upgrade Visual Basic 6.0 applications. For
projects written in Visual Basic versions 1.0 through 5.0, it is necessary that you first
upgrade them to Visual Basic 6.0 before upgrading to Visual Basic .NET. To upgrade
a project that was developed in a version earlier than Visual Basic 6.0, simply open
the project in the Visual Basic 6.0 IDE and save it. If Visual Basic 6.0 prompts you to
upgrade controls to Visual Basic 6.0, choose Yes. If the project contains Visual Basic
5.0 ActiveX controls, it is often best to replace these controls with Visual Basic 6.0
versions. This is because these controls use a different threading model than models
used by Visual Basic 6.0 controls. The earlier threading model is not supported in
Windows Forms.
For 16-bit projects written in Visual Basic versions 1.0 through 4.0, you may need to
make extra modifications to the application to convert it to Visual Basic 6.0.
VBX controls will not be automatically converted. You will also have to replace
Win16 Windows APIs with their Win32® counterparts.
Visual Basic versions 2.0 and 3.0 often require an extra step. Visual Basic 6.0 can only
open files in text format, whereas Visual Basic versions 2.0 and 3.0 support two file
formats: binary and text. Before upgrading these projects, ensure the entire applica-
tion is saved in text format by using the following procedure.
To convert Visual Basic 1.0 and 2.0 files to text format
1. On the File menu, click Save As.
2. In the Save dialog box, select the Save As Text check box.
Because Visual Basic 1.0 can only save files in binary format, all of these projects will
first need to be opened in Visual Basic 2.0 or 3.0 and then saved as text before they
can be converted to Visual Basic 6.0. After converting the project to Visual Basic 6.0,
you can begin the process of upgrading it to Visual Basic .NET.”
This book is available for free
from the MSDN
In VB6 when you have an ActiveX Library it was very important to use
the BinaryCompatibility setting to make sure that your applications did not break after a change.
So let’s first introduce what is binary compatibility and how to accomplish that in .NET.
Binary Compatibility allows to make changes to your components or COM classes without recompiling
every application you've made that uses the component.
And why do you need it. Why compatibility breaks.
On lets see.
An ActiveX Control or DLL expose Public interfaces.
Those interfaces have all of the properties, methods, events, etc. that you've marked as Public.
In other words, everything you've added that shows in Intellisense while working outside of your component.
Now let's say you have create a class, with two Methods Method1 and Method2
When you compile, VB generates all the COM infraestructure you need for your component.
It defines a CoClass and an interface and an entry for each method.
For a vb class with two methods:
Sub Method1()

End Sub

Sub Method2()

End Sub
It will produce a typelib like:
// Generated .IDL file (by the OLE/COM Object Viewer)
//
// typelib filename: <could not determine filename>
[
  uuid(8ABA2C0C-7CCA-40CD-A944-56707566634A),
  version(1.0)
]
library Project1
{
    // TLib :     // TLib : OLE Automation : {00020430-0000-0000-C000-000000000046}
    importlib("stdole2.tlb");

    // Forward declare all types defined in this typelib
    interface _Class1;

    [
      odl,
      uuid(6B86684C-B3DD-4680-BF95-8DEE2C17AF5B),
      version(1.0),
      hidden,
      dual,
      nonextensible,
      oleautomation
    ]
    interface _Class1 : IDispatch {
        [id(0x60030000)]
        HRESULT Method1();
        [id(0x60030001)]
        HRESULT Method2();
    };

    [
      uuid(C71C7AB0-552A-4D5D-A9FB-AF33830A697E),
      version(1.0)
    ]
    coclass Class1 {
        [default] interface _Class1;
    };
};
As you can see in the typelib there are IDs associated to each coclass, interface and
methods. Those IDs are the ones use when you generate the .exe file for your application.
Now if you modify your Class to:
Sub Method3()

End Sub

Sub Method4()

End Sub

Sub Method1()

End Sub

Sub Method2()

End Sub
and you use No Compatibility the typelib after your changes will be:
// Generated .IDL file (by the OLE/COM Object Viewer)
//
// typelib filename: <could not determine filename>

[
  uuid(FE5C56C2-E03A-4DC0-994D-B68543C72A46),
  version(1.0)
]
library Project1
{
    // TLib :     // TLib : OLE Automation : {00020430-0000-0000-C000-000000000046}
    importlib("stdole2.tlb");

    // Forward declare all types defined in this typelib
    interface _Class1;

    [
      odl,
      uuid(A3032E1E-52FE-42E0-98FF-84A9DD4FD8C3),
      version(1.0),
      hidden,
      dual,
      nonextensible,
      oleautomation
    ]
    interface _Class1 : IDispatch {
        [id(0x60030000)]
        HRESULT Method3();
        [id(0x60030001)]
        HRESULT Method4();
        [id(0x60030002)]
        HRESULT Method1();
        [id(0x60030003)]
        HRESULT Method2();
    };

    [
      uuid(72721504-CC56-4BB9-9447-C7193FE8C02D),
      version(1.0)
    ]
    coclass Class1 {
        [default] interface _Class1;
    };
};
As you can see, now the ids for the methods, CoClass are different, so your applications will return errors like: Error 430 (Automation error, the component dies horribly) or Error 429 (can't create the object at all)
But if you instead used BinaryCompatibility then the typelib for your class will be:
// Generated .IDL file (by the OLE/COM Object Viewer)
//
// typelib filename: <could not determine filename>
[
  uuid(8ABA2C0C-7CCA-40CD-A944-56707566634A),
  version(1.1)
]
library Project1
{
    // TLib :     // TLib : OLE Automation : {00020430-0000-0000-C000-000000000046}
    importlib("stdole2.tlb");

    // Forward declare all types defined in this typelib
    interface _Class1;
    [
      odl,
      uuid(6E9C59C3-82D7-444C-92FB-01B49D91A2FF),
      version(1.1),
      hidden,
      dual,
      nonextensible,
      oleautomation
    ]
    interface _Class1 : IDispatch {
        [id(0x60030002)]
        HRESULT Method3();
        [id(0x60030003)]
        HRESULT Method4();
        [id(0x60030000)]
        HRESULT Method1();
        [id(0x60030001)]
        HRESULT Method2();
    };

    [
      uuid(C71C7AB0-552A-4D5D-A9FB-AF33830A697E),
      version(1.1)
    ]
    coclass Class1 {
        [default] interface _Class1;
    };

    typedef [uuid(6B86684C-B3DD-4680-BF95-8DEE2C17AF5B), version(1.0), public]
    _Class1 Class1___v0;
};
If you compare now the two typelibs you can see the Method1 and Method2 keep the same ids.
For each version a typedef is generated that will point to the last version. For example adding a Method5 will add new entry like:
    typedef [uuid(6B86684C-B3DD-4680-BF95-8DEE2C17AF5B), version(1.0), public]
    _Class1 Class1___v0;

    typedef [uuid(6E9C59C3-82D7-444C-92FB-01B49D91A2FF), version(1.1), public]
    _Class1 Class1___v1;
Well that is what binary compatibility does. Now how to achieve binary compatibility in .NET
Binary Compatibility in .NET
Achieving binary compatibility in .NET is really easy. You just need to give more information to
make explicit how your typelib information will be. I will follow an approach as the one I already explained in this post:
http://blogs.artinsoft.net/mrojas/archive/2010/06/23/exposing-c-classes-thru-interop.aspx
Lets take our previous example:
using System;
using System.Runtime.InteropServices;

namespace InteropExamples
{
    public class Class1
    {
        public void Method3()
        {
        }
        public void Method4()
        {
        }
        public void Method1()
        {
        }
        public void Method2()
        {
        }
        public void Method5()
        {
        }
    }
}
In previous posts I had recommended using partial classes and using interfaces to explicitly specify what you what to be seen in COM. This means you start up with something like:
  public partial class Class1
    {
        public void Method3()
        {
        }
        public void Method4()
        {
        }
        public void Method1()
        {
        }
        public void Method2()
        {
        }
    }

    [ComVisible(true)]
    public interface _Class1
    {
        void Method3();
        void Method4();
        void Method1();
        void Method2();

    }
    [ComVisible(true)]
    [ClassInterface(ClassInterfaceType.None)]
    [ComDefaultInterface(typeof(_Class1))]
    partial class Class1 : _Class1
    {
        #region _Class1 Members

        void _Class1.Method3()
        {
            Method3();
        }

        void _Class1.Method4()
        {
            Method4();
        }

        void _Class1.Method1()
        {
            Method1();
        }

        void _Class1.Method2()
        {
            Method2();
        }

        #endregion
    }
Now to make this code binary compatible then you have to make sure that the tlb file generated for your class is almost identical to that generated before. To acomplish that we must make sure that we your methods, interfaces and classes have the same guids and ids. Lets see how:
using System;
using System.Runtime.InteropServices;

namespace InteropExamples
{
    public partial class Class1
    {

        public void Method3()
        {
            System.Windows.Forms.MessageBox.Show("3 N");
        }

        public void Method4()
        {
            System.Windows.Forms.MessageBox.Show("4 N");
        }

        public void Method5()
        {
            System.Windows.Forms.MessageBox.Show("5 N");
        }


        public void Method1()
        {
            System.Windows.Forms.MessageBox.Show("1 N");
        }

        public void Method2()
        {
            System.Windows.Forms.MessageBox.Show("2 N");
        }
    }

    [ComVisible(true)] //This to make the interface Visible for COM
    [TypeLibType((TypeLibTypeFlags)((short)TypeLibTypeFlags.FHidden |
        (short)TypeLibTypeFlags.FDual |
        (short)TypeLibTypeFlags.FNonExtensible |
        (short)TypeLibTypeFlags.FOleAutomation))] //This to use the same flags as in previous tlb
    [Guid("9BAFD76D-8E6B-439C-8B6D-37260BFA3317")] //This is to make the class have the guid
    public interface _Class1
    {
        [DispId(0x60030000)]
        void Method1();
        [DispId(0x60030001)]
        void Method2();
        [DispId(0x60030002)]
        void Method3();
        [DispId(0x60030003)]
        void Method4();
        [DispId(0x60030004)]
        void Method5();


    }

    [ComVisible(true)] //This to make the class Visible for COM
    [ClassInterface(ClassInterfaceType.None)] //This is to make sure that we have control on interface generation
    [ComDefaultInterface(typeof(_Class1))] //To set default interface
    [ProgId("Project1.Class1")] //To set ProgId
    [Guid("C71C7AB0-552A-4D5D-A9FB-AF33830A697E")] //Maintain same Guid.
    partial class Class1 : _Class1, Class1___v0, Class1___v1
    {
        #region _Class1 Members

        void _Class1.Method3()
        {
            Method3();
        }

        void _Class1.Method4()
        {
            Method4();
        }

        void _Class1.Method1()
        {
            Method1();
        }

        void _Class1.Method2()
        {
            Method2();
        }

        #endregion


        #region Class1___v0 Members

        void Class1___v0.Method1()
        {
            Method1();
        }

        void Class1___v0.Method2()
        {
            Method2();
        }

        void Class1___v0.Method3()
        {
            Method3();
        }

        void Class1___v0.Method4()
        {
            Method4();
        }

        void Class1___v0.Method5()
        {
            Method5();
        }

        #endregion

        #region Class1___v1 Members

        void Class1___v1.Method1()
        {
            Method1();
        }

        void Class1___v1.Method2()
        {
            Method2();
        }

        void Class1___v1.Method3()
        {
            Method3();
        }

        void Class1___v1.Method4()
        {
            Method4();
        }

        void Class1___v1.Method5()
        {
            Method5();
        }

        #endregion
    }

    //This is to keep compatibility with old versions
    //we cannot generate a typedef so we will need to add all of the versions
    //for BinaryCompatibility
    [ComVisible(true)]
    [Guid("6B86684C-B3DD-4680-BF95-8DEE2C17AF5B")]
    [TypeLibType(TypeLibTypeFlags.FHidden)]
    public interface Class1___v0
    {
        [DispId(0x60030000)]
        void Method1();
        [DispId(0x60030001)]
        void Method2();
        [DispId(0x60030002)]
        void Method3();
        [DispId(0x60030003)]
        void Method4();
        [DispId(0x60030004)]
        void Method5();
    }

    //This is to keep compatibility with old versions
    //we cannot generate a typedef so we will need to add all of the versions
    //for BinaryCompatibility
    [ComVisible(true)]
    [Guid("4A7A3317-BF13-443E-9DB0-2C5EA21F00CA")]
    [TypeLibType(TypeLibTypeFlags.FHidden)]
    public interface Class1___v1
    {
        [DispId(0x60030000)]
        void Method1();
        [DispId(0x60030001)]
        void Method2();
        [DispId(0x60030002)]
        void Method3();
        [DispId(0x60030003)]
        void Method4();
        [DispId(0x60030004)]
        void Method5();
    }

}
Sadly in .NET you cannot use Interface Inheritance in COM. If there is interface inheritance YOU HAVE TO IMPLEMENT each interface. In the case of code that comes from VB6. VB6 just uses typedefs, so you really don’t know which methods belong to each version. So in the end all versions have all methods.
The other alternative to this method, is just to implement last version. And after generating the tlb, decompile it to an .IDL file add the typedefs and recompiled it. I explained something similar in this post:http://blogs.artinsoft.net/mrojas/archive/2010/05/17/interop-remove-prefix-from-c-enums-for-com.aspx
Ok. I hope this helps you to have an more clear idea of what Binary Compatibility is and how to do it in .NET. I am attaching some sample code. It show an ActiveX library that uses BinaryCompatibility and three version on an aplications that uses the different versions. And also a .NET class library that is equivalent to the VB6 one. HERE
Enjoy.
Either if you migrate your application from VB6 to C# or if you develop a new application in C# something you end up with cases where you need to use your classes in legacy apps. Some of them could have been written in VB6 or could even be VBA macros in Excel applications.
Exposing your .NET classes can be sometimes very easy (you can think is just a matter of putting a ComVisible tag) but in other occasions is not that simple. Specially if your legacy application is using a lot of Late Bound calls like in VBA, so you must make sure that the COM information that you are exposing for your class is exactly what you really want and need.
OK. So I will provide some guidelines or some steps you should follow to provide a consistent COM interface for your .NET Code.
1. First you have to add the [ComVisible(true)] attribute. Don’t think that’s all. Even if in some cases that is enough is better if you take an strict control of want is being generated for your class. Ok Let’s use the following class as an example:
using System;
using System.Runtime.InteropServices;

namespace InteropExamples
{
    [ComVisible(true)]
    public class MyVerySimpleClass
    {
        public Class2 CreateANewClass()
        {  return new Class2()     }

        public int GetMyLuckyNumber() { return 15; }
    }
public class Class2 { }
}
// Generated .IDL file (by the OLE/COM Object Viewer)
//
// typelib filename: <could not determine filename>
[
uuid(370E4AD4-073B-4984-8C7D-5ED027F7B1CA),
version(1.0)
]
library ClassLibrary1
{
// TLib : // TLib : mscorlib.dll : {BED7F4EA-1A96-11D2-8F08-00A0C9A6186D}
importlib("mscorlib.tlb");
// TLib : OLE Automation : {00020430-0000-0000-C000-000000000046}
importlib("stdole2.tlb");
// Forward declare all types defined in this typelib
interface _MyVerySimpleClass;
[
uuid(E03CCE68-2D55-3576-9DB6-019AAA667A5D),
version(1.0),
custom({0F21F359-AB84-41E8-9A78-36D110E6D2F9}, "InteropExamples.MyVerySimpleClass")
]
coclass MyVerySimpleClass {
[default] interface _MyVerySimpleClass;
interface _Object;
};
[
odl,
uuid(D18BEEE1-4425-3AC7-891E-807EC2283731),
hidden,
dual,
oleautomation,
custom({0F21F359-AB84-41E8-9A78-36D110E6D2F9}, "InteropExamples.MyVerySimpleClass")
]
interface _MyVerySimpleClass : IDispatch {
};
};
In this case your class will be expose using all defaults. That is, a progId that will be the <AssemblyName>.ClassName an interface _<ClassName> is generated and the class is exposed only for IDispatch, which would not provide class information if you add the tlb reference to a VB6 or VBA project.
And if you run this code in VB6 you will have a problem like type mismatch when you try to use the method x.CreateAClass because it is returning an object that is not exposed thru COM.
Private Sub Command1_Click()
Dim x As Object
Set x = CreateObject("InteropExamples.MyVerySimpleClass")
MsgBox x.GetMyLuckyNumber
MsgBox x.CreateAClass
End Sub
So my recommendation is to make explicit what you want to expose. Maybe you only need some of the methods to be exposed. Well that is step two.
2. Define a public, ComVisible(true) interface that will define the methods that you want to be exposed thru COM. Sometimes it is better to implement the interface explicitly. I even recommend using partial classes so you isolate the COM stuff from your normal class. If you class is very simple you can leave all COM stuff there.
    //It is better to have an interface, because
    //you are completely sure what you are exposing or not
    [ComVisible(true)]
    public interface _MyVerySimpleClass
    {
        int GetMyLuckyNumber();
    }
3. (Recommedation) This is not an obligatory step but I recommend using partial classes.
    //Using partial classes allow you to separate all the
    //COM plumbing and leave your .NET implementation simple
    public partial class MyVerySimpleClass
    {
        public Class2 CreateAClass()
        {
            return new Class2();
        }

        public int GetMyLuckyNumber() { return 15; }
    }
3. Make sure your partial class has the following attributes:
[ComVisible(true)] <—This is obvious because you want to use your class in COM
[ClassInterface(ClassInterfaceType.None)] <—This is because your want to take charge or what will be generated in your Typelib (tlb)
[ComDefaultInterface(typeof(_MyVerySimpleClass))] <—This is to indicate the interface that holds your COM visible methods.
[ProgId("InteropExamples.MyVerySimpleClass")] <—To establish which will be the progId not have a generated one
[Guid("{029D468C-8BE6-498f-8A57-3B4B0306BA41}")] <—this is important specially if you are trying to accomplish binary compatibility
Optionally add this attribute [IDispatchImpl(IDispatchImplType.CompatibleImpl)] this is currently marked as an obsolete attribute but it still works and I have found scenarios, specially in some VBA applications where you need this attribute in order to make some late bound calls.
4. And Explicitly implement the interface methods. This is important because some of the return values or arguments might need convertions. For example what can you do if your method returns a DataSet and your Excel VBA script is expecting something like a Recordset (more on this on other posts).
So now you will have a class like:
    //Using partial classes allow you to separate all the
    //COM plumbing and leave your .NET implementation simple
    public partial class MyVerySimpleClass
    {
        public Class2 CreateAClass()
        {
            return new Class2();
        }

        public int GetMyLuckyNumber() { return 15; }
    }

    //It is better to have an interface, because
    //you are completely sure what you are exposing or not
    [ComVisible(true)]
    public interface _MyVerySimpleClass
    {
        int GetMyLuckyNumber();
    }

    [ComVisible(true)]
    [ClassInterface(ClassInterfaceType.None)] //This is to make sure that no automatic generation of COM methods is done
    [ComDefaultInterface(typeof(_MyVerySimpleClass))] //This to explicitly establish which is the default interface
    [ProgId("InteropExamples.MyVerySimpleClass")]
    [Guid("{029D468C-8BE6-498f-8A57-3B4B0306BA41}")]
    [IDispatchImpl(IDispatchImplType.CompatibleImpl)]
    partial class MyVerySimpleClass : _MyVerySimpleClass
    {

        #region _MyVerySimpleClass Members
        //Explicit implementation is better because it avoids messing your .NET
        //class specification. Sometimes when you expose thru COM you can have problem with
        //methods overloads. For example you have to have the same method name but differente
        //return type. Or you have a collition with an existing member.
        int _MyVerySimpleClass.GetMyLuckyNumber()
        {
            return GetMyLuckyNumber();
        }

        #endregion
    }
And your TLB is now explicit and exposes ONLY what you really really want.
// Generated .IDL file (by the OLE/COM Object Viewer)
//
// typelib filename: <could not determine filename>
[
uuid(370E4AD4-073B-4984-8C7D-5ED027F7B1CA),
version(1.0)
]
library ClassLibrary1
{
// TLib : // TLib : mscorlib.dll : {BED7F4EA-1A96-11D2-8F08-00A0C9A6186D}
importlib("mscorlib.tlb");
// TLib : OLE Automation : {00020430-0000-0000-C000-000000000046}
importlib("stdole2.tlb");
// Forward declare all types defined in this typelib
interface _MyVerySimpleClass;
[
odl,
uuid(80D00C45-EE10-3D65-A5FF-42AB7D8F8A71),
version(1.0),
dual,
oleautomation,
custom({0F21F359-AB84-41E8-9A78-36D110E6D2F9}, "InteropExamples._MyVerySimpleClass")
]
interface _MyVerySimpleClass : IDispatch {
[id(0x60020000)]
HRESULT GetMyLuckyNumber([out, retval] long* pRetVal);
};
[
uuid(029D468C-8BE6-498F-8A57-3B4B0306BA41),
version(1.0),
custom({0F21F359-AB84-41E8-9A78-36D110E6D2F9}, "InteropExamples.MyVerySimpleClass")
]
coclass MyVerySimpleClass {
interface _Object;
[default] interface _MyVerySimpleClass;
};
};
For more info about BinaryCompatibility see my other posts on Interop.
Microsoft has decided that .hlp files are not the best option for your help files.
And you will probably receive an error message like: http://support.microsoft.com/kb/917607
If you still want to run your .hlp help files you still can look for a WinHelp viewer for Vista from Microsoft.
But as someone that has been in the application migration/upgrade bussiness for several year I think automatic migration is a very good option.
For example take a look at the following links:
Good luck! And If you had any other suggestions just leave a comment.
I was recently trying to get the exact width of a string. And I found that the Graphics.MeasureString does not give an exact result.
I finally found Pierre Arnaud
post in Code Project, which gave me a good explaination and solution of what was happening.
You can see in the image Pierre put in his post:

That Graphics.measurestring will return a size that might be bigger that the actual drawn size, this is due some GDI+ details that he explains in that post.
I really like the second proposed solution:
static public int MeasureDisplayStringWidth(Graphics graphics, string text,Font font)
{
System.Drawing.StringFormat format = new System.Drawing.StringFormat ();
System.Drawing.RectangleF rect = new System.Drawing.RectangleF(0, 0,1000, 1000);
System.Drawing.CharacterRange[] ranges = { new System.Drawing.CharacterRange(0, text.Length) };
System.Drawing.Region[] regions = new System.Drawing.Region[1];
format.SetMeasurableCharacterRanges (ranges);
regions = graphics.MeasureCharacterRanges (text, font, rect, format);
rect = regions[0].GetBounds (graphics);
return (int)(rect.Right + 1.0f);
}
In VB6 ActiveX-EXEs or ActiveX OLE Server where used for several
reasons. Sometimes it was performance (because it allowed you to run
your code in another process) and sometimes as way to share resources
between several applications, like connection information, database
connections, mainframe info, etc.
During migration some of this ActiveX-Exes can be migrated as simple
Assembly DLLs, but other require more attention. Specially if they have
global variables that hold state shared by several programs.
In that is your case what are your options then?
1. Convert those ActiveX-Exes to Windows Services.
This option is simple. You modify your migrated assembly to work as a Windows Service. The easier way to do that is:
a) Start Microsoft Visual Studio 2005\2008
b) Go to File\New…\Project… and Select Windows Service
That will generated code like:
using System;
using System.Collections.Generic;
using System.ComponentModel;
using System.Data;
using System.Diagnostics;
using System.Linq;
using System.ServiceProcess;
using System.Text;
namespace WindowsService1
{
public partial class Service1 : ServiceBase
{
public Service1() { InitializeComponent(); }
protected override void OnStart(string[] args) { }
protected override void OnStop() { }
}
}
c) Add a reference to the Remoting Assemblies: System.Runtime.Remoting;
d) Modify the previous code:
Add two using statements like:
using System.Runtime.Remoting.Channels.Http;
using System.Runtime.Remoting.Channels;
using System.Runtime.Remoting;
Add a simple event log for tracing:
private static EventLog evt = new EventLog(“Application”);
private static string SVC_NAME = “ActiveX Server Example Svc”;
And modify the OnStart and OnStop methods to look like:
protected override void OnStart(string[] args)
{
HttpChannel chnl = new HttpChannel(1234);
ChannelServices.RegisterChannel(chnl,true );
RemotingConfiguration.RegisterWellKnownServiceType(typeof(MyClass), “MyClass.soap”, WellKnownObjectMode.Singleton);
evt.WriteEntry(SVC_NAME + ” Started”);
}
protected override void OnStop() { evt.WriteEntry(SVC_NAME +” Stoppped”); }
Also make sure that MyClass extends MarshalByRefClass
2. Convert those ActiveX-Exes using the Artinsoft ActiveX migration helpers.
Sometimes, you need your migrated application to replicate some of
the original ActiveX EXE \OLE DLL VB6 characteristics. For example you
need your ActiveX-EXE to start just when the first instance is created
and to resemble the VB6 logic for Process creation\destruction.
For that purpose Artinsoft has created some helpers that our
migration tool is able to automatically use in the generated code if it
detects that this functionality is needed.
The code will then be changed from:
Dim myInstance As New MyProject.MyClass
To the following Helper method:
myInstance = MyProjectFactory.Create< MyProject.MyClass>(myInstance);
And destroy calls can be changed to the following Helper method:
myInstance= MyProjectFactory.Dispose<MyProject.MyClass >( myInstance);
The migration tool will modify your ActiveX-EXEs or OLE Servers to
be Windows EXE and the helper will then locate the assembly that
contains the desired Class, create an instance and initilize a Remoting
channel to the desired classes. Settings as SingleUse and MultiUse are
also taken care by the helpers.
3. Other possible alternatives are using WFC and COM+ that I will comment in another post.
| vb Constant | Decimal Value | Hex Value | .NET |
| vbDstInvert | 5570569 | H550009 | System.Drawing.CopyPixelOperation.DestinationInvert
|
| vbMergeCopy |
12583114 |
HC000CA |
System.Drawing.CopyPixelOperation.MergeCopy
|
| vbMergePaint |
12255782 |
HBB0226 |
System.Drawing.CopyPixelOperation.MergePaint
|
| vbNotSrcCopy |
3342344 |
H330008 |
System.Drawing.CopyPixelOperation.NotSourceCopy
|
| vbNotSrcErase |
1114278 |
H1100A6 |
System.Drawing.CopyPixelOperation.NotSourceErase
|
| vbPatCopy |
15728673 |
HF00021 |
System.Drawing.CopyPixelOperation.PatCopy
|
| vbPatInvert |
5898313 |
H5A0049 |
System.Drawing.CopyPixelOperation.PatInvert
|
| vbPatPaint |
16452105 |
HFB0A09 |
System.Drawing.CopyPixelOperation.PatPaint
|
| vbSrcAnd |
8913094 |
H8800C6 |
System.Drawing.CopyPixelOperation.SourceAnd
|
| vbSrcCopy |
13369376 |
HCC0020 |
System.Drawing.CopyPixelOperation.SourceCopy
|
| vbSrcErase |
4457256 |
H440328 |
System.Drawing.CopyPixelOperation.SourceErase
|
| vbSrcInvert |
6684742 |
H660046 |
System.Drawing.CopyPixelOperation.SourceInvert
|
| vbSrcPaint |
15597702 |
HEE0086 |
System.Drawing.CopyPixelOperation.SourcePaint
|
To create a new Team System Project in Visual Studio 2005, follow these steps:
1. Go to the File Menu. Select New…, and in the New… submenu select Team Project… to start a wizard.

2. The “Specify the Team Project Settings” of the New Team Project wizard appears. Type the Team Project name. For example type MergeExample and click Next
![clip_image002[5]](http://blogs.artinsoft.net/public_img/0d61167332a7_CAF4/clip_image0025_thumb.jpg "clip_image002[5]")
3. In the following page, select the Process Template for the Team Project. We recommend using the Artinsoft Migration Methodology – v0.8 or later. Click Next.
![clip_image002[7]](http://blogs.artinsoft.net/public_img/0d61167332a7_CAF4/clip_image0027_thumb.jpg "clip_image002[7]")
4. In the following page, type the Title for the Team Project Portal. Type MergeExample. The Team Project Portal provides useful information about your project. Click Next
![clip_image002[9]](http://blogs.artinsoft.net/public_img/0d61167332a7_CAF4/clip_image0029_thumb.jpg "clip_image002[9]")
5. In the following page you select your source control settings.
Select the first option “Create an empty source control folder”. Click Next
![clip_image002[11]](http://blogs.artinsoft.net/public_img/0d61167332a7_CAF4/clip_image00211_thumb.jpg "clip_image002[11]")
6. In the following page a summary of your Team Project settings is presented. Click Finish
![clip_image002[17]](http://blogs.artinsoft.net/public_img/0d61167332a7_CAF4/clip_image00217_thumb.jpg "clip_image002[17]")
7. In the following page the a process bar appears while the project is created. Just wait until the process is done. It normally takes between 3 and 5 minutes.
![clip_image002[19]](http://blogs.artinsoft.net/public_img/0d61167332a7_CAF4/clip_image00219_thumb.jpg "clip_image002[19]")
This post will show you the necessary steps to configure Microsoft Visual Studio 2005 to use a Team System Project. In this example we will use a Team Project created to illustrate Continuous Migration with VBUC and MS Team System 2005, called MergeExample.
1. Start Microsoft Visual Studio 2005
2. Go to the File Menu\Open\Team Project…

3. Dialog is presented, where you can choose your Team Foundation Server, and the Team Project to use. For these Continuous Migration example we’ll assume a project called MergeExample.

4. The Team Explorer is shown, with your selected project.
Expand the elements for the Team Project you previously selected.

5. We now have to map our local directories to bind them to the
source control system. On the expanded tree, double click on the
Source Control Node

6. The Source Code Explorer is shown:

7. Go to the Workspaces dropdown box and select Workspaces…

8. The Manage workspace dialog is shown.
Select the appropiate workspace and click Edit…

9. On the Edit Workspace dialog type a description for your source control and select the source control Folder we had created (for this example it is $/MergeExample) and the directory for your code (for this example it is C:\MergeExample).

NOTE: if a message box about a pending update is shown, just click ok.
Now you have successfully mapped your directories, and you can start setting up your VB6 code for continuous migration
This post describes an an interesting workaround that you can use to support the migration of ActiveX Documents with the Artinsoft Visual Basic Upgrade Companion which is one of the Artinsoft \ Mobilize.NET tools you can use to modernize your Visual Basic, Windows Forms and PowerBuilder applications.
Currently the Visual Basic Upgrade Companion does not allow you to process ActiveX Document directly, but there is a workaround: in general ActiveX Document are something really close to an User Control which is a element that is migrated automatically by the Visual Basic Upgrade Companion.
This post provides a link to a tool (DOWNLOAD TOOL) that can fix your VB6 projects, so the Visual Basic Upgrade Companion processes them. To run the tool:
1) Open the command prompt
2) Go to the Folder where the .vbp file is located
3) Execute a command line command like:
FixUserDocuments Project1.vbp
This will generate a new project called Project1_modified.vbp. Migrate this new project and now UserDocuments will be supported.
First Some History
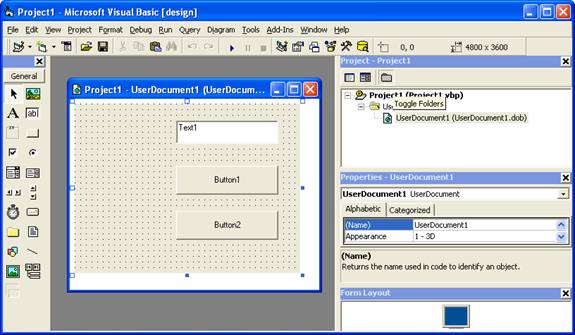
VB6 allows you to create UserDocuments, which can be embedded inside an ActiveX container. The most common one is Internet Explorer. After compilation, the document is contained in a Visual Basic Document file (.VBD) and the server is contained in either an .EXE or .DLL file. During development, the project is in a .DOB file, which is a plain text file containing the definitions of the project’s controls, source code, and so on.
If an ActiveX document project contains graphical elements that cannot be stored in text format, they will be kept in a .DOX file. The .DOB and .DOX files in an ActiveX document project are parallel to the .FRM and .FRX files of a regular Visual Basic executable project.
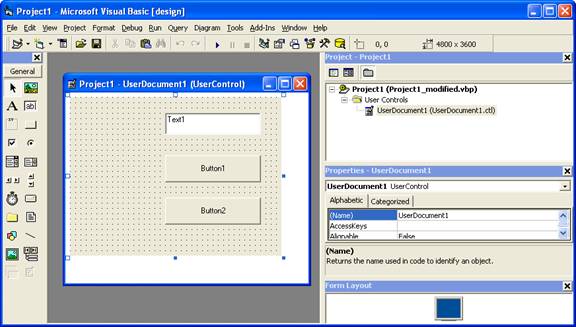
The trick to support ActiveX documents is that in general they are very similar to UserControls, and .NET UserControls can also be hosted in a WebBrowser. The following command line tool can be used to update your VB6 projects. It will generate a new solution where UserDocuments will be defined as UserControls.
If you have an ActiveX document like the following:
Then after running the tool you will have an Project like the following:
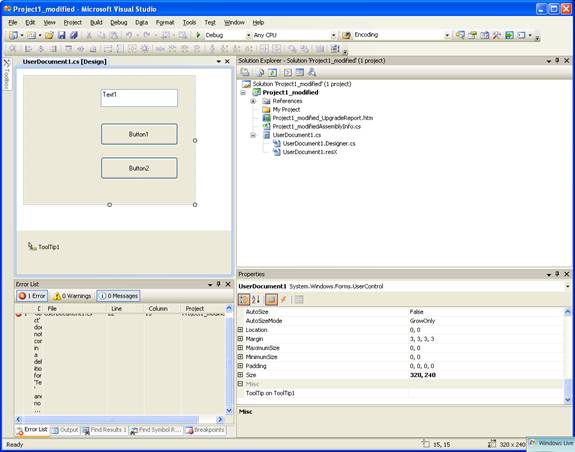
So after you have upgraded the projet with the Fixing tool, open the Visual Basic Upgrade Companion and migrate your project.
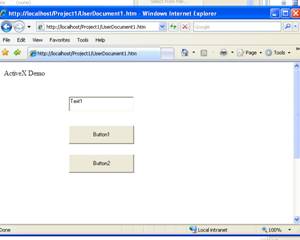
After migration you will get something like this:
To use your migrated code embedded in a Web Browser copy the generated assemblies and .pdb to the directory you will publish:
Next create an .HTM page. For example UserDocument1.htm
The contents of that page should be something like the following:
|
<html>
<body>
<p>ActiveX Demo<br> <br></body>
<object id="UserDocument1"
classid="http:<AssemblyFileName>#<QualifiedName of Object>"
height="500" width="500" VIEWASTEXT>
</object>
<br><br>
</html>
For example:
<html>
<body>
<p>ActiveX Demo<br> <br></body>
<object id="UserDocument1"
classid="http:Project1.dll#Project1.UserDocument1"
height="500" width="500" VIEWASTEXT>
</object>
<br><br>
</html>
|
Now all that is left is to publish the output directory.
To publish your WinForms user control follow these steps.
- Create a Virtual Directory:
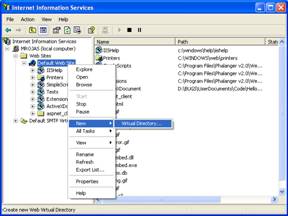
- A Wizard to create a Virtual Directory will appear.

Click Next
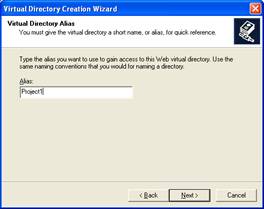
Name the directory as you want. For example Project1. Click Next
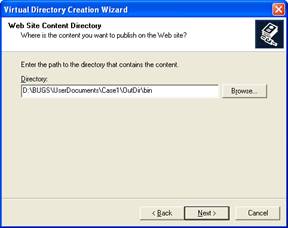
Select the location of your files. Click the Browse button to open a dialog box where you can select your files location. Click Next
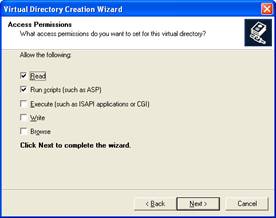
Check the read and run scripts checks and click next
Now Click Finish
- Properties for the Virtual Directory will look like this:
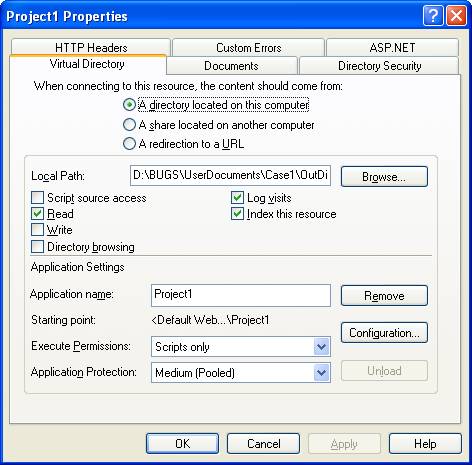
NOTE: to see this dialog right click over the virtual directory
- Now just browse to the address lets say http:\\localhost\Project1\UserDocument1.htm
And that should be all! :)
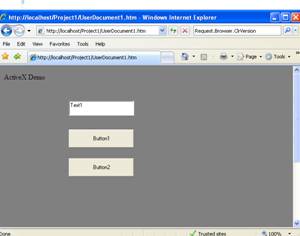
The colors are different because of the Host configuration however a simple CSS like:
<style>
body {background-color: gray;}
</style>
Can make the desired change:
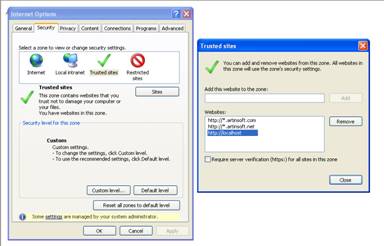
Notice that there will be security limitations, for example for thinks like MessageBoxes.
You can allow restricted operations by setting your site as a restricted site:
For example:

Restrictions
The constraints for this solution include:
* This solutions requires Windows operating system on the client side
* Internet Explorer 6.0 is the only browser that provides support for this type of hosting
* It requires .NET runtime to be installed on the client machine.
* It also requires Windows 2000 and IIS 5.0 or above on the server side
Due to all of the above constraints, it might be beneficial to detect the capabilities of the client machine and then deliver content that is appropriate to them. For example, since forms controls hosted in IE require the presence of the .NET runtime on the client machine, we can write code to check if the client machine has the .NET runtime installed. You can do this by checking the value of the Request.Browser.ClrVersion property. If the client machine has .NET installed, this property will return the version number; otherwise it will return 0.0.
Adding a script like:
<script>
if ((navigator.userAgent.indexOf(".NET CLR")>-1))
{
//alert ("CLR available " +navigator.userAgent);
}
else
alert(".NET SDK/Runtime is not available for us from within " + "your web browser or your web browser is not supported." + " Please check with http://msdn.microsoft.com/net/ for " + "appropriate .NET runtime for your machine.");
</script>
Will help with that.
References:
ActiveX Documents Definitions:
http://www.aivosto.com/visdev/vdmbvis58.html
Hosting .NET Controls in IE
http://www.15seconds.com/issue/030610.htm