Silverlight is when you have to add a lot of items.
I know, I know maybe you should choose another way to show that data,
but leaving philosophical-ui design discussions, the real problem is that
usually those components are bind to ObservableCollections.
ObservableCollections are a bit of an exhibitionist.
Each time you add an item it will yell
Hey!! Yoo-hoo! HEY!!! YOU!!
I'm HEREEEEEEEEEEEEEEEEEE!!!!
Look at me!! Look at Me!!! Look Mom No Hands!!! Look Dad no Feet!!! HEY!!!!!!!!
So if you have some code like:
for(int i=0;i<10000;i++)
{
    comboItems.Add("item" + i);
}
A nice thing will be to be able to do something like:
var items = new String[10000]
for(int i=0;i<10000;i++)
{
    items[i]="item" + i;
}
comboItems.AddRange(items);
And then provide just ONE notification of Collection Changed instead of a lot of
little cries for attention.
Well that is the reason for this new version of ObservableCollection that I call
RangeObservableCollection:
using System;
using System.Collections.ObjectModel;
using System.Collections.Generic;

namespace Utils
{
    public class RangeObservableCollection<T> : ObservableCollection<T>
    {
        private bool _suppressNotification = false;

        public RangeObservableCollection() : base() { }

        public RangeObservableCollection(IEnumerable<T> collection) : base(collection) { }

        protected override void OnPropertyChanged(System.ComponentModel.PropertyChangedEventArgs e)
        {
            if (!_suppressNotification) base.OnPropertyChanged(e);
        }

        protected override void OnCollectionChanged(System.Collections.Specialized.NotifyCollectionChangedEventArgs e)
        {
            if (!_suppressNotification)
                base.OnCollectionChanged(e);
        }

        /// <summary>
        /// Adds a collection suppressing notification per item and just raising a notification
        /// for the whole collection
        /// </summary>
        /// <param name="list"></param>
        public void AddRange(IEnumerable<T> list)
        {
            if (list == null) throw new ArgumentNullException("list");
            _suppressNotification = true;
            foreach (T item in list)
            {
                Add(item);
            }
            _suppressNotification = false;
            OnCollectionChanged(new System.Collections.Specialized.NotifyCollectionChangedEventArgs(System.Collections.Specialized.NotifyCollectionChangedAction.Reset));
        }

    }

}
The following C# code shows how to use WMI to query printers information, set and get default printer.
public bool SetDefaultPrinter()
{
    System.Management.ManagementObjectSearcher search =
                   default(System.Management.ManagementObjectSearcher);
    System.Management.ManagementObjectCollection results =
                   default(System.Management.ManagementObjectCollection);
    System.Management.ManagementObject printer =
                   default(System.Management.ManagementObject);


    search =
     new System.Management.ManagementObjectSearcher("select * from win32_printer");
    results = search.Get();
    //Get Default Printer
    System.Management.ManagementObject defaultPrinter = null;
    foreach (System.Management.ManagementObject foundPrinter in results)
    {
        System.Management.PropertyDataCollection
              propertyDataCollection = foundPrinter.Properties;

         if ((bool)foundPrinter["Default"]) // DEFAULT PRINTER
         {
              System.Diagnostics.Debug.WriteLine(foundPrinter["Name"]);
              System.Diagnostics.Debug.WriteLine(foundPrinter["Location"]);
         }
     }


     //Sets new default Printer
     foreach (System.Management.ManagementObject foundPrinter in results)
     {
         System.Diagnostics.Debug.Print(foundPrinter["Name"].ToString());
         if (foundPrinter["Name"].Equals("PDFCreator"))
         {
             System.Management.ManagementBaseObject outParams =
                   foundPrinter.InvokeMethod("SetDefaultPrinter", null, null);
             if (outParams == null)
                 System.Diagnostics.Debug.WriteLine("Unable to set default printer");
             Int32 retVal = (int)(uint)outParams.Properties["ReturnValue"].Value;
             if (retVal == 0)
                return true;
             else
                return false;
         }
     }

    return false;

}
For VB6 applications it is common to rely on OS or Kernel API Calls. Some of those APIs might
need you to send data back and for the native API.
Marshalling in .NET can be complicated and bothersome. I have published several posts about
interop. But it usually depends on adding several marshalling attributes and even tricks specially for
fixed strings.
So I decided to provide a more a simpler approach for conversion. In this approach you just need to things:
1. Your VB6 types or structs will be mapped to .NET classes
2. All VB6 type or struct fields will be mapped to public fields
3. An attribute must be used on those fields to indicate the field length, for arrays or strings.
4. Extension methods .AsString() .SetFromString and .GetClassLength will handle all the complexities of setting the struct fields.
Let’s see an example:
Type EmployeeRecord
    FirstName As String * 5
    LastName As String * 5
End Type
That vb6 type will be mapped in .NET following this approach to:
    public class EmployeeRecord
    {
        [FixedLength(5)]
        public string FirstName = "Mau";
        [FixedLength(5)]
        public string LastName = "Rojas";

    }
You can then simple use that class in .NET
var emp = new EmployeeRecord {FirstName="Mauricio",LastName="Rojas"} ;
var str = emp.AsString();
//This str value will be "MauriRojas" the helper extension methods
// .AsString and .SetFromString will handle setting the internal class fields
All that is very good but how is this used in Marshalling?? Well very simple. Let’s say you have a Dll called foo.dll
with a function foo that receives an EmployeeRecord:
        [DllImport("foo.dll")]
        public static extern int foo(IntPtr Struct);
Then if you want to call that function you will do something like:
            var emp = new EmployeeRecord { FirstName="Ann",LastName="Smith"};
            string str = emp.AsString();
            var ptr = IntPtr.Zero;
            ptr = Marshal.StringToBSTR(str);
            //or
            ptr = Marshal.StringToHGlobalAnsi(str);
            //or
            ptr = Marshal.StringToHGlobalAuto(str);
            //or
            ptr = Marshal.StringToHGlobalUni(str);

            //And call the native function
            foo(ptr);
If the function modifies the structure and you want to reflect those changes then you will do something like:
str = Marshal.PtrToStringAnsi(ptr,typeof(EmployeeRecord).GetClassLength())
emp.SetFromString(str);
This solution can also be applied for more complex structures. For example:
    public class EmployeeRecord
    {
        [FixedLength(5)]
        public string FirstName = "Mau";
        [FixedLength(5)]
        public string LastName = "Rojas";

    }

    public class Record1
    {
        public int field1;
        [FixedLength(10)]
        public string field2 = "";
        public EmployeeRecord rec = new EmployeeRecord();
    }

    public class GeneralInfo
    {
        public int field1;
        [ArrayLength(5)]
        [FixedLength(2)]
        public String[] countrycodes = { "cr","es","mx","pa","ni"};
        [FixedLength(2)]
        public EmployeeRecord[] employees;
    }
If you want to try it out this is the link to the CODE
If you were in VB6 HelpContextID will be familiar for you (http://msdn.microsoft.com/en-us/library/aa267690(v=vs.60).aspx). In those sweet VB6 days all you had to do was:
Private Sub Form_Load ()
   App.HelpFile = "VB.HLP"
   Frame1.HelpContextID = 21004
   Text1.HelpContextID = 21001
   Form1.HelpContextID = 21005
End Sub
And each time you pressed the F1 button your application will have opened the .hlp file and show you the Help Topic corresponding to that ID. After migration from VB6 to WinForms Help you now have the HelpProvider.SetHelpKeyword http://msdn.microsoft.com/en-us/library/system.windows.forms.helpprovider.sethelpkeyword.aspx And you had to do something like:
internal System.Windows.Forms.HelpProvider HelpProvider1;
...
HelpProvider1.HelpNamespace = "sample.chm";
HelpProvider1.SetHelpKeyword(TextBox1, "1007.html");
HelpProvider1.SetHelpNavigator(TextBox1, HelpNavigator.Topic);
HelpProvider1.SetHelpKeyword(ListBox1, "1006.html");
HelpProvider1.SetHelpNavigator(ListBox1, HelpNavigator.Topic);
And all that seems nice. But, what can you do when you cross over to SilverlightjQuery15205164761650376022_1357918518660? Well, in general there are several systems that allow you to author your help files in html or convert your .hlp or .chm files to html, but how do you link your components to that help system in order to provide context-sensitive help???? Ok. So one of the possible solutions is very very simple. In general, the solution that I will show in this post is this: 1) First implement an attached property for adding a HelpKeyword to Silverlight components 2) Set the helpkeyword in the desired components 3) Provide logic that will open the appropiate help file. Ok. So let's implement a Silverlight Attached property. An attached propery is like adding a new property to your controls. This new attached property will be called Helpkeyword
using System;
using System.Windows.Shapes;
namespace System.Windows.Controls
{
    public class HelpProvider
    {
        public static readonly DependencyProperty HelpKeyword =
            DependencyProperty.RegisterAttached("HelpKeyword", typeof(string), typeof(HelpProvider), new PropertyMetadata(null));
        public static void SetHelpKeyword(UIElement element, string keyword)
        {
            element.SetValue(HelpKeyword, keyword);
        }

        public static string GetHelpKeyword(UIElement element)
        {
            return (string)element.GetValue(HelpKeyword);
        }
    }
}
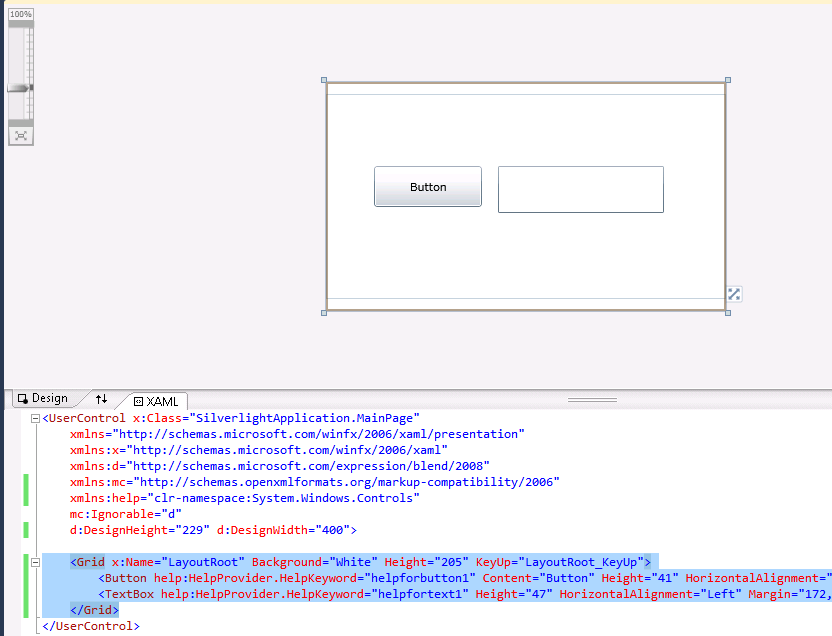
Ok. So once we have the attached property we have to use it, and set it on the code: To set it on the code we must add a namespace:
<UserControl x:Class="SilverlightApplication.MainPage"
    xmlns="http://schemas.microsoft.com/winfx/2006/xaml/presentation"
    ...
    xmlns:help="clr-namespace:System.Windows.Controls"
    mc:Ignorable="d"
    ....>
And apply the attribute to components
<Button help:HelpProvider.HelpKeyword="helpforbutton1" Content="Button" ...  />
<TextBox help:HelpProvider.HelpKeyword="helpfortext1" Height="47" ... />
So that almost everything, now we just need to trigger the appropiate logic, to do that we will add a KeyUp handler to the top most element, in this example a grid. NOTE: if Silverlight is running on the browser F1 is not an option. I just used F2 here as an example.
<Grid x:Name="LayoutRoot" Background="White" Height="205" KeyUp="LayoutRoot_KeyUp">
<Button help:HelpProvider.HelpKeyword="helpforbutton1" ...  />
<TextBox help:HelpProvider.HelpKeyword="helpfortext1" ... />
</Grid>
using System;
using System.Windows;
using System.Windows.Controls;
using System.Windows.Input;
using System.Windows.Browser;

namespace SilverlightApplication
{
    public partial class MainPage : UserControl
    {
        public MainPage()
        {
            InitializeComponent();
        }

        private void LayoutRoot_KeyUp(object sender, KeyEventArgs e)
        {
            //check for the specific key. For now use F2 as the Help Shortcut
            if (e.Key==Key.F2) {
                    var uielement = FocusManager.GetFocusedElement() as UIElement;
                    if (uielement!=null)
                    {

                        var keyword = HelpProvider.GetHelpKeyword(uielement);
                        var host = HtmlPage.Document.DocumentUri.Host;
                        var port = HtmlPage.Document.DocumentUri.Port;
                        var url = string.Format("http://{0}:{1}/help/{2}.html", host,port,keyword);
                        HtmlPage.Window.Navigate(new Uri(url),"_blank");
                    }
            } // else ignore the keystroke
        }
    }
}
This property can be used on the IDE:
On code
var uielement = FocusManager.GetFocusedElement() as UIElement;
if (uielement!=null) {
var keyword = HelpProvider.GetHelpKeyword(uielement);
}
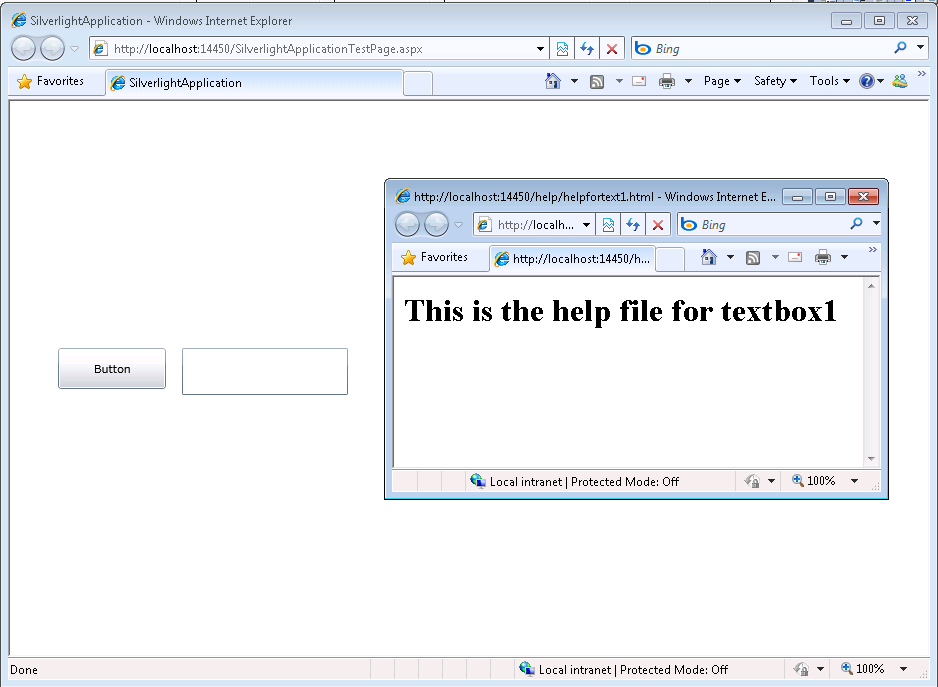
This is an image of the application running.
And you can download the code from: CODE
If you have any questions or would like more info on Silverlight migration check www.silverlightmigration.com
In VB6 when you have an ActiveX Library it was very important to use
the BinaryCompatibility setting to make sure that your applications did not break after a change.
So let’s first introduce what is binary compatibility and how to accomplish that in .NET.
Binary Compatibility allows to make changes to your components or COM classes without recompiling
every application you've made that uses the component.
And why do you need it. Why compatibility breaks.
On lets see.
An ActiveX Control or DLL expose Public interfaces.
Those interfaces have all of the properties, methods, events, etc. that you've marked as Public.
In other words, everything you've added that shows in Intellisense while working outside of your component.
Now let's say you have create a class, with two Methods Method1 and Method2
When you compile, VB generates all the COM infraestructure you need for your component.
It defines a CoClass and an interface and an entry for each method.
For a vb class with two methods:
Sub Method1()

End Sub

Sub Method2()

End Sub
It will produce a typelib like:
// Generated .IDL file (by the OLE/COM Object Viewer)
//
// typelib filename: <could not determine filename>
[
  uuid(8ABA2C0C-7CCA-40CD-A944-56707566634A),
  version(1.0)
]
library Project1
{
    // TLib :     // TLib : OLE Automation : {00020430-0000-0000-C000-000000000046}
    importlib("stdole2.tlb");

    // Forward declare all types defined in this typelib
    interface _Class1;

    [
      odl,
      uuid(6B86684C-B3DD-4680-BF95-8DEE2C17AF5B),
      version(1.0),
      hidden,
      dual,
      nonextensible,
      oleautomation
    ]
    interface _Class1 : IDispatch {
        [id(0x60030000)]
        HRESULT Method1();
        [id(0x60030001)]
        HRESULT Method2();
    };

    [
      uuid(C71C7AB0-552A-4D5D-A9FB-AF33830A697E),
      version(1.0)
    ]
    coclass Class1 {
        [default] interface _Class1;
    };
};
As you can see in the typelib there are IDs associated to each coclass, interface and
methods. Those IDs are the ones use when you generate the .exe file for your application.
Now if you modify your Class to:
Sub Method3()

End Sub

Sub Method4()

End Sub

Sub Method1()

End Sub

Sub Method2()

End Sub
and you use No Compatibility the typelib after your changes will be:
// Generated .IDL file (by the OLE/COM Object Viewer)
//
// typelib filename: <could not determine filename>

[
  uuid(FE5C56C2-E03A-4DC0-994D-B68543C72A46),
  version(1.0)
]
library Project1
{
    // TLib :     // TLib : OLE Automation : {00020430-0000-0000-C000-000000000046}
    importlib("stdole2.tlb");

    // Forward declare all types defined in this typelib
    interface _Class1;

    [
      odl,
      uuid(A3032E1E-52FE-42E0-98FF-84A9DD4FD8C3),
      version(1.0),
      hidden,
      dual,
      nonextensible,
      oleautomation
    ]
    interface _Class1 : IDispatch {
        [id(0x60030000)]
        HRESULT Method3();
        [id(0x60030001)]
        HRESULT Method4();
        [id(0x60030002)]
        HRESULT Method1();
        [id(0x60030003)]
        HRESULT Method2();
    };

    [
      uuid(72721504-CC56-4BB9-9447-C7193FE8C02D),
      version(1.0)
    ]
    coclass Class1 {
        [default] interface _Class1;
    };
};
As you can see, now the ids for the methods, CoClass are different, so your applications will return errors like: Error 430 (Automation error, the component dies horribly) or Error 429 (can't create the object at all)
But if you instead used BinaryCompatibility then the typelib for your class will be:
// Generated .IDL file (by the OLE/COM Object Viewer)
//
// typelib filename: <could not determine filename>
[
  uuid(8ABA2C0C-7CCA-40CD-A944-56707566634A),
  version(1.1)
]
library Project1
{
    // TLib :     // TLib : OLE Automation : {00020430-0000-0000-C000-000000000046}
    importlib("stdole2.tlb");

    // Forward declare all types defined in this typelib
    interface _Class1;
    [
      odl,
      uuid(6E9C59C3-82D7-444C-92FB-01B49D91A2FF),
      version(1.1),
      hidden,
      dual,
      nonextensible,
      oleautomation
    ]
    interface _Class1 : IDispatch {
        [id(0x60030002)]
        HRESULT Method3();
        [id(0x60030003)]
        HRESULT Method4();
        [id(0x60030000)]
        HRESULT Method1();
        [id(0x60030001)]
        HRESULT Method2();
    };

    [
      uuid(C71C7AB0-552A-4D5D-A9FB-AF33830A697E),
      version(1.1)
    ]
    coclass Class1 {
        [default] interface _Class1;
    };

    typedef [uuid(6B86684C-B3DD-4680-BF95-8DEE2C17AF5B), version(1.0), public]
    _Class1 Class1___v0;
};
If you compare now the two typelibs you can see the Method1 and Method2 keep the same ids.
For each version a typedef is generated that will point to the last version. For example adding a Method5 will add new entry like:
    typedef [uuid(6B86684C-B3DD-4680-BF95-8DEE2C17AF5B), version(1.0), public]
    _Class1 Class1___v0;

    typedef [uuid(6E9C59C3-82D7-444C-92FB-01B49D91A2FF), version(1.1), public]
    _Class1 Class1___v1;
Well that is what binary compatibility does. Now how to achieve binary compatibility in .NET
Binary Compatibility in .NET
Achieving binary compatibility in .NET is really easy. You just need to give more information to
make explicit how your typelib information will be. I will follow an approach as the one I already explained in this post:
http://blogs.artinsoft.net/mrojas/archive/2010/06/23/exposing-c-classes-thru-interop.aspx
Lets take our previous example:
using System;
using System.Runtime.InteropServices;

namespace InteropExamples
{
    public class Class1
    {
        public void Method3()
        {
        }
        public void Method4()
        {
        }
        public void Method1()
        {
        }
        public void Method2()
        {
        }
        public void Method5()
        {
        }
    }
}
In previous posts I had recommended using partial classes and using interfaces to explicitly specify what you what to be seen in COM. This means you start up with something like:
  public partial class Class1
    {
        public void Method3()
        {
        }
        public void Method4()
        {
        }
        public void Method1()
        {
        }
        public void Method2()
        {
        }
    }

    [ComVisible(true)]
    public interface _Class1
    {
        void Method3();
        void Method4();
        void Method1();
        void Method2();

    }
    [ComVisible(true)]
    [ClassInterface(ClassInterfaceType.None)]
    [ComDefaultInterface(typeof(_Class1))]
    partial class Class1 : _Class1
    {
        #region _Class1 Members

        void _Class1.Method3()
        {
            Method3();
        }

        void _Class1.Method4()
        {
            Method4();
        }

        void _Class1.Method1()
        {
            Method1();
        }

        void _Class1.Method2()
        {
            Method2();
        }

        #endregion
    }
Now to make this code binary compatible then you have to make sure that the tlb file generated for your class is almost identical to that generated before. To acomplish that we must make sure that we your methods, interfaces and classes have the same guids and ids. Lets see how:
using System;
using System.Runtime.InteropServices;

namespace InteropExamples
{
    public partial class Class1
    {

        public void Method3()
        {
            System.Windows.Forms.MessageBox.Show("3 N");
        }

        public void Method4()
        {
            System.Windows.Forms.MessageBox.Show("4 N");
        }

        public void Method5()
        {
            System.Windows.Forms.MessageBox.Show("5 N");
        }


        public void Method1()
        {
            System.Windows.Forms.MessageBox.Show("1 N");
        }

        public void Method2()
        {
            System.Windows.Forms.MessageBox.Show("2 N");
        }
    }

    [ComVisible(true)] //This to make the interface Visible for COM
    [TypeLibType((TypeLibTypeFlags)((short)TypeLibTypeFlags.FHidden |
        (short)TypeLibTypeFlags.FDual |
        (short)TypeLibTypeFlags.FNonExtensible |
        (short)TypeLibTypeFlags.FOleAutomation))] //This to use the same flags as in previous tlb
    [Guid("9BAFD76D-8E6B-439C-8B6D-37260BFA3317")] //This is to make the class have the guid
    public interface _Class1
    {
        [DispId(0x60030000)]
        void Method1();
        [DispId(0x60030001)]
        void Method2();
        [DispId(0x60030002)]
        void Method3();
        [DispId(0x60030003)]
        void Method4();
        [DispId(0x60030004)]
        void Method5();


    }

    [ComVisible(true)] //This to make the class Visible for COM
    [ClassInterface(ClassInterfaceType.None)] //This is to make sure that we have control on interface generation
    [ComDefaultInterface(typeof(_Class1))] //To set default interface
    [ProgId("Project1.Class1")] //To set ProgId
    [Guid("C71C7AB0-552A-4D5D-A9FB-AF33830A697E")] //Maintain same Guid.
    partial class Class1 : _Class1, Class1___v0, Class1___v1
    {
        #region _Class1 Members

        void _Class1.Method3()
        {
            Method3();
        }

        void _Class1.Method4()
        {
            Method4();
        }

        void _Class1.Method1()
        {
            Method1();
        }

        void _Class1.Method2()
        {
            Method2();
        }

        #endregion


        #region Class1___v0 Members

        void Class1___v0.Method1()
        {
            Method1();
        }

        void Class1___v0.Method2()
        {
            Method2();
        }

        void Class1___v0.Method3()
        {
            Method3();
        }

        void Class1___v0.Method4()
        {
            Method4();
        }

        void Class1___v0.Method5()
        {
            Method5();
        }

        #endregion

        #region Class1___v1 Members

        void Class1___v1.Method1()
        {
            Method1();
        }

        void Class1___v1.Method2()
        {
            Method2();
        }

        void Class1___v1.Method3()
        {
            Method3();
        }

        void Class1___v1.Method4()
        {
            Method4();
        }

        void Class1___v1.Method5()
        {
            Method5();
        }

        #endregion
    }

    //This is to keep compatibility with old versions
    //we cannot generate a typedef so we will need to add all of the versions
    //for BinaryCompatibility
    [ComVisible(true)]
    [Guid("6B86684C-B3DD-4680-BF95-8DEE2C17AF5B")]
    [TypeLibType(TypeLibTypeFlags.FHidden)]
    public interface Class1___v0
    {
        [DispId(0x60030000)]
        void Method1();
        [DispId(0x60030001)]
        void Method2();
        [DispId(0x60030002)]
        void Method3();
        [DispId(0x60030003)]
        void Method4();
        [DispId(0x60030004)]
        void Method5();
    }

    //This is to keep compatibility with old versions
    //we cannot generate a typedef so we will need to add all of the versions
    //for BinaryCompatibility
    [ComVisible(true)]
    [Guid("4A7A3317-BF13-443E-9DB0-2C5EA21F00CA")]
    [TypeLibType(TypeLibTypeFlags.FHidden)]
    public interface Class1___v1
    {
        [DispId(0x60030000)]
        void Method1();
        [DispId(0x60030001)]
        void Method2();
        [DispId(0x60030002)]
        void Method3();
        [DispId(0x60030003)]
        void Method4();
        [DispId(0x60030004)]
        void Method5();
    }

}
Sadly in .NET you cannot use Interface Inheritance in COM. If there is interface inheritance YOU HAVE TO IMPLEMENT each interface. In the case of code that comes from VB6. VB6 just uses typedefs, so you really don’t know which methods belong to each version. So in the end all versions have all methods.
The other alternative to this method, is just to implement last version. And after generating the tlb, decompile it to an .IDL file add the typedefs and recompiled it. I explained something similar in this post:http://blogs.artinsoft.net/mrojas/archive/2010/05/17/interop-remove-prefix-from-c-enums-for-com.aspx
Ok. I hope this helps you to have an more clear idea of what Binary Compatibility is and how to do it in .NET. I am attaching some sample code. It show an ActiveX library that uses BinaryCompatibility and three version on an aplications that uses the different versions. And also a .NET class library that is equivalent to the VB6 one. HERE
Enjoy.
Either if you migrate your application from VB6 to C# or if you develop a new application in C# something you end up with cases where you need to use your classes in legacy apps. Some of them could have been written in VB6 or could even be VBA macros in Excel applications.
Exposing your .NET classes can be sometimes very easy (you can think is just a matter of putting a ComVisible tag) but in other occasions is not that simple. Specially if your legacy application is using a lot of Late Bound calls like in VBA, so you must make sure that the COM information that you are exposing for your class is exactly what you really want and need.
OK. So I will provide some guidelines or some steps you should follow to provide a consistent COM interface for your .NET Code.
1. First you have to add the [ComVisible(true)] attribute. Don’t think that’s all. Even if in some cases that is enough is better if you take an strict control of want is being generated for your class. Ok Let’s use the following class as an example:
using System;
using System.Runtime.InteropServices;

namespace InteropExamples
{
    [ComVisible(true)]
    public class MyVerySimpleClass
    {
        public Class2 CreateANewClass()
        {  return new Class2()     }

        public int GetMyLuckyNumber() { return 15; }
    }
public class Class2 { }
}
// Generated .IDL file (by the OLE/COM Object Viewer)
//
// typelib filename: <could not determine filename>
[
uuid(370E4AD4-073B-4984-8C7D-5ED027F7B1CA),
version(1.0)
]
library ClassLibrary1
{
// TLib : // TLib : mscorlib.dll : {BED7F4EA-1A96-11D2-8F08-00A0C9A6186D}
importlib("mscorlib.tlb");
// TLib : OLE Automation : {00020430-0000-0000-C000-000000000046}
importlib("stdole2.tlb");
// Forward declare all types defined in this typelib
interface _MyVerySimpleClass;
[
uuid(E03CCE68-2D55-3576-9DB6-019AAA667A5D),
version(1.0),
custom({0F21F359-AB84-41E8-9A78-36D110E6D2F9}, "InteropExamples.MyVerySimpleClass")
]
coclass MyVerySimpleClass {
[default] interface _MyVerySimpleClass;
interface _Object;
};
[
odl,
uuid(D18BEEE1-4425-3AC7-891E-807EC2283731),
hidden,
dual,
oleautomation,
custom({0F21F359-AB84-41E8-9A78-36D110E6D2F9}, "InteropExamples.MyVerySimpleClass")
]
interface _MyVerySimpleClass : IDispatch {
};
};
In this case your class will be expose using all defaults. That is, a progId that will be the <AssemblyName>.ClassName an interface _<ClassName> is generated and the class is exposed only for IDispatch, which would not provide class information if you add the tlb reference to a VB6 or VBA project.
And if you run this code in VB6 you will have a problem like type mismatch when you try to use the method x.CreateAClass because it is returning an object that is not exposed thru COM.
Private Sub Command1_Click()
Dim x As Object
Set x = CreateObject("InteropExamples.MyVerySimpleClass")
MsgBox x.GetMyLuckyNumber
MsgBox x.CreateAClass
End Sub
So my recommendation is to make explicit what you want to expose. Maybe you only need some of the methods to be exposed. Well that is step two.
2. Define a public, ComVisible(true) interface that will define the methods that you want to be exposed thru COM. Sometimes it is better to implement the interface explicitly. I even recommend using partial classes so you isolate the COM stuff from your normal class. If you class is very simple you can leave all COM stuff there.
    //It is better to have an interface, because
    //you are completely sure what you are exposing or not
    [ComVisible(true)]
    public interface _MyVerySimpleClass
    {
        int GetMyLuckyNumber();
    }
3. (Recommedation) This is not an obligatory step but I recommend using partial classes.
    //Using partial classes allow you to separate all the
    //COM plumbing and leave your .NET implementation simple
    public partial class MyVerySimpleClass
    {
        public Class2 CreateAClass()
        {
            return new Class2();
        }

        public int GetMyLuckyNumber() { return 15; }
    }
3. Make sure your partial class has the following attributes:
[ComVisible(true)] <—This is obvious because you want to use your class in COM
[ClassInterface(ClassInterfaceType.None)] <—This is because your want to take charge or what will be generated in your Typelib (tlb)
[ComDefaultInterface(typeof(_MyVerySimpleClass))] <—This is to indicate the interface that holds your COM visible methods.
[ProgId("InteropExamples.MyVerySimpleClass")] <—To establish which will be the progId not have a generated one
[Guid("{029D468C-8BE6-498f-8A57-3B4B0306BA41}")] <—this is important specially if you are trying to accomplish binary compatibility
Optionally add this attribute [IDispatchImpl(IDispatchImplType.CompatibleImpl)] this is currently marked as an obsolete attribute but it still works and I have found scenarios, specially in some VBA applications where you need this attribute in order to make some late bound calls.
4. And Explicitly implement the interface methods. This is important because some of the return values or arguments might need convertions. For example what can you do if your method returns a DataSet and your Excel VBA script is expecting something like a Recordset (more on this on other posts).
So now you will have a class like:
    //Using partial classes allow you to separate all the
    //COM plumbing and leave your .NET implementation simple
    public partial class MyVerySimpleClass
    {
        public Class2 CreateAClass()
        {
            return new Class2();
        }

        public int GetMyLuckyNumber() { return 15; }
    }

    //It is better to have an interface, because
    //you are completely sure what you are exposing or not
    [ComVisible(true)]
    public interface _MyVerySimpleClass
    {
        int GetMyLuckyNumber();
    }

    [ComVisible(true)]
    [ClassInterface(ClassInterfaceType.None)] //This is to make sure that no automatic generation of COM methods is done
    [ComDefaultInterface(typeof(_MyVerySimpleClass))] //This to explicitly establish which is the default interface
    [ProgId("InteropExamples.MyVerySimpleClass")]
    [Guid("{029D468C-8BE6-498f-8A57-3B4B0306BA41}")]
    [IDispatchImpl(IDispatchImplType.CompatibleImpl)]
    partial class MyVerySimpleClass : _MyVerySimpleClass
    {

        #region _MyVerySimpleClass Members
        //Explicit implementation is better because it avoids messing your .NET
        //class specification. Sometimes when you expose thru COM you can have problem with
        //methods overloads. For example you have to have the same method name but differente
        //return type. Or you have a collition with an existing member.
        int _MyVerySimpleClass.GetMyLuckyNumber()
        {
            return GetMyLuckyNumber();
        }

        #endregion
    }
And your TLB is now explicit and exposes ONLY what you really really want.
// Generated .IDL file (by the OLE/COM Object Viewer)
//
// typelib filename: <could not determine filename>
[
uuid(370E4AD4-073B-4984-8C7D-5ED027F7B1CA),
version(1.0)
]
library ClassLibrary1
{
// TLib : // TLib : mscorlib.dll : {BED7F4EA-1A96-11D2-8F08-00A0C9A6186D}
importlib("mscorlib.tlb");
// TLib : OLE Automation : {00020430-0000-0000-C000-000000000046}
importlib("stdole2.tlb");
// Forward declare all types defined in this typelib
interface _MyVerySimpleClass;
[
odl,
uuid(80D00C45-EE10-3D65-A5FF-42AB7D8F8A71),
version(1.0),
dual,
oleautomation,
custom({0F21F359-AB84-41E8-9A78-36D110E6D2F9}, "InteropExamples._MyVerySimpleClass")
]
interface _MyVerySimpleClass : IDispatch {
[id(0x60020000)]
HRESULT GetMyLuckyNumber([out, retval] long* pRetVal);
};
[
uuid(029D468C-8BE6-498F-8A57-3B4B0306BA41),
version(1.0),
custom({0F21F359-AB84-41E8-9A78-36D110E6D2F9}, "InteropExamples.MyVerySimpleClass")
]
coclass MyVerySimpleClass {
interface _Object;
[default] interface _MyVerySimpleClass;
};
};
For more info about BinaryCompatibility see my other posts on Interop.
When a VB6 COM+ Component is migrated to a ServiceComponent,
you might want to take advantage of the Configuration files of .NET to specify your
connection strings and other important information.
So where should your App.Config go.
There is a slight diference with a ServiceComponent.
Remember that for a ServicedComponent the hosting process is ‘dllhost.exe’.
So your programs will look for config files in %windir%\System32, which is not a very nice solution.
You can instead set the ‘Application Base Directory’ of the COM+ Application.
Follow these steps:
1) Create an application.manifest file and copy it to the directory
that will be used as the base directory for the COM+ application. The file can be like:
<?xml version="1.0" encoding="UTF-8" standalone="yes"?>
<assembly xmlns="urn:schemas-microsoft-com:asm.v1" manifestVersion="1.0"/>
2) Create an app.config file and copy that file to the same :
<?xml version="1.0" encoding="utf-8" ?>
<configuration>
<appSettings>
  <add key="ConfigData" value="My Custom AppSetting!" />
</appSettings>
</configuration>
3) Configure the COM+ Application:
3.1) Open the Component Services MMC
3.2) Find the COM+ Application
3.3) Right Click the Application and go to Properties and Activation Tab
3.4) Find option: ‘Application Root Directory’
3.5) Write the path where the other two files where created.
This blog post was created from an original Blog Post from HeikkiRi.
AutoCAD 2010 will not be supporting VBA.
Quoting
“If you utilize VBA macros in your work environment, they will no longer work unless the VBA module is installed on your system. “
“When you run a command that requires VBA, a message dialog box will be displayed stating that VBA is no longer installed with AutoCAD and directing you to a website where you can download the VBA module. “
And also you can see that Autodesk states: “Autodesk is evaluating how long VBA will be supported in Autodesk products in the future. Though supported in the AutoCAD 2010-based products, it may or may not be supported in future releases. Therefore, it is strongly recommended that VB developers develop all new code using VB .NET.”
VBA does not support 64bit systems in a native way.
But If you want some advice from the VB migration experts or help on your migration project from VBA to VB.NET or C# you can us contact Artinsoft Migration Services.
We build the VB Upgrade Wizard that shipped with Visual Studio and have been doing VB migrations for years.
We have seen a situation that can be a little annoying.
I usually find that situation in ASP.NET projects, but it can also happen in Winforms.
The issue is like this:
- You have a VStudio Solution
- You have added all the needed references
- All your code compiles
BUT
When you run the application it terminates at a certain point with a
FileNotFound exception indicating that the assembly blablabla or one of its
dependencies could not be loaded.
Whats hapenning!!!
Do this:
1) Look at the bin\debug or bin\release and make sure that the assembly is in those directories.
2) If the assembly is not there, then go to the project references in the solution explorer, right click and select properties and set the Copy Local Setting

| vb Constant | Decimal Value | Hex Value | .NET |
| vbDstInvert | 5570569 | H550009 | System.Drawing.CopyPixelOperation.DestinationInvert
|
| vbMergeCopy |
12583114 |
HC000CA |
System.Drawing.CopyPixelOperation.MergeCopy
|
| vbMergePaint |
12255782 |
HBB0226 |
System.Drawing.CopyPixelOperation.MergePaint
|
| vbNotSrcCopy |
3342344 |
H330008 |
System.Drawing.CopyPixelOperation.NotSourceCopy
|
| vbNotSrcErase |
1114278 |
H1100A6 |
System.Drawing.CopyPixelOperation.NotSourceErase
|
| vbPatCopy |
15728673 |
HF00021 |
System.Drawing.CopyPixelOperation.PatCopy
|
| vbPatInvert |
5898313 |
H5A0049 |
System.Drawing.CopyPixelOperation.PatInvert
|
| vbPatPaint |
16452105 |
HFB0A09 |
System.Drawing.CopyPixelOperation.PatPaint
|
| vbSrcAnd |
8913094 |
H8800C6 |
System.Drawing.CopyPixelOperation.SourceAnd
|
| vbSrcCopy |
13369376 |
HCC0020 |
System.Drawing.CopyPixelOperation.SourceCopy
|
| vbSrcErase |
4457256 |
H440328 |
System.Drawing.CopyPixelOperation.SourceErase
|
| vbSrcInvert |
6684742 |
H660046 |
System.Drawing.CopyPixelOperation.SourceInvert
|
| vbSrcPaint |
15597702 |
HEE0086 |
System.Drawing.CopyPixelOperation.SourcePaint
|