In VB6 the communication with backend services usually involves the definition of Types (or Structs) using fixed length strings.
VB6 provided language support for defining these data types.
For example:
Public Type HostData
	UserName       As String * 8
	PassWord       As String * 8
	FullName       As String * 50
End Type
Figure 1 Example of VB6 Type with Fixed Length Strings
There are some ways to model this structures in .NET using the FixedLengthString defined in Microsoft.VisualBasic.Compatibity.
Here I will present another approach.
This approach uses character arrays (char[]) to model this structures.
Ok. Let’s get down to business. To model a vb6 type like the one in Figure 1, we will use this approach:
struct HostData
    {
        [DebuggerDisplay("{s(UserName)}")]
        [MarshalAs(UnmanagedType.ByValArray, SizeConst=8)]
        public char[] UserName;

        [DebuggerDisplay("{s(PassWord)}")]
        [MarshalAs(UnmanagedType.ByValArray, SizeConst = 8)]
        char[] PassWord;

        [DebuggerDisplay("{s(FullName)}")]
        [MarshalAs(UnmanagedType.ByValArray, SizeConst = 50)]
        public char[] FullName;
        /// This method is used to provide a better display of
	 /// character arrays as strings on the debugger.
        string s(char[] array) { return new string(array); }

        public byte[] toByteArray() {
           return StructsHelper.StructToByteArray(this);
        }

 public static explicit operator HostData(byte[] array)
        {
            return (HostData)StructsHelper.ByteArrayToStructure(array,typeof(HostData));
        }

        /// <summary>
        /// Constructor to initialize the char arrays that are used as fixed length strings
        /// Struct constructors must have at least one parameter.
        /// </summary>
        /// <param name="initFixedLengthStrings">if true will automatically init all fixed length char arrays according to the SizeConst property of the MarshalAs attribute</param>
        public HostData (bool initFixedLengthStrings=false)
        {
            UserName = null;
            PassWord = null;
            FullName = null;
            if (initFixedLengthStrings)
            {
                StructsHelper.InitFixedStrings(GetType(), __makeref(this));
            }
        }
    }
Figure 2: Code of Example 1 in C#
So several tricks are used here, I will describe them:
First
All fixed length strings are declared as char[]. A MarshalAs attribute is applied to each field. Like this:
[MarshalAs(UnmanagedType.ByValArray, SizeConst=n)]
Where n is the number of characters in the fixed length strings. Note that character arrays must be initialized. However structs do not allow field initializers. So they will need to be initialized on a constructor.
Second
A DebuggerDisplay attribute
[DebuggerDisplay("{s(<AttributeName>)}")]
is added to each field, just to make the developer experience. That makes that instead of showing this field as a character array it will be shown as a string.
This attribute uses a small helper function used s that just converts the character array to string.
Third
A constructor is added. Structs do not accept parameter-less constructors.
This struct receives a Boolean indicating whether you want to initialize the character array fields.
As a requirement character arrays fields should at least be initialized to null. Character arrays could have been initialized here but I opted to create a helper function. Why? Well I think it is better if this arrays are initialized using the SizeConst attribute. So if I want to change their size I do not have to update both the SizeConst and the constructor.
public static void InitFixedStrings(Type type,TypedReference reference)
        {
            if (type.IsValueType && !type.IsPrimitive && !type.Namespace.StartsWith("System") && !type.IsEnum)
            {//This should be an struct
                foreach (var field in
                    type.GetFields(System.Reflection.BindingFlags.Instance |
                    System.Reflection.BindingFlags.Public | System.Reflection.BindingFlags.NonPublic))
                {

                    if (field.FieldType.IsArray && field.FieldType == typeof(char[]))
                    {
                        var attr = field.GetCustomAttributes(typeof(MarshalAsAttribute),false);
                        if (attr != null && attr.Length > 0)
                        {
                            MarshalAsAttribute maa = (MarshalAsAttribute)attr[0];
                            var constSize = maa.SizeConst;
                            if (constSize != -1)
                            {
                                var newValue = new char[constSize];
                                field.SetValueDirect(reference, newValue);
                            }
                        }
                    }
                }
            }
        }
Forth>
In VB6 the common approach is to use the StrConv and CopyMemory functions to copy memory to and from structs and send them as strings or event to copy data between structs of different types.
To solve that utility methods have been created:
/// <summary>
        /// Takes a bytearray and uses it to create a struct of the given type
        /// and populate it with the data of the byte array.
        /// NOTE: this method only works withs Structs which have a fixed size
        /// </summary>
        /// <param name="bytearray"> The data that will be used to initialize the struct</param>
        /// <param name="type">The type of the expected struct</param>
        /// <returns>A new struct instance with its fields initialized with the bytes from bytearray</returns>
        public static object ByteArrayToStructure(byte[] bytearray, Type type)
        {
            int len = Marshal.SizeOf(type);
            IntPtr i = Marshal.AllocHGlobal(len);
            Marshal.Copy(bytearray, 0, i, len);
            var obj = Marshal.PtrToStructure(i,type);
            Marshal.FreeHGlobal(i);
            return obj;
        }

/// <summary>
        /// Returns the contents of an struct as a byte array.
        /// It only works with fixed length structs.
        /// </summary>
        /// <param name="obj">the struct that holds the data that will be returned in the byte array</param>
        /// <returns>A byte array with the contents of the struct</returns>
        public static byte[] StructToByteArray(this object obj)
        {

            int len = Marshal.SizeOf(obj);
            byte[] arr = new byte[len];
            IntPtr ptr = Marshal.AllocHGlobal(len);
            Marshal.StructureToPtr(obj, ptr, true);
            Marshal.Copy(ptr, arr, 0, len);
            Marshal.FreeHGlobal(ptr);
            return arr;

        }
With these utility methods you can then use your structs like this:
var hostData = new HostData (true);
var byteArray = UnicodeEncoding.Unicode.GetBytes(new String(' ', Marshal.SizeOf(typeof(HostData))));
hostData = (HostData)byteArray;

var size = Marshal.SizeOf(HostData);
var test = "helloworld";
test = test.PadRight(size, '*');

byteArray = UnicodeEncoding.Unicode.GetBytes(test);
hostData = (HostData)byteArray;
Fifth
And finally how to you easily get/set data from these structs?
Very easy. We will add an extension method:
const string IF_VALUE_NOT_PROVIDED_THEN_RETURN_VALUE = "\0\0internal";
        /// <summary>
        /// This method is used to get/set the values of a char array as an string.
        /// It has been implemented in a way similar to that used in the jquery .val function.
        /// If called without parameters it will return the character array value as an string.
        /// If called with parameters will use the given string to set the character array value.
        /// If the given string is bigger that the character string the value is truncated
        /// </summary>
        /// <param name="array"></param>
        /// <param name="value"></param>
        /// <returns></returns>
        public static string val(this char[] array, String value = IF_VALUE_NOT_PROVIDED_THEN_RETURN_VALUE)
        {
            if (value == IF_VALUE_NOT_PROVIDED_THEN_RETURN_VALUE)
                return new string(array);
            else
            {
                var source = value.ToCharArray();
                Array.Copy(source, array, Math.Min(source.Length, array.Length));
                return value;
            }
        }
With that if you want to set a field you will do something like:
hostData.UserName.val(“Mauricio”)
And if you want to get the contents of the field you will do something like:
String username = hostData.UserName.val();
Well that’s all. Hope this helps
StructsHelpers.cs (5.93 kb)
Well tonight while I was deleting some spam comments from my blog and watching Dr. Who with my wife, I found a rather interesting comment.
So the story was:
First there is a VB6 DLL that had a class called Class1 with code like the following:
public type emprecord
name as string
end type

Public Sub Fn(T()as emprecord)
 MsgBox "The silence is comming said Prisoner 0"
End Sub
When this little dll was called from a VB.NET big brother
Dim test as new prj.class1
Dim em(0) as prj.emprecord 'able to create it no problem
em(0).name="hello"
test.fn(em)  ' here gives error
An error ocurred... well this is not very document issue with the TLBIMP tool which creates the interop assemblies. See StackOverflow Answer. The workaround is to right click on your type library, select properties, and change Embed interop Types to false.
After that you will be able to call your function.
Sometimes during migrations from VB6 to VS2010 we have found issues when you tried to add an ActiveX control with the VS2010 winforms designer. The issue is only present in VS2010 not on previous versions.
You usually will see an error in the added Interop references, and messages like a missing VBA or StdLib library.
The error has been reported several times so please vote on Connect to make sure MS will consider fixing it.
https://connect.microsoft.com/VisualStudio/feedback/details/557722/errors-utilizing-activex-controls-in-vs-2010
http://connect.microsoft.com/VisualStudio/feedback/details/568769/aximp-error-with-vb6-activex-control
And possible workarounds are running the Aximp manually from the command line and the add the references. You will then need to add the control by hand in your forms. Do not use the designer to add the component, this will try to regenerate the references and reproduice the issue.
Today someone asked what is a way to send messages between two .NET exes.
mmm Well. Interesting question. There are several approaches.
1. .NET Remoting
.NET remoting is not a new technology but is a core part of the
.NET framework and it's always available:
For an example see this code from: http://www.codeproject.com/Articles/62813/NET-Remoting-Events-Explained
2. Named Pipes
This is vb.net example: http://support.microsoft.com/kb/871044
3. WCF
WCF is a great option even if you have legacy VB6 code you can use the SOAP Client to communicate
with the service:
This link http://www.aspfree.com/c/a/VB.NET/Calling-a-Web-Service-using-VB6-with-SOAP-30/
shows an example calling a Coldfusion Service but use it as a base for calling
a WCF service
You can also integrate WCF with COM+ http://msdn.microsoft.com/en-us/library/bb735856.aspx
4. Windows Messages
There is a nice project that wrap it all up for you so you can use this solution:
http://www.codeproject.com/Articles/17606/NET-Interprocess-Communication
In VB6 you could use the commondialog to show several of the
standard operating system dialogs. For example show the a
the print setup dialog box or the print dialog box.
VB6 Example showing the Print Setup Dialog Box
cdlgprint.Flags = cdlPDPrintSetup

    cdlgprint.ShowPrinter
In .NET you have 4 kinds of Priting Dialogs:
PageSetupDialog
PrintDialog
PrintDocument
PrintPreviewDialog
So during a migration remember that if your were using the the CommonDialog.Flags
property to show the PrintSetupDialog you will have to change that for something like
var cdlgprint_ForPrintSetup  = new PrintSetupDialog();

 cdlgprint_ForPrintSetup.Print()
When you are migrating from VB6 to VB.NET most of the Put statements will be migrated to
FileSystem.FilePutObject http://msdn.microsoft.com/en-us/library/z07he9as.aspx
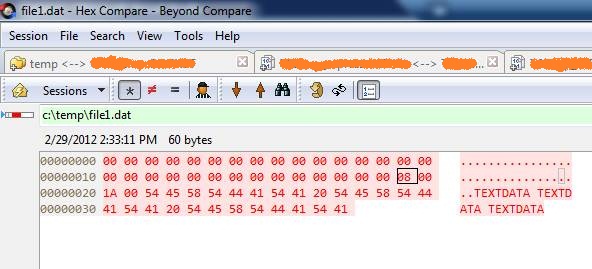
The problem with this is that if you need that the files generated by your application to be compatible byte per byte
with your VB6 generated files you must put special attention.
Take a look at this example:
Module Module1

    Sub Main()
              Dim str = "TEXTDATA"
              FileSystem.FileOpen(1, "c:\temp\file1.dat", OpenMode.Random, OpenAccess.Write, , 30)
              FileSystem.FilePutObject(1, str, 2)
              FileSystem.FileClose(1)
    End Sub

End Module
Module Module1

    Sub Main()
              Dim str = "TEXTDATA TEXTDATA TEXTDATA"
              FileSystem.FileOpen(1, "c:\temp\file1.dat", OpenMode.Random, OpenAccess.Write, , 30)
              FileSystem.FilePut(1, str, 2)
              FileSystem.FileClose(1)
    End Sub

End Module
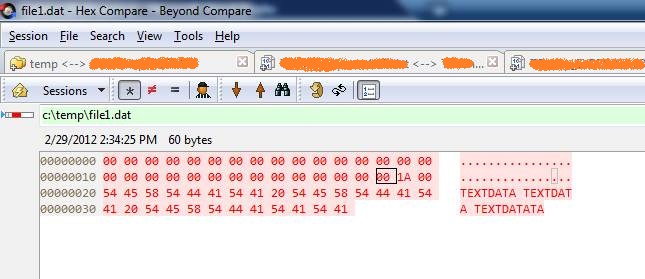
The difference might seem minimal but it can be hard to detect.
The different byte is caused by using the FilePutObject instead of FilePut method
I have developed a very quick replacement for the OLE Container Control that you had in VB6.
I just did it in rush so it just supports basic properties as DisplayType Icon or Content
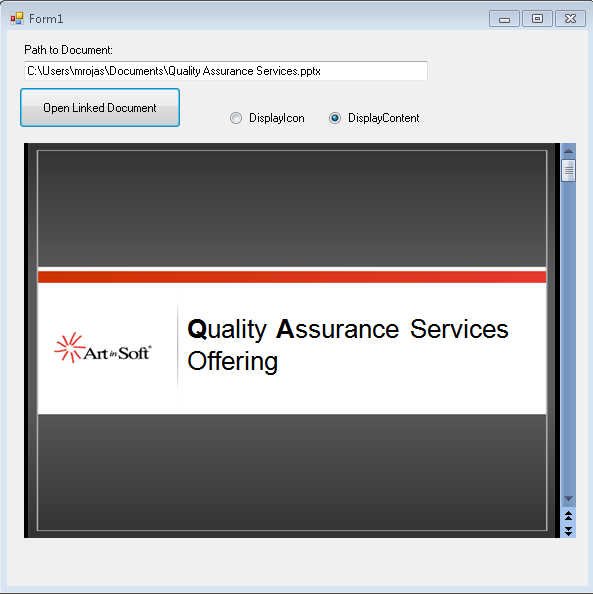
The content functionality is performed using the Vista feature for content preview. I would have tried using a
WebBrowser control but in new versions of Office, the default is not showing the document on the Browser and
it might be difficult to change the registry in some vista or Win7 environments.
The following picture show the OLEContainer inside a Windows Form.
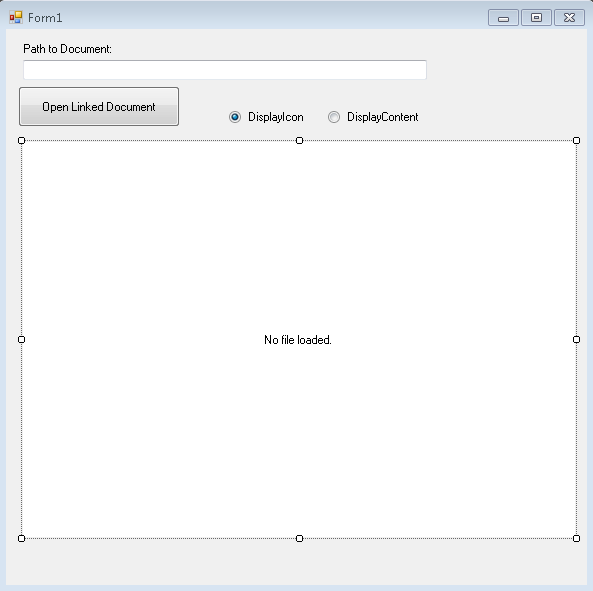
This is the container with the Display set to content:
And the container with display set to icon:
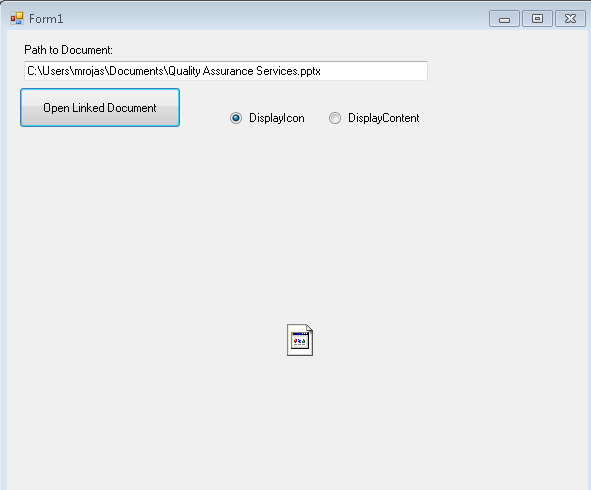
You can call the CreateLink and you can also use the DoVerb Open.
I have attached the example source code in this post.
ReplaceOLEContainer.zip (100.69 kb)
UPDATE
NOTE: I friend also sent me a link to this article in CodeProject which is very similar: http://www.codeproject.com/Tips/487566/OLE-container-surrogate-for-NET
NOTE: This solution only applies for read-only. If you wan to edit your files, then you need a real ActiveX container. MS used to have a sample OCX called DSOFramer that allows you to do that. Warning: this sample is no longer supported by MS becuase it said to have issues However I have used it in the past and it worked fine in some simple scenarios. I have added the control and its source to this post. There is a commercial product from Edraw http://www.edrawsoft.com/edword.php that is supported by them and has samples for C# and VB.NET
NOTE: Another approach, embed the application in your windows form.
In general what you should do is use the SetParent, SetWindowLong and MoveWindow APIs to embed the application. Something like this:
var filename = openFileDialog1.FileName;
                var officeApplicationProgID = "Excel.Application";
                var officeApplicationType = Type.GetTypeFromProgID(officeApplicationProgID, false);
                dynamic officeApplication = Activator.CreateInstance(officeApplicationType);
                officeApplication.Workbooks.Open(filename);
                int pid = 0;
                GetWindowThreadProcessId(officeApplication.HWnd, out pid);
                officeApplication.Visible = true;
                //officeApplication.Visible = false;
                var process = Process.GetProcessById(pid);
                var panel = new Panel();
                panel.Location = new Point(0, 0);
                panel.Size = new Size(this.Size.Width, this.Size.Height);
                var processHandle = process.MainWindowHandle;
                SetParent(processHandle, panel.Handle);
                SetWindowLong(processHandle, GWL_STYLE, WS_VISIBLE + WS_MAXIMIZE + WS_CHILD);
                MoveWindow(processHandle, 0, 0, panel.Width, panel.Height, true);
                this.mainBody.Controls.Add(panel);
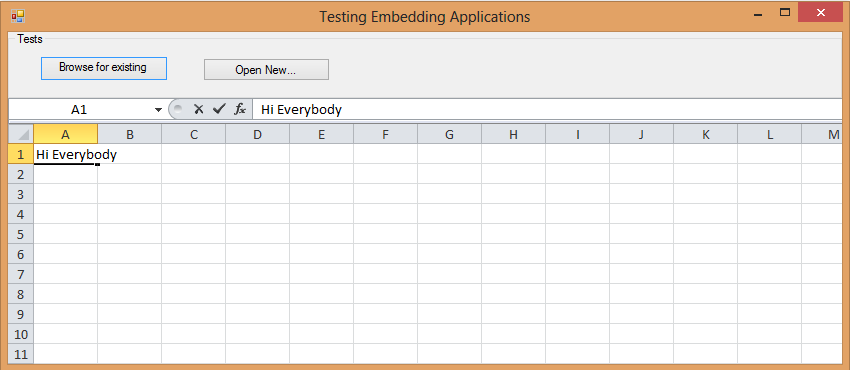
Figure: Example of technique of hosting Excel inside a Windows Form Application
I have attached a sample project. (Remember to free your resources, and close the excel App before closing your application, I skipped that from this sample)
DsoFramer.zip (463.42 kb)
ExampleOfEmbeddingExcelInWindowsForm.zip (53.76 kb)
What is the ROT?
“Using ROT (Running Object Table) is a great way to establish interprocess communication between two windows applications. From a purely logical aspect, one application registers a pointer to an instance of a class in the ROT, the other one gets a pointer pointing to the same instance of the registered class and therefore can use the same instance of the class via this pointer. The class that is registered has to be a COM class, otherwise it can be written in any language. The application that will retrieve the pointer from the ROT can be written in any language that can use COM, as ROT gives a pointer to a COM interface.”
Can it be implemented in .NET?
Sure a .NET application can be exposed thru COM and then its pointer can be gotten and consumed by other applications querying the ROT.
And excelent example can be found here: http://www.codeproject.com/KB/COM/ROTStuff.aspx
As always it has its caveats. Be careful.
Obvious replacement?
Well if what you want is (Interprocess Communication) IPC,there are several options in .NET :
* Classical .NET remoting which is very simple and stable to
* Named Pipes see an example here http://bartdesmet.net/blogs/bart/archive/2007/04/12/getting-started-with-named-pipes.aspx
* or WCF with Named Pipes, an example here http://www.codeproject.com/KB/WCF/WCF_CommOptions_part1.aspx
WCF can be an interesting option specially if we were doing things like DCOM and Remote monikers.
I just came back from executing a Ready assessment for a company in Minnesota, where I analyzed 740,000 lines of code in a VB6 application, of which 660,000 belonged to a single Visual Basic project (.vbp). This is actually the largest single .vbp I have seen so far, beating the previous record of about 500,000 lines of code held by an European company. We have migrated plenty of applications that contain 1+ million lines of code, but they are usually distributed across many .vbp’s.
Though unusual, single vbp’s of this size are perfectly manageable from a migration standpoint, and here are some things that can be done to deal with them:
- Ensure that the migration computer has at the very minimum, 3GB of RAM.
- Look for customization opportunities before you start migrating the code. Customizing the VBUC for this specific VBP can reduce manual effort drastically.
- When making manual changes, start with a small team until you get the project to compile, especially if migrating to VB.NET as the compiler has a maximum of build errors that it can show at any given time.
- Once the application compiles, increase the team size and go for Visual Equivalence by distributing the different forms and user controls across your developers.
Crystal Reports was one of the most popular reporting engines in VB6, and still holds a strong market presence with its .NET version. However, the object model in the .NET version of Crystal has changed so dramatically from the VB6 days that automating this conversion is not be cost-effective in most cases. These are the options when dealing with Crystal Reports in an application to be migrated to .NET:
- Use COM Interop: we have successfully migrated many applications with Crystal Reports through COM Interop. However, this only works when the report objects are populated using Crystal’s own querying engine (for example, sending a SQL string to Crystal so it can retrieve the data directly from the database), instead of providing an already-populated RecordSet as a data source for the report. This is because once the application is ported to .NET, its RecordSets will become ADO.NET DataSets (or Helper Classes inheriting from DataSet), which will not be compatible with the legacy version of Crystal. This can be fixed this by disabling the conversion of ADO to ADO.NET, but this is not desirable in most enterprise applications, and may compromise future maintainability and enhancements.
- Replace with Crystal .NET or another .NET-compatible reporting engine: this is also a popular option among our clients, as it removes the legacy Crystal component. On the other hand, this replacement is manual and will require adjustments to the report layout, if converting to the .NET version of Crystal, or even a rewrite of the reports if migrating to other engines.
How do you write a Windows Service in VB6?
Althought this is not a recommend practice due to the stability issues and VB6 support, if for
any reason you need to do this I provide a guide of how to do that in VB6 and how do the same thing
in VB.NET and C#.
Using the NTSVC.ocx
This is an OCX implement by Mauricio Ordonez some time ago.
It is very simple to use. You just drop it on a form and add some code to your VB6.
Example: VB6 Form with the NTSVC.ocx control
Private Sub Form_Load()
Me.Visible = False
Dim strDisplayName As String
On Error GoTo Err_Load
strDisplayName = NTService1.DisplayName
If Command = "-install" Then
' Enable interaction with desktop.
NTService1.Interactive = True
If NTService1.Install Then
MsgBox strDisplayName & " installed successfully"
Else
MsgBox strDisplayName & " failed to install"
End If
End
ElseIf Command = "-uninstall" Then
If NTService1.Uninstall Then
MsgBox strDisplayName & " uninstalled successfully"
Else
MsgBox strDisplayName & " failed to uninstall"
End If
End
ElseIf Command = "-debug" Then
NTService1.Debug = True
ElseIf Command <> "" Then
MsgBox "Invalid command option"
End
End If
' Connect service to Win32 services controller.
NTService1.StartService
Err_Load:
' Error starting service
End Sub
Private Sub Timer1_Timer()
MsgBox "hola"
End Sub
NOTE: Remember that VB6 is not a supported platform and that even if it is true
that you can still run VB6 code in Windows Vista and Windows 7 MS does not support this
platform anymore.
How can I convert my VB6 service to .NET?
To create a Windows Service in VB.NET follow this steps.
1. First you need to create a Windows Service Project:
a. Open Visual Studio 2010
b. Go to the File\New\Project….
c. Select the Windows Service Template
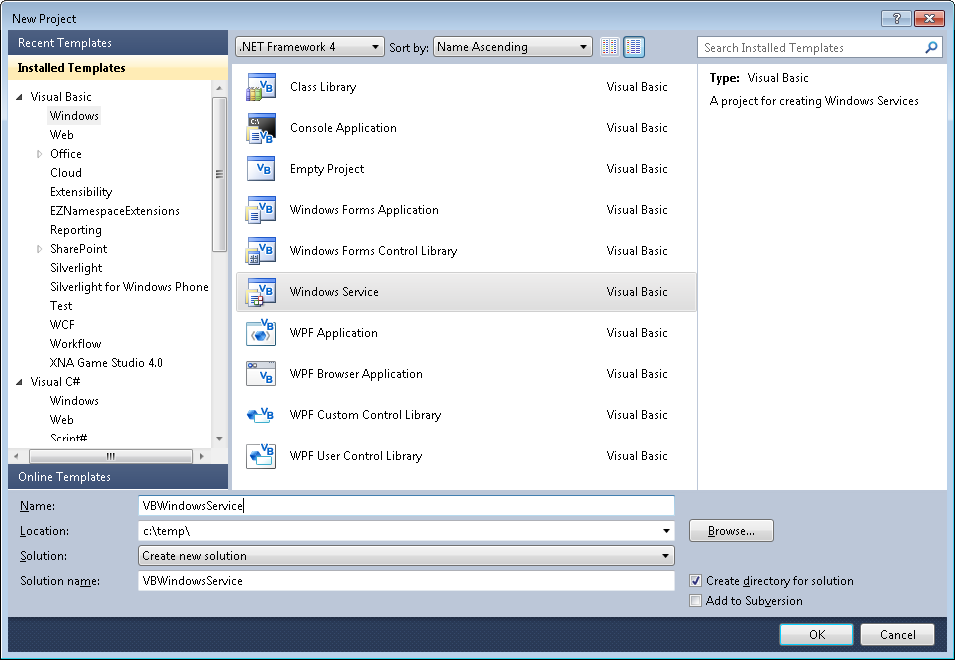
d. And you just put your code in the OnStart method:
Public Class Service1

    Protected Overrides Sub OnStart(ByVal args() As String)
        ' Add code here to start your service. This method should set things
        ' in motion so your service can do its work.
        ExecuteWindowsServiceCode()
    End Sub

    Protected Overrides Sub OnStop()
        ' Add code here to perform any tear-down necessary to stop your service.
    End Sub

    Private Sub ExecuteWindowsServiceCode()
        'TODO Add Some Code
    End Sub

End Class
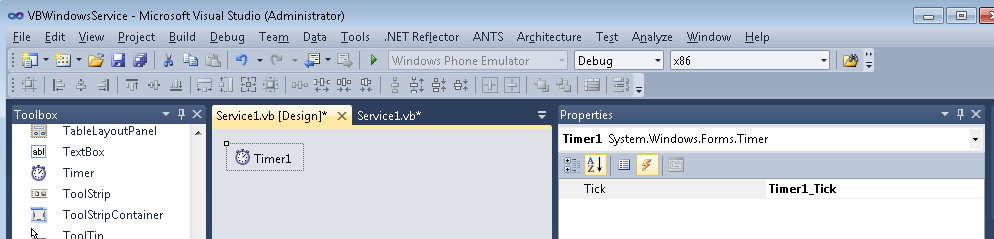
e. Another typical thing to do in Windows Service is to add a Timer Control, you you can have
your windows service performs some actions every number of seconds. To do that, drag a
Timer Control on your Service component, execute the Start method of the timer control on the OnStart method and
handle the Tick event:
Public Class Service1

    Protected Overrides Sub OnStart(ByVal args() As String)
        ' Add code here to start your service. This method should set things
        ' in motion so your service can do its work.
        Timer1.Start()
        ExecuteWindowsServiceCode()
    End Sub

    Protected Overrides Sub OnStop()
        ' Add code here to perform any tear-down necessary to stop your service.
        Timer1.Stop()
    End Sub

    Private Sub ExecuteWindowsServiceCode()
        'TODO Add Some Code
    End Sub

    Private Sub Timer1_Tick(sender As System.Object, e As System.EventArgs) Handles Timer1.Tick
        MsgBox("Viva la vida Loca!")
    End Sub
End Class
If you need to recover some of your code from your VB6 project, download our Visual Basic Conversion Tool VBUC tool.
How do I Install my Windows Service?
In general you just need to use the command line utility installutil.exe for more details see this other post.
For VB6 applications it is common to rely on OS or Kernel API Calls. Some of those APIs might
need you to send data back and for the native API.
Marshalling in .NET can be complicated and bothersome. I have published several posts about
interop. But it usually depends on adding several marshalling attributes and even tricks specially for
fixed strings.
So I decided to provide a more a simpler approach for conversion. In this approach you just need to things:
1. Your VB6 types or structs will be mapped to .NET classes
2. All VB6 type or struct fields will be mapped to public fields
3. An attribute must be used on those fields to indicate the field length, for arrays or strings.
4. Extension methods .AsString() .SetFromString and .GetClassLength will handle all the complexities of setting the struct fields.
Let’s see an example:
Type EmployeeRecord
    FirstName As String * 5
    LastName As String * 5
End Type
That vb6 type will be mapped in .NET following this approach to:
    public class EmployeeRecord
    {
        [FixedLength(5)]
        public string FirstName = "Mau";
        [FixedLength(5)]
        public string LastName = "Rojas";

    }
You can then simple use that class in .NET
var emp = new EmployeeRecord {FirstName="Mauricio",LastName="Rojas"} ;
var str = emp.AsString();
//This str value will be "MauriRojas" the helper extension methods
// .AsString and .SetFromString will handle setting the internal class fields
All that is very good but how is this used in Marshalling?? Well very simple. Let’s say you have a Dll called foo.dll
with a function foo that receives an EmployeeRecord:
        [DllImport("foo.dll")]
        public static extern int foo(IntPtr Struct);
Then if you want to call that function you will do something like:
            var emp = new EmployeeRecord { FirstName="Ann",LastName="Smith"};
            string str = emp.AsString();
            var ptr = IntPtr.Zero;
            ptr = Marshal.StringToBSTR(str);
            //or
            ptr = Marshal.StringToHGlobalAnsi(str);
            //or
            ptr = Marshal.StringToHGlobalAuto(str);
            //or
            ptr = Marshal.StringToHGlobalUni(str);

            //And call the native function
            foo(ptr);
If the function modifies the structure and you want to reflect those changes then you will do something like:
str = Marshal.PtrToStringAnsi(ptr,typeof(EmployeeRecord).GetClassLength())
emp.SetFromString(str);
This solution can also be applied for more complex structures. For example:
    public class EmployeeRecord
    {
        [FixedLength(5)]
        public string FirstName = "Mau";
        [FixedLength(5)]
        public string LastName = "Rojas";

    }

    public class Record1
    {
        public int field1;
        [FixedLength(10)]
        public string field2 = "";
        public EmployeeRecord rec = new EmployeeRecord();
    }

    public class GeneralInfo
    {
        public int field1;
        [ArrayLength(5)]
        [FixedLength(2)]
        public String[] countrycodes = { "cr","es","mx","pa","ni"};
        [FixedLength(2)]
        public EmployeeRecord[] employees;
    }
If you want to try it out this is the link to the CODE
Some time ago Artinsoft participated in the development of a book called “Upgrading Visual Basic 6.0 Applications”.
I quote from that book:
“The upgrade wizard is designed to upgrade Visual Basic 6.0 applications. For
projects written in Visual Basic versions 1.0 through 5.0, it is necessary that you first
upgrade them to Visual Basic 6.0 before upgrading to Visual Basic .NET. To upgrade
a project that was developed in a version earlier than Visual Basic 6.0, simply open
the project in the Visual Basic 6.0 IDE and save it. If Visual Basic 6.0 prompts you to
upgrade controls to Visual Basic 6.0, choose Yes. If the project contains Visual Basic
5.0 ActiveX controls, it is often best to replace these controls with Visual Basic 6.0
versions. This is because these controls use a different threading model than models
used by Visual Basic 6.0 controls. The earlier threading model is not supported in
Windows Forms.
For 16-bit projects written in Visual Basic versions 1.0 through 4.0, you may need to
make extra modifications to the application to convert it to Visual Basic 6.0.
VBX controls will not be automatically converted. You will also have to replace
Win16 Windows APIs with their Win32® counterparts.
Visual Basic versions 2.0 and 3.0 often require an extra step. Visual Basic 6.0 can only
open files in text format, whereas Visual Basic versions 2.0 and 3.0 support two file
formats: binary and text. Before upgrading these projects, ensure the entire applica-
tion is saved in text format by using the following procedure.
To convert Visual Basic 1.0 and 2.0 files to text format
1. On the File menu, click Save As.
2. In the Save dialog box, select the Save As Text check box.
Because Visual Basic 1.0 can only save files in binary format, all of these projects will
first need to be opened in Visual Basic 2.0 or 3.0 and then saved as text before they
can be converted to Visual Basic 6.0. After converting the project to Visual Basic 6.0,
you can begin the process of upgrading it to Visual Basic .NET.”
This book is available for free
from the MSDN
In VB6 when you have an ActiveX Library it was very important to use
the BinaryCompatibility setting to make sure that your applications did not break after a change.
So let’s first introduce what is binary compatibility and how to accomplish that in .NET.
Binary Compatibility allows to make changes to your components or COM classes without recompiling
every application you've made that uses the component.
And why do you need it. Why compatibility breaks.
On lets see.
An ActiveX Control or DLL expose Public interfaces.
Those interfaces have all of the properties, methods, events, etc. that you've marked as Public.
In other words, everything you've added that shows in Intellisense while working outside of your component.
Now let's say you have create a class, with two Methods Method1 and Method2
When you compile, VB generates all the COM infraestructure you need for your component.
It defines a CoClass and an interface and an entry for each method.
For a vb class with two methods:
Sub Method1()

End Sub

Sub Method2()

End Sub
It will produce a typelib like:
// Generated .IDL file (by the OLE/COM Object Viewer)
//
// typelib filename: <could not determine filename>
[
  uuid(8ABA2C0C-7CCA-40CD-A944-56707566634A),
  version(1.0)
]
library Project1
{
    // TLib :     // TLib : OLE Automation : {00020430-0000-0000-C000-000000000046}
    importlib("stdole2.tlb");

    // Forward declare all types defined in this typelib
    interface _Class1;

    [
      odl,
      uuid(6B86684C-B3DD-4680-BF95-8DEE2C17AF5B),
      version(1.0),
      hidden,
      dual,
      nonextensible,
      oleautomation
    ]
    interface _Class1 : IDispatch {
        [id(0x60030000)]
        HRESULT Method1();
        [id(0x60030001)]
        HRESULT Method2();
    };

    [
      uuid(C71C7AB0-552A-4D5D-A9FB-AF33830A697E),
      version(1.0)
    ]
    coclass Class1 {
        [default] interface _Class1;
    };
};
As you can see in the typelib there are IDs associated to each coclass, interface and
methods. Those IDs are the ones use when you generate the .exe file for your application.
Now if you modify your Class to:
Sub Method3()

End Sub

Sub Method4()

End Sub

Sub Method1()

End Sub

Sub Method2()

End Sub
and you use No Compatibility the typelib after your changes will be:
// Generated .IDL file (by the OLE/COM Object Viewer)
//
// typelib filename: <could not determine filename>

[
  uuid(FE5C56C2-E03A-4DC0-994D-B68543C72A46),
  version(1.0)
]
library Project1
{
    // TLib :     // TLib : OLE Automation : {00020430-0000-0000-C000-000000000046}
    importlib("stdole2.tlb");

    // Forward declare all types defined in this typelib
    interface _Class1;

    [
      odl,
      uuid(A3032E1E-52FE-42E0-98FF-84A9DD4FD8C3),
      version(1.0),
      hidden,
      dual,
      nonextensible,
      oleautomation
    ]
    interface _Class1 : IDispatch {
        [id(0x60030000)]
        HRESULT Method3();
        [id(0x60030001)]
        HRESULT Method4();
        [id(0x60030002)]
        HRESULT Method1();
        [id(0x60030003)]
        HRESULT Method2();
    };

    [
      uuid(72721504-CC56-4BB9-9447-C7193FE8C02D),
      version(1.0)
    ]
    coclass Class1 {
        [default] interface _Class1;
    };
};
As you can see, now the ids for the methods, CoClass are different, so your applications will return errors like: Error 430 (Automation error, the component dies horribly) or Error 429 (can't create the object at all)
But if you instead used BinaryCompatibility then the typelib for your class will be:
// Generated .IDL file (by the OLE/COM Object Viewer)
//
// typelib filename: <could not determine filename>
[
  uuid(8ABA2C0C-7CCA-40CD-A944-56707566634A),
  version(1.1)
]
library Project1
{
    // TLib :     // TLib : OLE Automation : {00020430-0000-0000-C000-000000000046}
    importlib("stdole2.tlb");

    // Forward declare all types defined in this typelib
    interface _Class1;
    [
      odl,
      uuid(6E9C59C3-82D7-444C-92FB-01B49D91A2FF),
      version(1.1),
      hidden,
      dual,
      nonextensible,
      oleautomation
    ]
    interface _Class1 : IDispatch {
        [id(0x60030002)]
        HRESULT Method3();
        [id(0x60030003)]
        HRESULT Method4();
        [id(0x60030000)]
        HRESULT Method1();
        [id(0x60030001)]
        HRESULT Method2();
    };

    [
      uuid(C71C7AB0-552A-4D5D-A9FB-AF33830A697E),
      version(1.1)
    ]
    coclass Class1 {
        [default] interface _Class1;
    };

    typedef [uuid(6B86684C-B3DD-4680-BF95-8DEE2C17AF5B), version(1.0), public]
    _Class1 Class1___v0;
};
If you compare now the two typelibs you can see the Method1 and Method2 keep the same ids.
For each version a typedef is generated that will point to the last version. For example adding a Method5 will add new entry like:
    typedef [uuid(6B86684C-B3DD-4680-BF95-8DEE2C17AF5B), version(1.0), public]
    _Class1 Class1___v0;

    typedef [uuid(6E9C59C3-82D7-444C-92FB-01B49D91A2FF), version(1.1), public]
    _Class1 Class1___v1;
Well that is what binary compatibility does. Now how to achieve binary compatibility in .NET
Binary Compatibility in .NET
Achieving binary compatibility in .NET is really easy. You just need to give more information to
make explicit how your typelib information will be. I will follow an approach as the one I already explained in this post:
http://blogs.artinsoft.net/mrojas/archive/2010/06/23/exposing-c-classes-thru-interop.aspx
Lets take our previous example:
using System;
using System.Runtime.InteropServices;

namespace InteropExamples
{
    public class Class1
    {
        public void Method3()
        {
        }
        public void Method4()
        {
        }
        public void Method1()
        {
        }
        public void Method2()
        {
        }
        public void Method5()
        {
        }
    }
}
In previous posts I had recommended using partial classes and using interfaces to explicitly specify what you what to be seen in COM. This means you start up with something like:
  public partial class Class1
    {
        public void Method3()
        {
        }
        public void Method4()
        {
        }
        public void Method1()
        {
        }
        public void Method2()
        {
        }
    }

    [ComVisible(true)]
    public interface _Class1
    {
        void Method3();
        void Method4();
        void Method1();
        void Method2();

    }
    [ComVisible(true)]
    [ClassInterface(ClassInterfaceType.None)]
    [ComDefaultInterface(typeof(_Class1))]
    partial class Class1 : _Class1
    {
        #region _Class1 Members

        void _Class1.Method3()
        {
            Method3();
        }

        void _Class1.Method4()
        {
            Method4();
        }

        void _Class1.Method1()
        {
            Method1();
        }

        void _Class1.Method2()
        {
            Method2();
        }

        #endregion
    }
Now to make this code binary compatible then you have to make sure that the tlb file generated for your class is almost identical to that generated before. To acomplish that we must make sure that we your methods, interfaces and classes have the same guids and ids. Lets see how:
using System;
using System.Runtime.InteropServices;

namespace InteropExamples
{
    public partial class Class1
    {

        public void Method3()
        {
            System.Windows.Forms.MessageBox.Show("3 N");
        }

        public void Method4()
        {
            System.Windows.Forms.MessageBox.Show("4 N");
        }

        public void Method5()
        {
            System.Windows.Forms.MessageBox.Show("5 N");
        }


        public void Method1()
        {
            System.Windows.Forms.MessageBox.Show("1 N");
        }

        public void Method2()
        {
            System.Windows.Forms.MessageBox.Show("2 N");
        }
    }

    [ComVisible(true)] //This to make the interface Visible for COM
    [TypeLibType((TypeLibTypeFlags)((short)TypeLibTypeFlags.FHidden |
        (short)TypeLibTypeFlags.FDual |
        (short)TypeLibTypeFlags.FNonExtensible |
        (short)TypeLibTypeFlags.FOleAutomation))] //This to use the same flags as in previous tlb
    [Guid("9BAFD76D-8E6B-439C-8B6D-37260BFA3317")] //This is to make the class have the guid
    public interface _Class1
    {
        [DispId(0x60030000)]
        void Method1();
        [DispId(0x60030001)]
        void Method2();
        [DispId(0x60030002)]
        void Method3();
        [DispId(0x60030003)]
        void Method4();
        [DispId(0x60030004)]
        void Method5();


    }

    [ComVisible(true)] //This to make the class Visible for COM
    [ClassInterface(ClassInterfaceType.None)] //This is to make sure that we have control on interface generation
    [ComDefaultInterface(typeof(_Class1))] //To set default interface
    [ProgId("Project1.Class1")] //To set ProgId
    [Guid("C71C7AB0-552A-4D5D-A9FB-AF33830A697E")] //Maintain same Guid.
    partial class Class1 : _Class1, Class1___v0, Class1___v1
    {
        #region _Class1 Members

        void _Class1.Method3()
        {
            Method3();
        }

        void _Class1.Method4()
        {
            Method4();
        }

        void _Class1.Method1()
        {
            Method1();
        }

        void _Class1.Method2()
        {
            Method2();
        }

        #endregion


        #region Class1___v0 Members

        void Class1___v0.Method1()
        {
            Method1();
        }

        void Class1___v0.Method2()
        {
            Method2();
        }

        void Class1___v0.Method3()
        {
            Method3();
        }

        void Class1___v0.Method4()
        {
            Method4();
        }

        void Class1___v0.Method5()
        {
            Method5();
        }

        #endregion

        #region Class1___v1 Members

        void Class1___v1.Method1()
        {
            Method1();
        }

        void Class1___v1.Method2()
        {
            Method2();
        }

        void Class1___v1.Method3()
        {
            Method3();
        }

        void Class1___v1.Method4()
        {
            Method4();
        }

        void Class1___v1.Method5()
        {
            Method5();
        }

        #endregion
    }

    //This is to keep compatibility with old versions
    //we cannot generate a typedef so we will need to add all of the versions
    //for BinaryCompatibility
    [ComVisible(true)]
    [Guid("6B86684C-B3DD-4680-BF95-8DEE2C17AF5B")]
    [TypeLibType(TypeLibTypeFlags.FHidden)]
    public interface Class1___v0
    {
        [DispId(0x60030000)]
        void Method1();
        [DispId(0x60030001)]
        void Method2();
        [DispId(0x60030002)]
        void Method3();
        [DispId(0x60030003)]
        void Method4();
        [DispId(0x60030004)]
        void Method5();
    }

    //This is to keep compatibility with old versions
    //we cannot generate a typedef so we will need to add all of the versions
    //for BinaryCompatibility
    [ComVisible(true)]
    [Guid("4A7A3317-BF13-443E-9DB0-2C5EA21F00CA")]
    [TypeLibType(TypeLibTypeFlags.FHidden)]
    public interface Class1___v1
    {
        [DispId(0x60030000)]
        void Method1();
        [DispId(0x60030001)]
        void Method2();
        [DispId(0x60030002)]
        void Method3();
        [DispId(0x60030003)]
        void Method4();
        [DispId(0x60030004)]
        void Method5();
    }

}
Sadly in .NET you cannot use Interface Inheritance in COM. If there is interface inheritance YOU HAVE TO IMPLEMENT each interface. In the case of code that comes from VB6. VB6 just uses typedefs, so you really don’t know which methods belong to each version. So in the end all versions have all methods.
The other alternative to this method, is just to implement last version. And after generating the tlb, decompile it to an .IDL file add the typedefs and recompiled it. I explained something similar in this post:http://blogs.artinsoft.net/mrojas/archive/2010/05/17/interop-remove-prefix-from-c-enums-for-com.aspx
Ok. I hope this helps you to have an more clear idea of what Binary Compatibility is and how to do it in .NET. I am attaching some sample code. It show an ActiveX library that uses BinaryCompatibility and three version on an aplications that uses the different versions. And also a .NET class library that is equivalent to the VB6 one. HERE
Enjoy.
Either if you migrate your application from VB6 to C# or if you develop a new application in C# something you end up with cases where you need to use your classes in legacy apps. Some of them could have been written in VB6 or could even be VBA macros in Excel applications.
Exposing your .NET classes can be sometimes very easy (you can think is just a matter of putting a ComVisible tag) but in other occasions is not that simple. Specially if your legacy application is using a lot of Late Bound calls like in VBA, so you must make sure that the COM information that you are exposing for your class is exactly what you really want and need.
OK. So I will provide some guidelines or some steps you should follow to provide a consistent COM interface for your .NET Code.
1. First you have to add the [ComVisible(true)] attribute. Don’t think that’s all. Even if in some cases that is enough is better if you take an strict control of want is being generated for your class. Ok Let’s use the following class as an example:
using System;
using System.Runtime.InteropServices;

namespace InteropExamples
{
    [ComVisible(true)]
    public class MyVerySimpleClass
    {
        public Class2 CreateANewClass()
        {  return new Class2()     }

        public int GetMyLuckyNumber() { return 15; }
    }
public class Class2 { }
}
// Generated .IDL file (by the OLE/COM Object Viewer)
//
// typelib filename: <could not determine filename>
[
uuid(370E4AD4-073B-4984-8C7D-5ED027F7B1CA),
version(1.0)
]
library ClassLibrary1
{
// TLib : // TLib : mscorlib.dll : {BED7F4EA-1A96-11D2-8F08-00A0C9A6186D}
importlib("mscorlib.tlb");
// TLib : OLE Automation : {00020430-0000-0000-C000-000000000046}
importlib("stdole2.tlb");
// Forward declare all types defined in this typelib
interface _MyVerySimpleClass;
[
uuid(E03CCE68-2D55-3576-9DB6-019AAA667A5D),
version(1.0),
custom({0F21F359-AB84-41E8-9A78-36D110E6D2F9}, "InteropExamples.MyVerySimpleClass")
]
coclass MyVerySimpleClass {
[default] interface _MyVerySimpleClass;
interface _Object;
};
[
odl,
uuid(D18BEEE1-4425-3AC7-891E-807EC2283731),
hidden,
dual,
oleautomation,
custom({0F21F359-AB84-41E8-9A78-36D110E6D2F9}, "InteropExamples.MyVerySimpleClass")
]
interface _MyVerySimpleClass : IDispatch {
};
};
In this case your class will be expose using all defaults. That is, a progId that will be the <AssemblyName>.ClassName an interface _<ClassName> is generated and the class is exposed only for IDispatch, which would not provide class information if you add the tlb reference to a VB6 or VBA project.
And if you run this code in VB6 you will have a problem like type mismatch when you try to use the method x.CreateAClass because it is returning an object that is not exposed thru COM.
Private Sub Command1_Click()
Dim x As Object
Set x = CreateObject("InteropExamples.MyVerySimpleClass")
MsgBox x.GetMyLuckyNumber
MsgBox x.CreateAClass
End Sub
So my recommendation is to make explicit what you want to expose. Maybe you only need some of the methods to be exposed. Well that is step two.
2. Define a public, ComVisible(true) interface that will define the methods that you want to be exposed thru COM. Sometimes it is better to implement the interface explicitly. I even recommend using partial classes so you isolate the COM stuff from your normal class. If you class is very simple you can leave all COM stuff there.
    //It is better to have an interface, because
    //you are completely sure what you are exposing or not
    [ComVisible(true)]
    public interface _MyVerySimpleClass
    {
        int GetMyLuckyNumber();
    }
3. (Recommedation) This is not an obligatory step but I recommend using partial classes.
    //Using partial classes allow you to separate all the
    //COM plumbing and leave your .NET implementation simple
    public partial class MyVerySimpleClass
    {
        public Class2 CreateAClass()
        {
            return new Class2();
        }

        public int GetMyLuckyNumber() { return 15; }
    }
3. Make sure your partial class has the following attributes:
[ComVisible(true)] <—This is obvious because you want to use your class in COM
[ClassInterface(ClassInterfaceType.None)] <—This is because your want to take charge or what will be generated in your Typelib (tlb)
[ComDefaultInterface(typeof(_MyVerySimpleClass))] <—This is to indicate the interface that holds your COM visible methods.
[ProgId("InteropExamples.MyVerySimpleClass")] <—To establish which will be the progId not have a generated one
[Guid("{029D468C-8BE6-498f-8A57-3B4B0306BA41}")] <—this is important specially if you are trying to accomplish binary compatibility
Optionally add this attribute [IDispatchImpl(IDispatchImplType.CompatibleImpl)] this is currently marked as an obsolete attribute but it still works and I have found scenarios, specially in some VBA applications where you need this attribute in order to make some late bound calls.
4. And Explicitly implement the interface methods. This is important because some of the return values or arguments might need convertions. For example what can you do if your method returns a DataSet and your Excel VBA script is expecting something like a Recordset (more on this on other posts).
So now you will have a class like:
    //Using partial classes allow you to separate all the
    //COM plumbing and leave your .NET implementation simple
    public partial class MyVerySimpleClass
    {
        public Class2 CreateAClass()
        {
            return new Class2();
        }

        public int GetMyLuckyNumber() { return 15; }
    }

    //It is better to have an interface, because
    //you are completely sure what you are exposing or not
    [ComVisible(true)]
    public interface _MyVerySimpleClass
    {
        int GetMyLuckyNumber();
    }

    [ComVisible(true)]
    [ClassInterface(ClassInterfaceType.None)] //This is to make sure that no automatic generation of COM methods is done
    [ComDefaultInterface(typeof(_MyVerySimpleClass))] //This to explicitly establish which is the default interface
    [ProgId("InteropExamples.MyVerySimpleClass")]
    [Guid("{029D468C-8BE6-498f-8A57-3B4B0306BA41}")]
    [IDispatchImpl(IDispatchImplType.CompatibleImpl)]
    partial class MyVerySimpleClass : _MyVerySimpleClass
    {

        #region _MyVerySimpleClass Members
        //Explicit implementation is better because it avoids messing your .NET
        //class specification. Sometimes when you expose thru COM you can have problem with
        //methods overloads. For example you have to have the same method name but differente
        //return type. Or you have a collition with an existing member.
        int _MyVerySimpleClass.GetMyLuckyNumber()
        {
            return GetMyLuckyNumber();
        }

        #endregion
    }
And your TLB is now explicit and exposes ONLY what you really really want.
// Generated .IDL file (by the OLE/COM Object Viewer)
//
// typelib filename: <could not determine filename>
[
uuid(370E4AD4-073B-4984-8C7D-5ED027F7B1CA),
version(1.0)
]
library ClassLibrary1
{
// TLib : // TLib : mscorlib.dll : {BED7F4EA-1A96-11D2-8F08-00A0C9A6186D}
importlib("mscorlib.tlb");
// TLib : OLE Automation : {00020430-0000-0000-C000-000000000046}
importlib("stdole2.tlb");
// Forward declare all types defined in this typelib
interface _MyVerySimpleClass;
[
odl,
uuid(80D00C45-EE10-3D65-A5FF-42AB7D8F8A71),
version(1.0),
dual,
oleautomation,
custom({0F21F359-AB84-41E8-9A78-36D110E6D2F9}, "InteropExamples._MyVerySimpleClass")
]
interface _MyVerySimpleClass : IDispatch {
[id(0x60020000)]
HRESULT GetMyLuckyNumber([out, retval] long* pRetVal);
};
[
uuid(029D468C-8BE6-498F-8A57-3B4B0306BA41),
version(1.0),
custom({0F21F359-AB84-41E8-9A78-36D110E6D2F9}, "InteropExamples.MyVerySimpleClass")
]
coclass MyVerySimpleClass {
interface _Object;
[default] interface _MyVerySimpleClass;
};
};
For more info about BinaryCompatibility see my other posts on Interop.
Microsoft has decided that .hlp files are not the best option for your help files.
And you will probably receive an error message like: http://support.microsoft.com/kb/917607
If you still want to run your .hlp help files you still can look for a WinHelp viewer for Vista from Microsoft.
But as someone that has been in the application migration/upgrade bussiness for several year I think automatic migration is a very good option.
For example take a look at the following links:
Good luck! And If you had any other suggestions just leave a comment.
I was recently trying to get the exact width of a string. And I found that the Graphics.MeasureString does not give an exact result.
I finally found Pierre Arnaud
post in Code Project, which gave me a good explaination and solution of what was happening.
You can see in the image Pierre put in his post:

That Graphics.measurestring will return a size that might be bigger that the actual drawn size, this is due some GDI+ details that he explains in that post.
I really like the second proposed solution:
static public int MeasureDisplayStringWidth(Graphics graphics, string text,Font font)
{
System.Drawing.StringFormat format = new System.Drawing.StringFormat ();
System.Drawing.RectangleF rect = new System.Drawing.RectangleF(0, 0,1000, 1000);
System.Drawing.CharacterRange[] ranges = { new System.Drawing.CharacterRange(0, text.Length) };
System.Drawing.Region[] regions = new System.Drawing.Region[1];
format.SetMeasurableCharacterRanges (ranges);
regions = graphics.MeasureCharacterRanges (text, font, rect, format);
rect = regions[0].GetBounds (graphics);
return (int)(rect.Right + 1.0f);
}
In VB6 ActiveX-EXEs or ActiveX OLE Server where used for several
reasons. Sometimes it was performance (because it allowed you to run
your code in another process) and sometimes as way to share resources
between several applications, like connection information, database
connections, mainframe info, etc.
During migration some of this ActiveX-Exes can be migrated as simple
Assembly DLLs, but other require more attention. Specially if they have
global variables that hold state shared by several programs.
In that is your case what are your options then?
1. Convert those ActiveX-Exes to Windows Services.
This option is simple. You modify your migrated assembly to work as a Windows Service. The easier way to do that is:
a) Start Microsoft Visual Studio 2005\2008
b) Go to File\New…\Project… and Select Windows Service
That will generated code like:
using System;
using System.Collections.Generic;
using System.ComponentModel;
using System.Data;
using System.Diagnostics;
using System.Linq;
using System.ServiceProcess;
using System.Text;
namespace WindowsService1
{
public partial class Service1 : ServiceBase
{
public Service1() { InitializeComponent(); }
protected override void OnStart(string[] args) { }
protected override void OnStop() { }
}
}
c) Add a reference to the Remoting Assemblies: System.Runtime.Remoting;
d) Modify the previous code:
Add two using statements like:
using System.Runtime.Remoting.Channels.Http;
using System.Runtime.Remoting.Channels;
using System.Runtime.Remoting;
Add a simple event log for tracing:
private static EventLog evt = new EventLog(“Application”);
private static string SVC_NAME = “ActiveX Server Example Svc”;
And modify the OnStart and OnStop methods to look like:
protected override void OnStart(string[] args)
{
HttpChannel chnl = new HttpChannel(1234);
ChannelServices.RegisterChannel(chnl,true );
RemotingConfiguration.RegisterWellKnownServiceType(typeof(MyClass), “MyClass.soap”, WellKnownObjectMode.Singleton);
evt.WriteEntry(SVC_NAME + ” Started”);
}
protected override void OnStop() { evt.WriteEntry(SVC_NAME +” Stoppped”); }
Also make sure that MyClass extends MarshalByRefClass
2. Convert those ActiveX-Exes using the Artinsoft ActiveX migration helpers.
Sometimes, you need your migrated application to replicate some of
the original ActiveX EXE \OLE DLL VB6 characteristics. For example you
need your ActiveX-EXE to start just when the first instance is created
and to resemble the VB6 logic for Process creation\destruction.
For that purpose Artinsoft has created some helpers that our
migration tool is able to automatically use in the generated code if it
detects that this functionality is needed.
The code will then be changed from:
Dim myInstance As New MyProject.MyClass
To the following Helper method:
myInstance = MyProjectFactory.Create< MyProject.MyClass>(myInstance);
And destroy calls can be changed to the following Helper method:
myInstance= MyProjectFactory.Dispose<MyProject.MyClass >( myInstance);
The migration tool will modify your ActiveX-EXEs or OLE Servers to
be Windows EXE and the helper will then locate the assembly that
contains the desired Class, create an instance and initilize a Remoting
channel to the desired classes. Settings as SingleUse and MultiUse are
also taken care by the helpers.
3. Other possible alternatives are using WFC and COM+ that I will comment in another post.
| vb Constant | Decimal Value | Hex Value | .NET |
| vbDstInvert | 5570569 | H550009 | System.Drawing.CopyPixelOperation.DestinationInvert
|
| vbMergeCopy |
12583114 |
HC000CA |
System.Drawing.CopyPixelOperation.MergeCopy
|
| vbMergePaint |
12255782 |
HBB0226 |
System.Drawing.CopyPixelOperation.MergePaint
|
| vbNotSrcCopy |
3342344 |
H330008 |
System.Drawing.CopyPixelOperation.NotSourceCopy
|
| vbNotSrcErase |
1114278 |
H1100A6 |
System.Drawing.CopyPixelOperation.NotSourceErase
|
| vbPatCopy |
15728673 |
HF00021 |
System.Drawing.CopyPixelOperation.PatCopy
|
| vbPatInvert |
5898313 |
H5A0049 |
System.Drawing.CopyPixelOperation.PatInvert
|
| vbPatPaint |
16452105 |
HFB0A09 |
System.Drawing.CopyPixelOperation.PatPaint
|
| vbSrcAnd |
8913094 |
H8800C6 |
System.Drawing.CopyPixelOperation.SourceAnd
|
| vbSrcCopy |
13369376 |
HCC0020 |
System.Drawing.CopyPixelOperation.SourceCopy
|
| vbSrcErase |
4457256 |
H440328 |
System.Drawing.CopyPixelOperation.SourceErase
|
| vbSrcInvert |
6684742 |
H660046 |
System.Drawing.CopyPixelOperation.SourceInvert
|
| vbSrcPaint |
15597702 |
HEE0086 |
System.Drawing.CopyPixelOperation.SourcePaint
|
To create a new Team System Project in Visual Studio 2005, follow these steps:
1. Go to the File Menu. Select New…, and in the New… submenu select Team Project… to start a wizard.

2. The “Specify the Team Project Settings” of the New Team Project wizard appears. Type the Team Project name. For example type MergeExample and click Next
![clip_image002[5]](http://blogs.artinsoft.net/public_img/0d61167332a7_CAF4/clip_image0025_thumb.jpg "clip_image002[5]")
3. In the following page, select the Process Template for the Team Project. We recommend using the Artinsoft Migration Methodology – v0.8 or later. Click Next.
![clip_image002[7]](http://blogs.artinsoft.net/public_img/0d61167332a7_CAF4/clip_image0027_thumb.jpg "clip_image002[7]")
4. In the following page, type the Title for the Team Project Portal. Type MergeExample. The Team Project Portal provides useful information about your project. Click Next
![clip_image002[9]](http://blogs.artinsoft.net/public_img/0d61167332a7_CAF4/clip_image0029_thumb.jpg "clip_image002[9]")
5. In the following page you select your source control settings.
Select the first option “Create an empty source control folder”. Click Next
![clip_image002[11]](http://blogs.artinsoft.net/public_img/0d61167332a7_CAF4/clip_image00211_thumb.jpg "clip_image002[11]")
6. In the following page a summary of your Team Project settings is presented. Click Finish
![clip_image002[17]](http://blogs.artinsoft.net/public_img/0d61167332a7_CAF4/clip_image00217_thumb.jpg "clip_image002[17]")
7. In the following page the a process bar appears while the project is created. Just wait until the process is done. It normally takes between 3 and 5 minutes.
![clip_image002[19]](http://blogs.artinsoft.net/public_img/0d61167332a7_CAF4/clip_image00219_thumb.jpg "clip_image002[19]")