Silverlight is when you have to add a lot of items.
I know, I know maybe you should choose another way to show that data,
but leaving philosophical-ui design discussions, the real problem is that
usually those components are bind to ObservableCollections.
ObservableCollections are a bit of an exhibitionist.
Each time you add an item it will yell
Hey!! Yoo-hoo! HEY!!! YOU!!
I'm HEREEEEEEEEEEEEEEEEEE!!!!
Look at me!! Look at Me!!! Look Mom No Hands!!! Look Dad no Feet!!! HEY!!!!!!!!
So if you have some code like:
for(int i=0;i<10000;i++)
{
    comboItems.Add("item" + i);
}
A nice thing will be to be able to do something like:
var items = new String[10000]
for(int i=0;i<10000;i++)
{
    items[i]="item" + i;
}
comboItems.AddRange(items);
And then provide just ONE notification of Collection Changed instead of a lot of
little cries for attention.
Well that is the reason for this new version of ObservableCollection that I call
RangeObservableCollection:
using System;
using System.Collections.ObjectModel;
using System.Collections.Generic;

namespace Utils
{
    public class RangeObservableCollection<T> : ObservableCollection<T>
    {
        private bool _suppressNotification = false;

        public RangeObservableCollection() : base() { }

        public RangeObservableCollection(IEnumerable<T> collection) : base(collection) { }

        protected override void OnPropertyChanged(System.ComponentModel.PropertyChangedEventArgs e)
        {
            if (!_suppressNotification) base.OnPropertyChanged(e);
        }

        protected override void OnCollectionChanged(System.Collections.Specialized.NotifyCollectionChangedEventArgs e)
        {
            if (!_suppressNotification)
                base.OnCollectionChanged(e);
        }

        /// <summary>
        /// Adds a collection suppressing notification per item and just raising a notification
        /// for the whole collection
        /// </summary>
        /// <param name="list"></param>
        public void AddRange(IEnumerable<T> list)
        {
            if (list == null) throw new ArgumentNullException("list");
            _suppressNotification = true;
            foreach (T item in list)
            {
                Add(item);
            }
            _suppressNotification = false;
            OnCollectionChanged(new System.Collections.Specialized.NotifyCollectionChangedEventArgs(System.Collections.Specialized.NotifyCollectionChangedAction.Reset));
        }

    }

}
The following C# code shows how to use WMI to query printers information, set and get default printer.
public bool SetDefaultPrinter()
{
    System.Management.ManagementObjectSearcher search =
                   default(System.Management.ManagementObjectSearcher);
    System.Management.ManagementObjectCollection results =
                   default(System.Management.ManagementObjectCollection);
    System.Management.ManagementObject printer =
                   default(System.Management.ManagementObject);


    search =
     new System.Management.ManagementObjectSearcher("select * from win32_printer");
    results = search.Get();
    //Get Default Printer
    System.Management.ManagementObject defaultPrinter = null;
    foreach (System.Management.ManagementObject foundPrinter in results)
    {
        System.Management.PropertyDataCollection
              propertyDataCollection = foundPrinter.Properties;

         if ((bool)foundPrinter["Default"]) // DEFAULT PRINTER
         {
              System.Diagnostics.Debug.WriteLine(foundPrinter["Name"]);
              System.Diagnostics.Debug.WriteLine(foundPrinter["Location"]);
         }
     }


     //Sets new default Printer
     foreach (System.Management.ManagementObject foundPrinter in results)
     {
         System.Diagnostics.Debug.Print(foundPrinter["Name"].ToString());
         if (foundPrinter["Name"].Equals("PDFCreator"))
         {
             System.Management.ManagementBaseObject outParams =
                   foundPrinter.InvokeMethod("SetDefaultPrinter", null, null);
             if (outParams == null)
                 System.Diagnostics.Debug.WriteLine("Unable to set default printer");
             Int32 retVal = (int)(uint)outParams.Properties["ReturnValue"].Value;
             if (retVal == 0)
                return true;
             else
                return false;
         }
     }

    return false;

}
For VB6 applications it is common to rely on OS or Kernel API Calls. Some of those APIs might
need you to send data back and for the native API.
Marshalling in .NET can be complicated and bothersome. I have published several posts about
interop. But it usually depends on adding several marshalling attributes and even tricks specially for
fixed strings.
So I decided to provide a more a simpler approach for conversion. In this approach you just need to things:
1. Your VB6 types or structs will be mapped to .NET classes
2. All VB6 type or struct fields will be mapped to public fields
3. An attribute must be used on those fields to indicate the field length, for arrays or strings.
4. Extension methods .AsString() .SetFromString and .GetClassLength will handle all the complexities of setting the struct fields.
Let’s see an example:
Type EmployeeRecord
    FirstName As String * 5
    LastName As String * 5
End Type
That vb6 type will be mapped in .NET following this approach to:
    public class EmployeeRecord
    {
        [FixedLength(5)]
        public string FirstName = "Mau";
        [FixedLength(5)]
        public string LastName = "Rojas";

    }
You can then simple use that class in .NET
var emp = new EmployeeRecord {FirstName="Mauricio",LastName="Rojas"} ;
var str = emp.AsString();
//This str value will be "MauriRojas" the helper extension methods
// .AsString and .SetFromString will handle setting the internal class fields
All that is very good but how is this used in Marshalling?? Well very simple. Let’s say you have a Dll called foo.dll
with a function foo that receives an EmployeeRecord:
        [DllImport("foo.dll")]
        public static extern int foo(IntPtr Struct);
Then if you want to call that function you will do something like:
            var emp = new EmployeeRecord { FirstName="Ann",LastName="Smith"};
            string str = emp.AsString();
            var ptr = IntPtr.Zero;
            ptr = Marshal.StringToBSTR(str);
            //or
            ptr = Marshal.StringToHGlobalAnsi(str);
            //or
            ptr = Marshal.StringToHGlobalAuto(str);
            //or
            ptr = Marshal.StringToHGlobalUni(str);

            //And call the native function
            foo(ptr);
If the function modifies the structure and you want to reflect those changes then you will do something like:
str = Marshal.PtrToStringAnsi(ptr,typeof(EmployeeRecord).GetClassLength())
emp.SetFromString(str);
This solution can also be applied for more complex structures. For example:
    public class EmployeeRecord
    {
        [FixedLength(5)]
        public string FirstName = "Mau";
        [FixedLength(5)]
        public string LastName = "Rojas";

    }

    public class Record1
    {
        public int field1;
        [FixedLength(10)]
        public string field2 = "";
        public EmployeeRecord rec = new EmployeeRecord();
    }

    public class GeneralInfo
    {
        public int field1;
        [ArrayLength(5)]
        [FixedLength(2)]
        public String[] countrycodes = { "cr","es","mx","pa","ni"};
        [FixedLength(2)]
        public EmployeeRecord[] employees;
    }
If you want to try it out this is the link to the CODE
If you were in VB6 HelpContextID will be familiar for you (http://msdn.microsoft.com/en-us/library/aa267690(v=vs.60).aspx). In those sweet VB6 days all you had to do was:
Private Sub Form_Load ()
   App.HelpFile = "VB.HLP"
   Frame1.HelpContextID = 21004
   Text1.HelpContextID = 21001
   Form1.HelpContextID = 21005
End Sub
And each time you pressed the F1 button your application will have opened the .hlp file and show you the Help Topic corresponding to that ID. After migration from VB6 to WinForms Help you now have the HelpProvider.SetHelpKeyword http://msdn.microsoft.com/en-us/library/system.windows.forms.helpprovider.sethelpkeyword.aspx And you had to do something like:
internal System.Windows.Forms.HelpProvider HelpProvider1;
...
HelpProvider1.HelpNamespace = "sample.chm";
HelpProvider1.SetHelpKeyword(TextBox1, "1007.html");
HelpProvider1.SetHelpNavigator(TextBox1, HelpNavigator.Topic);
HelpProvider1.SetHelpKeyword(ListBox1, "1006.html");
HelpProvider1.SetHelpNavigator(ListBox1, HelpNavigator.Topic);
And all that seems nice. But, what can you do when you cross over to SilverlightjQuery15205164761650376022_1357918518660? Well, in general there are several systems that allow you to author your help files in html or convert your .hlp or .chm files to html, but how do you link your components to that help system in order to provide context-sensitive help???? Ok. So one of the possible solutions is very very simple. In general, the solution that I will show in this post is this: 1) First implement an attached property for adding a HelpKeyword to Silverlight components 2) Set the helpkeyword in the desired components 3) Provide logic that will open the appropiate help file. Ok. So let's implement a Silverlight Attached property. An attached propery is like adding a new property to your controls. This new attached property will be called Helpkeyword
using System;
using System.Windows.Shapes;
namespace System.Windows.Controls
{
    public class HelpProvider
    {
        public static readonly DependencyProperty HelpKeyword =
            DependencyProperty.RegisterAttached("HelpKeyword", typeof(string), typeof(HelpProvider), new PropertyMetadata(null));
        public static void SetHelpKeyword(UIElement element, string keyword)
        {
            element.SetValue(HelpKeyword, keyword);
        }

        public static string GetHelpKeyword(UIElement element)
        {
            return (string)element.GetValue(HelpKeyword);
        }
    }
}
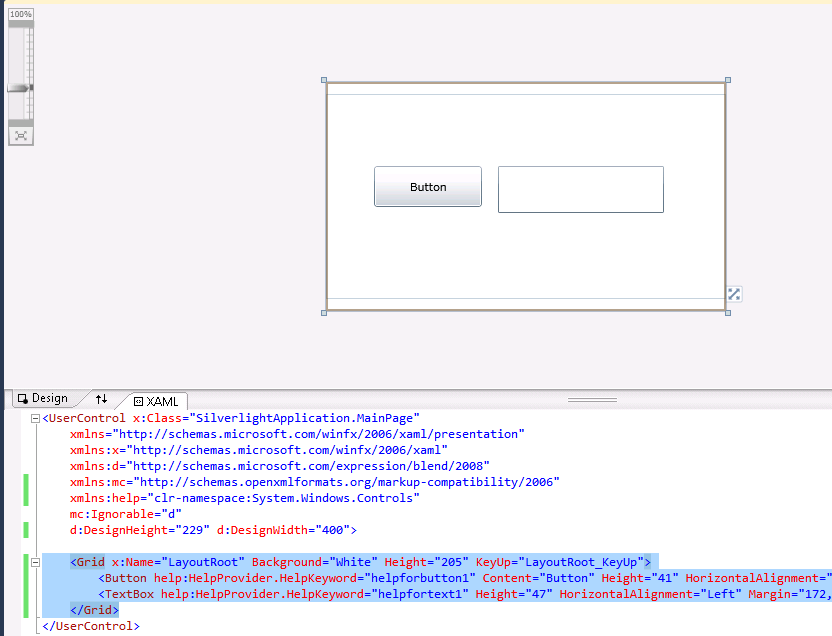
Ok. So once we have the attached property we have to use it, and set it on the code: To set it on the code we must add a namespace:
<UserControl x:Class="SilverlightApplication.MainPage"
    xmlns="http://schemas.microsoft.com/winfx/2006/xaml/presentation"
    ...
    xmlns:help="clr-namespace:System.Windows.Controls"
    mc:Ignorable="d"
    ....>
And apply the attribute to components
<Button help:HelpProvider.HelpKeyword="helpforbutton1" Content="Button" ...  />
<TextBox help:HelpProvider.HelpKeyword="helpfortext1" Height="47" ... />
So that almost everything, now we just need to trigger the appropiate logic, to do that we will add a KeyUp handler to the top most element, in this example a grid. NOTE: if Silverlight is running on the browser F1 is not an option. I just used F2 here as an example.
<Grid x:Name="LayoutRoot" Background="White" Height="205" KeyUp="LayoutRoot_KeyUp">
<Button help:HelpProvider.HelpKeyword="helpforbutton1" ...  />
<TextBox help:HelpProvider.HelpKeyword="helpfortext1" ... />
</Grid>
using System;
using System.Windows;
using System.Windows.Controls;
using System.Windows.Input;
using System.Windows.Browser;

namespace SilverlightApplication
{
    public partial class MainPage : UserControl
    {
        public MainPage()
        {
            InitializeComponent();
        }

        private void LayoutRoot_KeyUp(object sender, KeyEventArgs e)
        {
            //check for the specific key. For now use F2 as the Help Shortcut
            if (e.Key==Key.F2) {
                    var uielement = FocusManager.GetFocusedElement() as UIElement;
                    if (uielement!=null)
                    {

                        var keyword = HelpProvider.GetHelpKeyword(uielement);
                        var host = HtmlPage.Document.DocumentUri.Host;
                        var port = HtmlPage.Document.DocumentUri.Port;
                        var url = string.Format("http://{0}:{1}/help/{2}.html", host,port,keyword);
                        HtmlPage.Window.Navigate(new Uri(url),"_blank");
                    }
            } // else ignore the keystroke
        }
    }
}
This property can be used on the IDE:
On code
var uielement = FocusManager.GetFocusedElement() as UIElement;
if (uielement!=null) {
var keyword = HelpProvider.GetHelpKeyword(uielement);
}
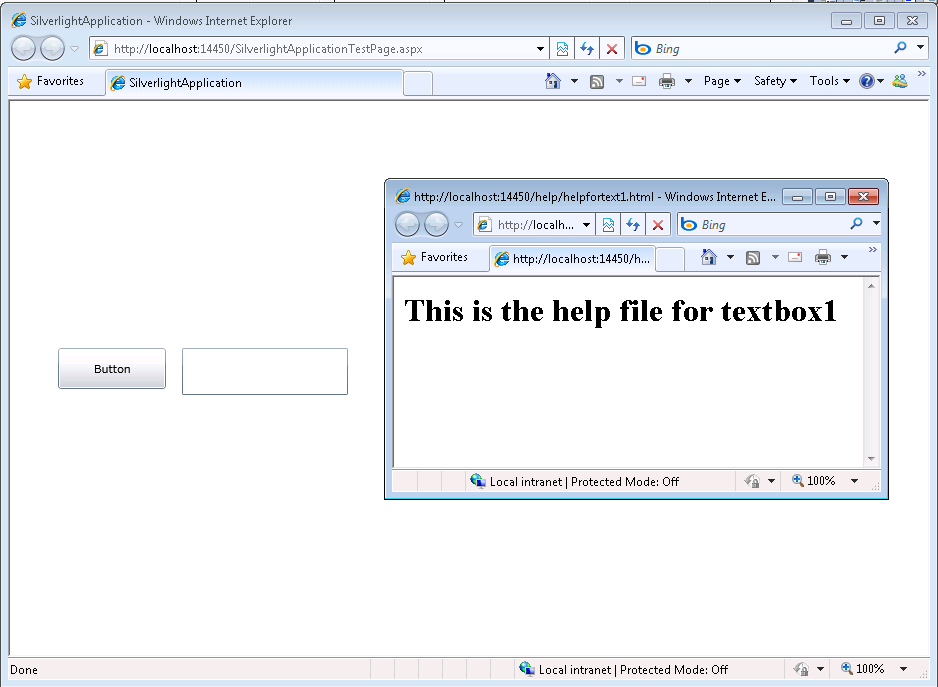
This is an image of the application running.
And you can download the code from: CODE
If you have any questions or would like more info on Silverlight migration check www.silverlightmigration.com
I recently found this interesting list of questions on the Datatek Inc. website. I enjoyed answering them and I want to share ArtinSoft’s answers.
Go ahead and judge for yourself if ArtinSoft is the right partner for your VB6 migration projects.
Q1: If you are manually converting the code, how many different programmers will be converting the code and how are you ensuring consistency and accuracy?
A1: ArtinSoft does not execute manual migration projects. However, there is always a percentage of code that requires manual adjustments. All the team members in a migration project follow the same coding standards to ensure a high level of consistency in the manual changes. If a certain issue is detected multiple times in the source code, its fixing will be implemented in the automatic migration process.
Q2: If this is a manual conversion, how do you minimize the issue of bugs being introduced by each and every programmer, which will have to be found individually during testing?
A2: Most of the work is performed by an automatic migration tool. People working in a migration project share a Knowledge Base where they record every manual change they perform. This knowledge sharing process minimizes the number of bugs introduced by programmers.
Q3: If you are automatically converting the code, what percentage is automated and what percentage is manual?
A3: The percentage of automatic code migration changes depending on the source/target platform. For example, in the case of Visual Basic 6 to .NET automation reaches 95% of the actual lines of code. This level of automation ensures consistency in the quality of the generated code.
Q4: Our programmers still need to make modifications to our code in order to support ongoing business requirements. Is there a “code freeze” and how long is it?
A4: ArtinSoft understands that software applications are ever evolving creatures. We have developed a mechanism where it is easy to incorporate changes during a migration process, we call it continuous migration. This process minimizes the code freeze period to the last acceptance testing phase of a project.
Q5: When we receive the converted code back from you, are we required to make any changes in order for it to be functional?
A5: When ArtinSoft bids on a functional equivalence migration project, the code that is delivered is ready for deployment.
Q6: Is the converted code guaranteed to compile?
A6: In a functional equivalence project, the code not only compiles, it runs!
Q7: Once the code compiles, do you just hand responsibility over to us or are you responsible for problems found during testing?
A7: NO! (See answer 6!)
Q8: What are we, the customer, specifically responsible for during the conversion project?
A8: The customer is mainly responsible for the testing of the project. This responsibility starts with the creation and delivery of test cases to ArtinSoft and ends with final project acceptance. The testing workflow is the main path of communication between the teams. This process ensures that project expectations are clearly set up front and is key to the success rate of the project.
Q9: Can our coding standards be applied to the converted code?
A9: Our migration tool can be customized to include the application of your coding standards. Coding standards are identified and agreed upon during the initial phase of the project.
Q10: What kinds of customizations can we make to the converted code?
A10: ArtinSoft delivers code that is completely standard to the target platform. There are no dependencies on ArtinSoft or any strange “programming behavior”. Any programmer that is fluent in the target platform is able to understand and evolve the generated code. This ensures that your application really gets a new life under the new platform.
Q11: How maintainable is the converted code? How long have other customers stayed on code you have converted for them?
A11: The generated code is fully maintainable. Our customers continue to use and modify it long after it has been converted.
Q12: What happens if we don’t like how certain pieces of the code got converted?
A12: This can be approached at to different moments: before the migration stats or during the evolution phase of the application. Before the migration start, the conversion tool or the migration process can be customized to change its behavior according to your coding preferences. During the evolution phase, since the application is written in standard maintainable source code, it can be evolved using your normal software development process.
Q13: What happens if our code inadvertently makes use of undocumented features? Will you support that functionality?
A13: Yes! ArtinSoft guarantees functional equivalence. If it worked before, it should work after the conversion.
Q14: What happens if we have existing bugs in our code that run fine on our current platform (such as uninitialized variables). Are you responsible for making sure that everything works like it did on the old platform?
A14: Yes! ArtinSoft guarantees functional equivalence.
Q15: Can we get a fixed price contract for the conversion?
A15: Absolutely. The great majority of ArtinSoft projects are executed on a fixed price & fixed time basis. Our Ready™ assessment methodology together with our experience allows us to minimize the risk for our clients.
Q16: Are there any runtime charges for any support code and/or libraries you supply? Do we have ownership rights to this code?
A16: An important element in our philosophy is to minimize the amount of necessary support code. Code should be converted to its “native” counterpart as much as possible. In case a support class is needed, the client will have full access to the source code and absolute independence from ArtinSoft moving forward.
Q17: How are we charged if we miss giving you a file after you have already started the conversion?
A18: ArtinSoft always include a price per line of code that can be used for adding/subtracting code from a migration project during its execution. Clients will always know beforehand how much additional work is going to cost.
Q18: How long does the conversion take?
A18: Each project is different. Typically, project length is a function of the size of the source code. ArtinSoft always insists on performing an assessment before the start of the project that will clearly state the required effort to successfully complete the migration.
Q19: What type of guarantees do you provide?
A19: ArtinSoft guarantees functional equivalence between the source and converted code. We typically include a guarantee period when clients can report bugs after project acceptance and ArtinSoft is responsible to fix them.
Q20: How long have you been doing code conversions?
A20: ArtinSoft has been doing automated code conversions since 1993 (we’re about to reach legal age!). In fact, ArtinSoft was founded on the premise that source code should be freed from its platform dependencies. Since day one, we’ve been applying our Artificial Intelligence research to providing cost-effective and low risk solution to code migrations. Companies choose ArtinSoft for our proven experience and comprehensive methodology.
In VB6 when you have an ActiveX Library it was very important to use
the BinaryCompatibility setting to make sure that your applications did not break after a change.
So let’s first introduce what is binary compatibility and how to accomplish that in .NET.
Binary Compatibility allows to make changes to your components or COM classes without recompiling
every application you've made that uses the component.
And why do you need it. Why compatibility breaks.
On lets see.
An ActiveX Control or DLL expose Public interfaces.
Those interfaces have all of the properties, methods, events, etc. that you've marked as Public.
In other words, everything you've added that shows in Intellisense while working outside of your component.
Now let's say you have create a class, with two Methods Method1 and Method2
When you compile, VB generates all the COM infraestructure you need for your component.
It defines a CoClass and an interface and an entry for each method.
For a vb class with two methods:
Sub Method1()

End Sub

Sub Method2()

End Sub
It will produce a typelib like:
// Generated .IDL file (by the OLE/COM Object Viewer)
//
// typelib filename: <could not determine filename>
[
  uuid(8ABA2C0C-7CCA-40CD-A944-56707566634A),
  version(1.0)
]
library Project1
{
    // TLib :     // TLib : OLE Automation : {00020430-0000-0000-C000-000000000046}
    importlib("stdole2.tlb");

    // Forward declare all types defined in this typelib
    interface _Class1;

    [
      odl,
      uuid(6B86684C-B3DD-4680-BF95-8DEE2C17AF5B),
      version(1.0),
      hidden,
      dual,
      nonextensible,
      oleautomation
    ]
    interface _Class1 : IDispatch {
        [id(0x60030000)]
        HRESULT Method1();
        [id(0x60030001)]
        HRESULT Method2();
    };

    [
      uuid(C71C7AB0-552A-4D5D-A9FB-AF33830A697E),
      version(1.0)
    ]
    coclass Class1 {
        [default] interface _Class1;
    };
};
As you can see in the typelib there are IDs associated to each coclass, interface and
methods. Those IDs are the ones use when you generate the .exe file for your application.
Now if you modify your Class to:
Sub Method3()

End Sub

Sub Method4()

End Sub

Sub Method1()

End Sub

Sub Method2()

End Sub
and you use No Compatibility the typelib after your changes will be:
// Generated .IDL file (by the OLE/COM Object Viewer)
//
// typelib filename: <could not determine filename>

[
  uuid(FE5C56C2-E03A-4DC0-994D-B68543C72A46),
  version(1.0)
]
library Project1
{
    // TLib :     // TLib : OLE Automation : {00020430-0000-0000-C000-000000000046}
    importlib("stdole2.tlb");

    // Forward declare all types defined in this typelib
    interface _Class1;

    [
      odl,
      uuid(A3032E1E-52FE-42E0-98FF-84A9DD4FD8C3),
      version(1.0),
      hidden,
      dual,
      nonextensible,
      oleautomation
    ]
    interface _Class1 : IDispatch {
        [id(0x60030000)]
        HRESULT Method3();
        [id(0x60030001)]
        HRESULT Method4();
        [id(0x60030002)]
        HRESULT Method1();
        [id(0x60030003)]
        HRESULT Method2();
    };

    [
      uuid(72721504-CC56-4BB9-9447-C7193FE8C02D),
      version(1.0)
    ]
    coclass Class1 {
        [default] interface _Class1;
    };
};
As you can see, now the ids for the methods, CoClass are different, so your applications will return errors like: Error 430 (Automation error, the component dies horribly) or Error 429 (can't create the object at all)
But if you instead used BinaryCompatibility then the typelib for your class will be:
// Generated .IDL file (by the OLE/COM Object Viewer)
//
// typelib filename: <could not determine filename>
[
  uuid(8ABA2C0C-7CCA-40CD-A944-56707566634A),
  version(1.1)
]
library Project1
{
    // TLib :     // TLib : OLE Automation : {00020430-0000-0000-C000-000000000046}
    importlib("stdole2.tlb");

    // Forward declare all types defined in this typelib
    interface _Class1;
    [
      odl,
      uuid(6E9C59C3-82D7-444C-92FB-01B49D91A2FF),
      version(1.1),
      hidden,
      dual,
      nonextensible,
      oleautomation
    ]
    interface _Class1 : IDispatch {
        [id(0x60030002)]
        HRESULT Method3();
        [id(0x60030003)]
        HRESULT Method4();
        [id(0x60030000)]
        HRESULT Method1();
        [id(0x60030001)]
        HRESULT Method2();
    };

    [
      uuid(C71C7AB0-552A-4D5D-A9FB-AF33830A697E),
      version(1.1)
    ]
    coclass Class1 {
        [default] interface _Class1;
    };

    typedef [uuid(6B86684C-B3DD-4680-BF95-8DEE2C17AF5B), version(1.0), public]
    _Class1 Class1___v0;
};
If you compare now the two typelibs you can see the Method1 and Method2 keep the same ids.
For each version a typedef is generated that will point to the last version. For example adding a Method5 will add new entry like:
    typedef [uuid(6B86684C-B3DD-4680-BF95-8DEE2C17AF5B), version(1.0), public]
    _Class1 Class1___v0;

    typedef [uuid(6E9C59C3-82D7-444C-92FB-01B49D91A2FF), version(1.1), public]
    _Class1 Class1___v1;
Well that is what binary compatibility does. Now how to achieve binary compatibility in .NET
Binary Compatibility in .NET
Achieving binary compatibility in .NET is really easy. You just need to give more information to
make explicit how your typelib information will be. I will follow an approach as the one I already explained in this post:
http://blogs.artinsoft.net/mrojas/archive/2010/06/23/exposing-c-classes-thru-interop.aspx
Lets take our previous example:
using System;
using System.Runtime.InteropServices;

namespace InteropExamples
{
    public class Class1
    {
        public void Method3()
        {
        }
        public void Method4()
        {
        }
        public void Method1()
        {
        }
        public void Method2()
        {
        }
        public void Method5()
        {
        }
    }
}
In previous posts I had recommended using partial classes and using interfaces to explicitly specify what you what to be seen in COM. This means you start up with something like:
  public partial class Class1
    {
        public void Method3()
        {
        }
        public void Method4()
        {
        }
        public void Method1()
        {
        }
        public void Method2()
        {
        }
    }

    [ComVisible(true)]
    public interface _Class1
    {
        void Method3();
        void Method4();
        void Method1();
        void Method2();

    }
    [ComVisible(true)]
    [ClassInterface(ClassInterfaceType.None)]
    [ComDefaultInterface(typeof(_Class1))]
    partial class Class1 : _Class1
    {
        #region _Class1 Members

        void _Class1.Method3()
        {
            Method3();
        }

        void _Class1.Method4()
        {
            Method4();
        }

        void _Class1.Method1()
        {
            Method1();
        }

        void _Class1.Method2()
        {
            Method2();
        }

        #endregion
    }
Now to make this code binary compatible then you have to make sure that the tlb file generated for your class is almost identical to that generated before. To acomplish that we must make sure that we your methods, interfaces and classes have the same guids and ids. Lets see how:
using System;
using System.Runtime.InteropServices;

namespace InteropExamples
{
    public partial class Class1
    {

        public void Method3()
        {
            System.Windows.Forms.MessageBox.Show("3 N");
        }

        public void Method4()
        {
            System.Windows.Forms.MessageBox.Show("4 N");
        }

        public void Method5()
        {
            System.Windows.Forms.MessageBox.Show("5 N");
        }


        public void Method1()
        {
            System.Windows.Forms.MessageBox.Show("1 N");
        }

        public void Method2()
        {
            System.Windows.Forms.MessageBox.Show("2 N");
        }
    }

    [ComVisible(true)] //This to make the interface Visible for COM
    [TypeLibType((TypeLibTypeFlags)((short)TypeLibTypeFlags.FHidden |
        (short)TypeLibTypeFlags.FDual |
        (short)TypeLibTypeFlags.FNonExtensible |
        (short)TypeLibTypeFlags.FOleAutomation))] //This to use the same flags as in previous tlb
    [Guid("9BAFD76D-8E6B-439C-8B6D-37260BFA3317")] //This is to make the class have the guid
    public interface _Class1
    {
        [DispId(0x60030000)]
        void Method1();
        [DispId(0x60030001)]
        void Method2();
        [DispId(0x60030002)]
        void Method3();
        [DispId(0x60030003)]
        void Method4();
        [DispId(0x60030004)]
        void Method5();


    }

    [ComVisible(true)] //This to make the class Visible for COM
    [ClassInterface(ClassInterfaceType.None)] //This is to make sure that we have control on interface generation
    [ComDefaultInterface(typeof(_Class1))] //To set default interface
    [ProgId("Project1.Class1")] //To set ProgId
    [Guid("C71C7AB0-552A-4D5D-A9FB-AF33830A697E")] //Maintain same Guid.
    partial class Class1 : _Class1, Class1___v0, Class1___v1
    {
        #region _Class1 Members

        void _Class1.Method3()
        {
            Method3();
        }

        void _Class1.Method4()
        {
            Method4();
        }

        void _Class1.Method1()
        {
            Method1();
        }

        void _Class1.Method2()
        {
            Method2();
        }

        #endregion


        #region Class1___v0 Members

        void Class1___v0.Method1()
        {
            Method1();
        }

        void Class1___v0.Method2()
        {
            Method2();
        }

        void Class1___v0.Method3()
        {
            Method3();
        }

        void Class1___v0.Method4()
        {
            Method4();
        }

        void Class1___v0.Method5()
        {
            Method5();
        }

        #endregion

        #region Class1___v1 Members

        void Class1___v1.Method1()
        {
            Method1();
        }

        void Class1___v1.Method2()
        {
            Method2();
        }

        void Class1___v1.Method3()
        {
            Method3();
        }

        void Class1___v1.Method4()
        {
            Method4();
        }

        void Class1___v1.Method5()
        {
            Method5();
        }

        #endregion
    }

    //This is to keep compatibility with old versions
    //we cannot generate a typedef so we will need to add all of the versions
    //for BinaryCompatibility
    [ComVisible(true)]
    [Guid("6B86684C-B3DD-4680-BF95-8DEE2C17AF5B")]
    [TypeLibType(TypeLibTypeFlags.FHidden)]
    public interface Class1___v0
    {
        [DispId(0x60030000)]
        void Method1();
        [DispId(0x60030001)]
        void Method2();
        [DispId(0x60030002)]
        void Method3();
        [DispId(0x60030003)]
        void Method4();
        [DispId(0x60030004)]
        void Method5();
    }

    //This is to keep compatibility with old versions
    //we cannot generate a typedef so we will need to add all of the versions
    //for BinaryCompatibility
    [ComVisible(true)]
    [Guid("4A7A3317-BF13-443E-9DB0-2C5EA21F00CA")]
    [TypeLibType(TypeLibTypeFlags.FHidden)]
    public interface Class1___v1
    {
        [DispId(0x60030000)]
        void Method1();
        [DispId(0x60030001)]
        void Method2();
        [DispId(0x60030002)]
        void Method3();
        [DispId(0x60030003)]
        void Method4();
        [DispId(0x60030004)]
        void Method5();
    }

}
Sadly in .NET you cannot use Interface Inheritance in COM. If there is interface inheritance YOU HAVE TO IMPLEMENT each interface. In the case of code that comes from VB6. VB6 just uses typedefs, so you really don’t know which methods belong to each version. So in the end all versions have all methods.
The other alternative to this method, is just to implement last version. And after generating the tlb, decompile it to an .IDL file add the typedefs and recompiled it. I explained something similar in this post:http://blogs.artinsoft.net/mrojas/archive/2010/05/17/interop-remove-prefix-from-c-enums-for-com.aspx
Ok. I hope this helps you to have an more clear idea of what Binary Compatibility is and how to do it in .NET. I am attaching some sample code. It show an ActiveX library that uses BinaryCompatibility and three version on an aplications that uses the different versions. And also a .NET class library that is equivalent to the VB6 one. HERE
Enjoy.
Either if you migrate your application from VB6 to C# or if you develop a new application in C# something you end up with cases where you need to use your classes in legacy apps. Some of them could have been written in VB6 or could even be VBA macros in Excel applications.
Exposing your .NET classes can be sometimes very easy (you can think is just a matter of putting a ComVisible tag) but in other occasions is not that simple. Specially if your legacy application is using a lot of Late Bound calls like in VBA, so you must make sure that the COM information that you are exposing for your class is exactly what you really want and need.
OK. So I will provide some guidelines or some steps you should follow to provide a consistent COM interface for your .NET Code.
1. First you have to add the [ComVisible(true)] attribute. Don’t think that’s all. Even if in some cases that is enough is better if you take an strict control of want is being generated for your class. Ok Let’s use the following class as an example:
using System;
using System.Runtime.InteropServices;

namespace InteropExamples
{
    [ComVisible(true)]
    public class MyVerySimpleClass
    {
        public Class2 CreateANewClass()
        {  return new Class2()     }

        public int GetMyLuckyNumber() { return 15; }
    }
public class Class2 { }
}
// Generated .IDL file (by the OLE/COM Object Viewer)
//
// typelib filename: <could not determine filename>
[
uuid(370E4AD4-073B-4984-8C7D-5ED027F7B1CA),
version(1.0)
]
library ClassLibrary1
{
// TLib : // TLib : mscorlib.dll : {BED7F4EA-1A96-11D2-8F08-00A0C9A6186D}
importlib("mscorlib.tlb");
// TLib : OLE Automation : {00020430-0000-0000-C000-000000000046}
importlib("stdole2.tlb");
// Forward declare all types defined in this typelib
interface _MyVerySimpleClass;
[
uuid(E03CCE68-2D55-3576-9DB6-019AAA667A5D),
version(1.0),
custom({0F21F359-AB84-41E8-9A78-36D110E6D2F9}, "InteropExamples.MyVerySimpleClass")
]
coclass MyVerySimpleClass {
[default] interface _MyVerySimpleClass;
interface _Object;
};
[
odl,
uuid(D18BEEE1-4425-3AC7-891E-807EC2283731),
hidden,
dual,
oleautomation,
custom({0F21F359-AB84-41E8-9A78-36D110E6D2F9}, "InteropExamples.MyVerySimpleClass")
]
interface _MyVerySimpleClass : IDispatch {
};
};
In this case your class will be expose using all defaults. That is, a progId that will be the <AssemblyName>.ClassName an interface _<ClassName> is generated and the class is exposed only for IDispatch, which would not provide class information if you add the tlb reference to a VB6 or VBA project.
And if you run this code in VB6 you will have a problem like type mismatch when you try to use the method x.CreateAClass because it is returning an object that is not exposed thru COM.
Private Sub Command1_Click()
Dim x As Object
Set x = CreateObject("InteropExamples.MyVerySimpleClass")
MsgBox x.GetMyLuckyNumber
MsgBox x.CreateAClass
End Sub
So my recommendation is to make explicit what you want to expose. Maybe you only need some of the methods to be exposed. Well that is step two.
2. Define a public, ComVisible(true) interface that will define the methods that you want to be exposed thru COM. Sometimes it is better to implement the interface explicitly. I even recommend using partial classes so you isolate the COM stuff from your normal class. If you class is very simple you can leave all COM stuff there.
    //It is better to have an interface, because
    //you are completely sure what you are exposing or not
    [ComVisible(true)]
    public interface _MyVerySimpleClass
    {
        int GetMyLuckyNumber();
    }
3. (Recommedation) This is not an obligatory step but I recommend using partial classes.
    //Using partial classes allow you to separate all the
    //COM plumbing and leave your .NET implementation simple
    public partial class MyVerySimpleClass
    {
        public Class2 CreateAClass()
        {
            return new Class2();
        }

        public int GetMyLuckyNumber() { return 15; }
    }
3. Make sure your partial class has the following attributes:
[ComVisible(true)] <—This is obvious because you want to use your class in COM
[ClassInterface(ClassInterfaceType.None)] <—This is because your want to take charge or what will be generated in your Typelib (tlb)
[ComDefaultInterface(typeof(_MyVerySimpleClass))] <—This is to indicate the interface that holds your COM visible methods.
[ProgId("InteropExamples.MyVerySimpleClass")] <—To establish which will be the progId not have a generated one
[Guid("{029D468C-8BE6-498f-8A57-3B4B0306BA41}")] <—this is important specially if you are trying to accomplish binary compatibility
Optionally add this attribute [IDispatchImpl(IDispatchImplType.CompatibleImpl)] this is currently marked as an obsolete attribute but it still works and I have found scenarios, specially in some VBA applications where you need this attribute in order to make some late bound calls.
4. And Explicitly implement the interface methods. This is important because some of the return values or arguments might need convertions. For example what can you do if your method returns a DataSet and your Excel VBA script is expecting something like a Recordset (more on this on other posts).
So now you will have a class like:
    //Using partial classes allow you to separate all the
    //COM plumbing and leave your .NET implementation simple
    public partial class MyVerySimpleClass
    {
        public Class2 CreateAClass()
        {
            return new Class2();
        }

        public int GetMyLuckyNumber() { return 15; }
    }

    //It is better to have an interface, because
    //you are completely sure what you are exposing or not
    [ComVisible(true)]
    public interface _MyVerySimpleClass
    {
        int GetMyLuckyNumber();
    }

    [ComVisible(true)]
    [ClassInterface(ClassInterfaceType.None)] //This is to make sure that no automatic generation of COM methods is done
    [ComDefaultInterface(typeof(_MyVerySimpleClass))] //This to explicitly establish which is the default interface
    [ProgId("InteropExamples.MyVerySimpleClass")]
    [Guid("{029D468C-8BE6-498f-8A57-3B4B0306BA41}")]
    [IDispatchImpl(IDispatchImplType.CompatibleImpl)]
    partial class MyVerySimpleClass : _MyVerySimpleClass
    {

        #region _MyVerySimpleClass Members
        //Explicit implementation is better because it avoids messing your .NET
        //class specification. Sometimes when you expose thru COM you can have problem with
        //methods overloads. For example you have to have the same method name but differente
        //return type. Or you have a collition with an existing member.
        int _MyVerySimpleClass.GetMyLuckyNumber()
        {
            return GetMyLuckyNumber();
        }

        #endregion
    }
And your TLB is now explicit and exposes ONLY what you really really want.
// Generated .IDL file (by the OLE/COM Object Viewer)
//
// typelib filename: <could not determine filename>
[
uuid(370E4AD4-073B-4984-8C7D-5ED027F7B1CA),
version(1.0)
]
library ClassLibrary1
{
// TLib : // TLib : mscorlib.dll : {BED7F4EA-1A96-11D2-8F08-00A0C9A6186D}
importlib("mscorlib.tlb");
// TLib : OLE Automation : {00020430-0000-0000-C000-000000000046}
importlib("stdole2.tlb");
// Forward declare all types defined in this typelib
interface _MyVerySimpleClass;
[
odl,
uuid(80D00C45-EE10-3D65-A5FF-42AB7D8F8A71),
version(1.0),
dual,
oleautomation,
custom({0F21F359-AB84-41E8-9A78-36D110E6D2F9}, "InteropExamples._MyVerySimpleClass")
]
interface _MyVerySimpleClass : IDispatch {
[id(0x60020000)]
HRESULT GetMyLuckyNumber([out, retval] long* pRetVal);
};
[
uuid(029D468C-8BE6-498F-8A57-3B4B0306BA41),
version(1.0),
custom({0F21F359-AB84-41E8-9A78-36D110E6D2F9}, "InteropExamples.MyVerySimpleClass")
]
coclass MyVerySimpleClass {
interface _Object;
[default] interface _MyVerySimpleClass;
};
};
For more info about BinaryCompatibility see my other posts on Interop.
When a VB6 COM+ Component is migrated to a ServiceComponent,
you might want to take advantage of the Configuration files of .NET to specify your
connection strings and other important information.
So where should your App.Config go.
There is a slight diference with a ServiceComponent.
Remember that for a ServicedComponent the hosting process is ‘dllhost.exe’.
So your programs will look for config files in %windir%\System32, which is not a very nice solution.
You can instead set the ‘Application Base Directory’ of the COM+ Application.
Follow these steps:
1) Create an application.manifest file and copy it to the directory
that will be used as the base directory for the COM+ application. The file can be like:
<?xml version="1.0" encoding="UTF-8" standalone="yes"?>
<assembly xmlns="urn:schemas-microsoft-com:asm.v1" manifestVersion="1.0"/>
2) Create an app.config file and copy that file to the same :
<?xml version="1.0" encoding="utf-8" ?>
<configuration>
<appSettings>
  <add key="ConfigData" value="My Custom AppSetting!" />
</appSettings>
</configuration>
3) Configure the COM+ Application:
3.1) Open the Component Services MMC
3.2) Find the COM+ Application
3.3) Right Click the Application and go to Properties and Activation Tab
3.4) Find option: ‘Application Root Directory’
3.5) Write the path where the other two files where created.
This blog post was created from an original Blog Post from HeikkiRi.
I am proud to announce that today ArtinSoft released version 4.0 Beta of its flagship product the Visual Basic Upgrade Companion.
This new release once more collects our learnings from migrating millions and millions of lines of code from Visual Basic 6 to VB.NET and C#.
This release revolves around a number of themes:
1) Visual Studio 2010 compatibility: You can now use the VBUC to create projects that are compatible with Visual Studio 2010.
2) Take advantage of new framework features: The code generated by the VBUC now takes advange of some advanced features of the .NET Framework to improve the quality of the code avoiding dependencies to any third party runtime.
3) Compatibility with Windows 7 and 64 bits system: The platform is evolving and the VBUC is evolving along with it. Now the VBUC is compatible with Win XP, Vista and 7 on both 32 and 64 bits systems.
4) Impoved usability: We are trying to minimize the learning curve to start a VB migration project. There will be even more changes in this theme for the next release. (I am specially excited about this!)
Please read our official press release, learn the specifics of version 4.0 or give it a try!
You can also watch a video demo on the Microsoft site channel 9: http://channel9.msdn.com/posts/VSIPMarketing/VSIP-Partners-CAN-DO--ArtinSoft-Visual-Basic-Upgrade-Companion/
AutoCAD 2010 will not be supporting VBA.
Quoting
“If you utilize VBA macros in your work environment, they will no longer work unless the VBA module is installed on your system. “
“When you run a command that requires VBA, a message dialog box will be displayed stating that VBA is no longer installed with AutoCAD and directing you to a website where you can download the VBA module. “
And also you can see that Autodesk states: “Autodesk is evaluating how long VBA will be supported in Autodesk products in the future. Though supported in the AutoCAD 2010-based products, it may or may not be supported in future releases. Therefore, it is strongly recommended that VB developers develop all new code using VB .NET.”
VBA does not support 64bit systems in a native way.
But If you want some advice from the VB migration experts or help on your migration project from VBA to VB.NET or C# you can us contact Artinsoft Migration Services.
We build the VB Upgrade Wizard that shipped with Visual Studio and have been doing VB migrations for years.
We have seen a situation that can be a little annoying.
I usually find that situation in ASP.NET projects, but it can also happen in Winforms.
The issue is like this:
- You have a VStudio Solution
- You have added all the needed references
- All your code compiles
BUT
When you run the application it terminates at a certain point with a
FileNotFound exception indicating that the assembly blablabla or one of its
dependencies could not be loaded.
Whats hapenning!!!
Do this:
1) Look at the bin\debug or bin\release and make sure that the assembly is in those directories.
2) If the assembly is not there, then go to the project references in the solution explorer, right click and select properties and set the Copy Local Setting

| vb Constant | Decimal Value | Hex Value | .NET |
| vbDstInvert | 5570569 | H550009 | System.Drawing.CopyPixelOperation.DestinationInvert
|
| vbMergeCopy |
12583114 |
HC000CA |
System.Drawing.CopyPixelOperation.MergeCopy
|
| vbMergePaint |
12255782 |
HBB0226 |
System.Drawing.CopyPixelOperation.MergePaint
|
| vbNotSrcCopy |
3342344 |
H330008 |
System.Drawing.CopyPixelOperation.NotSourceCopy
|
| vbNotSrcErase |
1114278 |
H1100A6 |
System.Drawing.CopyPixelOperation.NotSourceErase
|
| vbPatCopy |
15728673 |
HF00021 |
System.Drawing.CopyPixelOperation.PatCopy
|
| vbPatInvert |
5898313 |
H5A0049 |
System.Drawing.CopyPixelOperation.PatInvert
|
| vbPatPaint |
16452105 |
HFB0A09 |
System.Drawing.CopyPixelOperation.PatPaint
|
| vbSrcAnd |
8913094 |
H8800C6 |
System.Drawing.CopyPixelOperation.SourceAnd
|
| vbSrcCopy |
13369376 |
HCC0020 |
System.Drawing.CopyPixelOperation.SourceCopy
|
| vbSrcErase |
4457256 |
H440328 |
System.Drawing.CopyPixelOperation.SourceErase
|
| vbSrcInvert |
6684742 |
H660046 |
System.Drawing.CopyPixelOperation.SourceInvert
|
| vbSrcPaint |
15597702 |
HEE0086 |
System.Drawing.CopyPixelOperation.SourcePaint
|
Now all we need to do is setup the VB6 code that we will use for migration. To do that follow these steps:
1. On the Source Code Explorer toolback click on the Add Files button:

2. Click the Add Folder button and select the folder with your VB6 files

3. After you select the folder, a list of files found will be shown. Just remove any unneccesary files. For example files like MSSCCPRJ.SCC should be removed. And press OK

Now you have to commit your code the Source Code Repository
4. On the Source code Explorer Right click on Source Control Folder (for this example is MergeExample) and select Check In Pending Changes..

5. Write an apropiate comment and press Check In
To create a new Team System Project in Visual Studio 2005, follow these steps:
1. Go to the File Menu. Select New…, and in the New… submenu select Team Project… to start a wizard.

2. The “Specify the Team Project Settings” of the New Team Project wizard appears. Type the Team Project name. For example type MergeExample and click Next
![clip_image002[5]](http://blogs.artinsoft.net/public_img/0d61167332a7_CAF4/clip_image0025_thumb.jpg "clip_image002[5]")
3. In the following page, select the Process Template for the Team Project. We recommend using the Artinsoft Migration Methodology – v0.8 or later. Click Next.
![clip_image002[7]](http://blogs.artinsoft.net/public_img/0d61167332a7_CAF4/clip_image0027_thumb.jpg "clip_image002[7]")
4. In the following page, type the Title for the Team Project Portal. Type MergeExample. The Team Project Portal provides useful information about your project. Click Next
![clip_image002[9]](http://blogs.artinsoft.net/public_img/0d61167332a7_CAF4/clip_image0029_thumb.jpg "clip_image002[9]")
5. In the following page you select your source control settings.
Select the first option “Create an empty source control folder”. Click Next
![clip_image002[11]](http://blogs.artinsoft.net/public_img/0d61167332a7_CAF4/clip_image00211_thumb.jpg "clip_image002[11]")
6. In the following page a summary of your Team Project settings is presented. Click Finish
![clip_image002[17]](http://blogs.artinsoft.net/public_img/0d61167332a7_CAF4/clip_image00217_thumb.jpg "clip_image002[17]")
7. In the following page the a process bar appears while the project is created. Just wait until the process is done. It normally takes between 3 and 5 minutes.
![clip_image002[19]](http://blogs.artinsoft.net/public_img/0d61167332a7_CAF4/clip_image00219_thumb.jpg "clip_image002[19]")
This post will show you the necessary steps to configure Microsoft Visual Studio 2005 to use a Team System Project. In this example we will use a Team Project created to illustrate Continuous Migration with VBUC and MS Team System 2005, called MergeExample.
1. Start Microsoft Visual Studio 2005
2. Go to the File Menu\Open\Team Project…

3. Dialog is presented, where you can choose your Team Foundation Server, and the Team Project to use. For these Continuous Migration example we’ll assume a project called MergeExample.

4. The Team Explorer is shown, with your selected project.
Expand the elements for the Team Project you previously selected.

5. We now have to map our local directories to bind them to the
source control system. On the expanded tree, double click on the
Source Control Node

6. The Source Code Explorer is shown:

7. Go to the Workspaces dropdown box and select Workspaces…

8. The Manage workspace dialog is shown.
Select the appropiate workspace and click Edit…

9. On the Edit Workspace dialog type a description for your source control and select the source control Folder we had created (for this example it is $/MergeExample) and the directory for your code (for this example it is C:\MergeExample).

NOTE: if a message box about a pending update is shown, just click ok.
Now you have successfully mapped your directories, and you can start setting up your VB6 code for continuous migration
Someone recently made me remind an old technology called DDE.
“Dynamic Data Exchange (DDE) is a technology for communication between multiple applications under Microsoft Windows or OS/2”
“The primary function of DDE is to allow Windows applications to share data. For example, a cell in Microsoft Excel could be linked to a value in another application and when the value changed, it would be automatically updated in the Excel spreadsheet. The data communication was established by a simple, three-segment model. Each program was known to DDE by its "application" name. Each application could further organize information by groups known as "topic" and each topic could serve up individual pieces of data as an "item". For example, if a user wanted to pull a value from Microsoft Excel which was contained in a spreadsheet called "Sheet1" in the cell in the first row and first column, the application would be "Excel", the topic "Sheet1" and the item "r1c1".
Note: In DDE, the application, topic and item are not case-sensitive.”
So in VB6 you can have something like:
Private Sub Form_Load()
Text1.LinkMode = 0
Text1.LinkTopic = "Excel|Sheet1"
Text1.LinkItem = "R1C1"
Text1.LinkMode = 1
End Sub
How can you do that in .NET. Is it possible in C#? Well I started looking around and found several forums explaining about all the API calls and I was just about to write my own solution when I found NDDE. This project hosted in CodePlex “provides a convenient and easy way to integrate .NET applications with legacy applications that use Dynamic Data Exchange (DDE)” :)
So this is a nice example of how to do the previous lines in C#:
        //This class provides the infraestructure for DDE comunication
        NDde.Client.DdeClient ddeClient_TextBox1 = null;

        private void Form1_Load(object sender, EventArgs e)
        {
            //I initialize the DDEClient object. Application is Excel and Topic is Sheet1. I'm using the
            //the TextBox as the syncronization object
            ddeClient_TextBox1 = new NDde.Client.DdeClient("Excel", "Sheet1", textBox1);
            //Connect to the DDE Server
            ddeClient_TextBox1.Connect();
            //Start the Advise Loop
            ddeClient_TextBox1.StartAdvise("R1C1", 1, true, 60000);
            //Setup the Advise Method
            ddeClient_TextBox1.Advise += new EventHandler<NDde.Client.DdeAdviseEventArgs>(ddeClient_TextBox1_Advise);
            //Setup a method to Poke the Server for TextBox cahnges
            textBox1.TextChanged += new EventHandler(textBox1_TextChanged);

        }

        void textBox1_TextChanged(object sender, EventArgs e)
        {
            //Syncronous Poking the server
            ddeClient_TextBox1.Poke("R1C1", textBox1.Text + "\0", 4000);
        }

        const string DDE_postFix = "\r\n\0";
        void ddeClient_TextBox1_Advise(object sender, NDde.Client.DdeAdviseEventArgs e)
        {
            //Advise only if needed
            if (e.Text.Length >=DDE_postFix.Length && textBox1.Text + DDE_postFix != e.Text)
                textBox1.Text = e.Text.Substring(0,e.Text.Length-3);
        }
NOTE: Remember that you need to download NDDE and add a reference to this library
This is very good library, you can also set up a lot of Async calls to even improve performance. I have even thought of making an extender as the ToolTip control to add LinkTopic, LinkMode and LinkItem properties for Winforms controls or provide extensions methods to make all the syntax easier, but that is for a future post. Good Luck.
How can I migrate property pages? Well that is a common question when migrating VB6 Activex controls.
Property Pages where commonly used in VB6 to provide a mechanism for your user controls to edit values.
.NET provides even more mechanisms for editing your control properties. You can provide an editor for each one of your component properties or you can provide a ComponentEditor for all the component, this is very similar to the VB6 concept.
In .NET the ComponentEditor can be actived in the designer selecting Properties from the context menu when you right click over the control.
This is from the MSDN documentation:
“A component editor is used to edit a component as a whole and can be used to implement a
user interface similar to that of the property pages. You associate a component editor with a
component by using the EditorAttribute attribute.” From: ComponentEditor Class
The VBUC does not process out of the box, your PropertyPages, but I developed a tool that can be
used so the VBUC can help you migrate those property pages. This tool will modify your VB6 project,
and VB6 PropertyPages source code to make those VB6 PropertyPages look like VB6 UserControls.
This will allow the VBUC migration tool to recover some of the VB6 PropertyPages code and appearance
and with some manual changes you can get your property pages to work again.
Use the following link to downlaod the tool: DOWNLOAD TOOL
So these are the steps to migrate a VB6 Project that has Property Pages with the VB6.
1) Make a backup copy of your source code.
2) Run the TOOL with your project file. For example if your project file is Project1.vbp then run the tool like this:
FixPropertyPages Project1.vbp
This will generate a new VB6 Project file called ModifiedProject1.vbp
3) Open the VBUC, and migrate the new project file ModifiedProject1.vbp
4) Open the migrated solution in Visual Studio.
5) All your property pages will be migrated to .NET UserControls. You might need to go thru some changes to make them completely functional. Remeber to add the [ToolboxItem(false)] to these property pages because they do not need to be visible in your toolbox.
6) Now, to associate those property pages with your UserControl do this:
6.1) Add a new code file to your migrated solution. We are going to create a ComponentEditor, that will hold all the pages and associate that to the migrated control. Lets say the control is named Control1 and the property pages are PropertyPage1 and PropertyPage2.
We will call the ComponentEditor ComponentEditorToAssociatePagesForMyControl.
In this ComponentEditor we will add an internal class for each PropertyPage. This class will inherit from ComponentEditorPage. We will call this internal classes Page1, and Page2. And we will associate those classes with the ComponentEditorToAssociatePagesForMyControl in the GetComponentEditorPages().
The resulting code will be like:
C#using System.Windows.Forms.Design;
using WindowsFormsApplication1;
using System.Drawing;
using System.ComponentModel;
[ToolboxItem(false)]
public class ComponentEditorToAssociatePagesForMyControl : WindowsFormsComponentEditor
{
// Methods
public override bool EditComponent(ITypeDescriptorContext context, object component)
{
return false;
}
class Page1 : ComponentEditorPage
{
// Methods
public Page1()
{
PropertyPage1ForControl1 page1 = new PropertyPage1ForControl1();
Size mysize = new Size(400, 250);
this.Size = mysize;
this.Text = "Page 1 for Control1";
this.Controls.Add(page1);
}
protected override void LoadComponent() { }
protected override void SaveComponent() { }
}
class Page2 : ComponentEditorPage
{
// Methods
public Page2()
{
PropertyPage2ForControl1 page2 = new PropertyPage2ForControl1();
Size mysize = new Size(400, 250);
this.Size = mysize;
this.Text = "Page 2 for Control1";
this.Controls.Add(page2);
}
protected override void LoadComponent() { }
protected override void SaveComponent() { }
}
protected override System.Type[] GetComponentEditorPages()
{
return new System.Type[] { typeof(Page1),typeof(Page2) };
}
protected override int GetInitialComponentEditorPageIndex()
{
return 0;
}
}
VB.NET
<ToolboxItem(False)> _
Public Class ComponentEditorToAssociatePagesForMyControl
    Inherits WindowsFormsComponentEditor
    ' Methods
    Public Overrides Function EditComponent(ByVal context As ITypeDescriptorContext, ByVal component As Object) As Boolean
        Return False
    End Function

    Protected Overrides Function GetComponentEditorPages() As Type()
        Return New Type() { GetType(Page1), GetType(Page2) }
    End Function

    Protected Overrides Function GetInitialComponentEditorPageIndex() As Integer
        Return 0
    End Function


    ' Nested Types
    Private Class Page1
        Inherits ComponentEditorPage
        ' Methods
        Public Sub New()
            Dim page1 As New PropertyPage1ForControl1
            Dim mysize As New Size(400, 250)
            MyBase.Size = mysize
            Me.Text = "Page 1 for Control1"
            MyBase.Controls.Add(page1)
        End Sub

        Protected Overrides Sub LoadComponent()
        End Sub

        Protected Overrides Sub SaveComponent()
        End Sub

    End Class

    Private Class Page2
        Inherits ComponentEditorPage
        ' Methods
        Public Sub New()
            Dim page2 As New PropertyPage2ForControl1
            Dim mysize As New Size(400, 250)
            MyBase.Size = mysize
            Me.Text = "Page 2 for Control1"
            MyBase.Controls.Add(page2)
        End Sub

        Protected Overrides Sub LoadComponent()
        End Sub

        Protected Overrides Sub SaveComponent()
        End Sub

    End Class
End Class
7) After creating the ComponentEditor you must associate the component Editor to your new component editors. This can be done with something like:
C#
[Editor(typeof(ComponentEditorToAssociatePagesForMyControl), typeof(ComponentEditor))]
public class Control1 : UserControl
|
VB.NET
<Editor(GetType(ComponentEditorToAssociatePagesForMyControl), GetType(ComponentEditor))> _
Public Class Control1
|
8) Now to use this property pages, go to the designer screen and open the context menu and select properties. And editor with your properties pages will appear :)
9) You still need to write some code for saving the property values that is something you have to add to the LoadComponent and SaveComponent methods of the internal classes in your ComponentEditor (ComponentEditorToAssociatePagesForMyControl in our previous example).
I hope this helps to get your code faster in .NET. I'm attaching a C# sample if you want to try it out.
Some time ago Jose Aguilar had blogged about the Interesting Behavior of TabIndex in Migrated Applications. As he explained at the time there are functional differences between the TabIndex behaviour in VB6
If you look at Figure1.

Figure 1. This image show a VB6 form, the TabIndex values and the way the form navigates when you press Tab.
If you migrate that form with the VBUC and activate the TabOrder option in View\TabOrder you will see something like:

As you can see by the 0.1 and 0.3 and 5.4 and 5.2 values. TabOrder in .NET is hierarquical. When you press tab you will navigate to the next control in the container, and when you get to the last in that container then you will switch to the next one in the following container. This is different from the VB6 world when you would have switched from 0.1 to 5.2.
How can we fix this without a lot of manual corrections. Well you can override the ProcessTabKey method to navigate controls following the tabIndex without taking into account the containers.
The code you will need to add is:
        /// <summary>
        /// holds a list of controls for tab navigation
        /// </summary>
        List<Control> controls = new List<Control>();
        /// <summary>
        /// Populates the list used for tab navigation
        /// </summary>
        /// <param name="c">Control to use to populate list</param>
        protected void BuildOrder(Control c)
        {
            if (c.TabStop)
                controls.Add(c);
            if (c.Controls.Count > 0)
            {
                foreach (Control child in c.Controls)
                    BuildOrder(child);
            }
        }
        /// <summary>
        /// Transversers all form controls to populate a list ordered by TabIndex
        /// that will be used to follow tabindex ignoring containers
        /// </summary>
        protected void BuildOrder()
        {
            if (controls.Count == 0)
            {

                foreach (Control c in this.Controls)
                {
                    BuildOrder(c);
                }
                controls.Sort(
                delegate(Control c1, Control c2) { return c1.TabIndex.CompareTo(c2.TabIndex); });
            }
        }
        /// <summary>
        /// Overrides default tabIndex behaviour
        /// </summary>
        /// <param name="forward"></param>
        /// <returns></returns>
        protected override bool ProcessTabKey(bool forward)
        {
            BuildOrder();
            if (ActiveControl != null)
            {
                int index = controls.IndexOf(ActiveControl);
                if (index != -1)
                {
                    if (forward)
                        controls[(index + 1) % controls.Count].Select();
                    else
                        controls[index==0?controls.Count-1:index-1].Select();

                    return true;
                }

                else
                    return false;
            }
            else
                return base.ProcessTabKey(forward);
        }
After adding this code just run your project and it will fix the tabIndex issues.
Well recently Kingsley has point me to a lot of useful links to improve the ExtendedWebBrowser. However he found another detail. When in Javascript you do something like a:
window.open(‘url’,’window’,’width=200;height=300’);
Those width and height settings were not being considered in the new window. I researched for I while until I found this great link:
So basicly I follow the sugested code and added logic in my EventSink class:
        public void WindowSetLeft(int Left)
        {
            ///Should I calculate any diff?
            _Browser.Parent.Left = Left;

        }

        public void WindowSetTop(int Top)
        {
            _Browser.Parent.Top = Top;

        }

        public void WindowSetWidth(int Width)
        {
            int diff = 0;
            diff = _Browser.Parent.Width - _Browser.Width;
            _Browser.Parent.Width = diff + Width;

        }
        public void WindowSetHeight(int Height)
        {
            int diff = 0;
            diff = _Browser.Parent.Height - _Browser.Height;
            _Browser.Parent.Height = diff + Height;

        }
So now when the window opens it takes the specified width, heigth, left and top.
As always
HERE IS THE UPDATED CODE
Aberdeen Group recently published a report titled “Migrating from VB6 to .NET: The challenge of Software Agility in a Volatile Economy”.
The report contains a good summary of the status quo with respect to Visual Basic 6 renewal efforts. It is based on a survey of 130 organizations at the end of 2008.
The Aberdeen report contains lots of advice for organizations that are faced with the challenge of upgrading their infrastructure, I think it is worth reading it.
ArtinSoft is very proud to have been recognized as a key player in the Visual Basic migration game along with a number of its outsourcing partners. This shows once more how our 15 years trajectory in the migration business is our best letter of presentation.
In his summary of the report, Aberdeen analyst Michael Lock also shows how best in class companies have a much greater tendency to use automatic migration tools to support their porting efforts. During these times of financial uncertainty is more important than ever to minimize the cost of evolving your infrastructure and automation is certainly a good way of doing so. ArtinSoft approach to automatic migration is aimed at minimizing the cost of reaching functional equivalence while at the same time ensuring that all delivered code is completely .NET native and ready to be evolved to the next level by our customers. ArtinSoft offers the best balance between cost speed and future insurance. Jose Aguilar also analyzes some of the conclusions from Aberdeen in this blog post.
If you are deciding what’s your next move with VB6, you should certainly read the Aberdeen report and you should look at our Visual Basic Upgrade Companion 3.0 and our new technical resources site www.VBtoNET.com .