Maybe you faced the situation where you had code that was to be used on your server side services and also on your silverlight clients.
Having this situation required some tricks because Silverlight Class libraries could not be used on .NET projects and viceversa.
Common workarounds were to share files and use precompilation directive iack!!
Well VS 2011 has a concept called Portable Class Libraries which allow you to create class libraries that can be use in Windows Phone, Silverlight, .NET framework, etc.
And if you have VS 2010 you don't have to suffer. Just use the Portable Library Tools from from the VS Extensions and start sharing code (see this image form the VS Extensions site)
For more details about Portable Libraries check the MSDN documentation page: http://msdn.microsoft.com/en-us/library/gg597391.aspx
The VS Profiler Team has an excellent post teaching how to use the VS2010 profiler with Silverlight Applications.
The steps are simple.
Run the A Visual Studio Command Prompt
And follow these steps:
- VSPerfClrEnv /sampleon
- "c:\Program Files (x86)\Internet Explorer\iexplore.exe" C:\Breakout\Breakout\Bin\Release\TestPage.html
- VSPerfCmd /start:sample /output:MyFile /attach:<PID of iexplore.exe process>
- Run your scenario
- VSPerfCmd /detach
- VSPerfCmd /shutdown
- VSPerfClrEnv /off
NOTE: information reposted from http://blogs.msdn.com/b/profiler/archive/2010/04/26/vs2010-silverlight-4-profiling.aspx
When the finish you will have a file called MyFile.vsp and just open that with VS2010.
If you are getting ready to migrate your applications to Windows Phone,
you have to install all the neccesary Windows Phone Stuff.
However you might have incompatibilities in your dev machine.
This post: http://blogs.msdn.com/b/astebner/archive/2010/07/12/10037442.aspx
Is great. I used it to identity why the installation tool insisted that
I had a Windows Phone Emulator installed in my machine. It seems that it looked for something like XDE.
So if you have this same issue or something similar just take a look at that post, it might be of great help
Back when it was first announced I made a couple of posts about Windows 7 XP Mode (available here and here). Now that I’ve been using almost every day for the past few months, I wanted to revisit the topic and write about my hands-on impressions. In this post I’ll show how applications that run under XP Mode integrate with the regular Windows 7 environment.
The integration features of XP Mode work really well, for the most part. Applications installed in the Virtual Machine appear right there on the Start Menu:

The Start menu gains a “Windows XP Mode Applications” folder under “Windows Virtual PC”,
which holds all apps installed in the XP Mode virtual machine (click picture to enlarge)
And even show up when searching, which is extremely convenient.

The Quick Search functionality of the Start menu covers
XP Mode Applications. (click picture to enlarge)
When you launch applications, Windows starts up the XP Mode virtual machine behind the scenes, showing a progress toolbar instead of XP’s boot up sequence.

Windows XP Mode virtual machine startup. Notice it is running under
Windows Virtual PC. (click picture to enlarge)
Once the application starts up, you’ll notice it is running on XP Mode since the UI uses XP’s windows, instead of Aero:

Visual Basic 6.0 on XP mode, complete with default Windows XP “Luna” theme. (click picture to enlarge)
The following screenshot shows this more clearly, by contrasting the Visual Basic 6.0 IDE running under XP Mode and Visual Studio 2008 running directly on the Windows 7 desktop.:

Visual Basic 6.0 on XP mode (Luna theme) vs. Visual Studio 2008
on Windows 7 (Aero Glass theme). (click picture to enlarge)
Another VERY NICE feature is that the "My Documents” folder is transparently mapped to Windows 7’s “Documents” library:

Visual Basic 6.0 on XP mode Open Project dialog showing the My Documents folder.
Notice the same contents on the Documents library in Windows 7. (click picture to enlarge)
These integration features of XP Mode make life much easier for legacy applications, but it is far from perfect. In the next post I’ll mention the annoyances I’ve run into while working with XP Mode.
Here is a quick way to know if a binary file (*.exe, *.dll, *.ocx, …) has a dependency on the Visual Basic 6.0 Runtime. The trick is to use the Dependency Walker tool to see its dependencies. The dependency you are looking for is the Visual Basic 6.0 runtime library (msvbvm60.dll), and it appears on the tree if you are dealing with a VB6.0 binary:
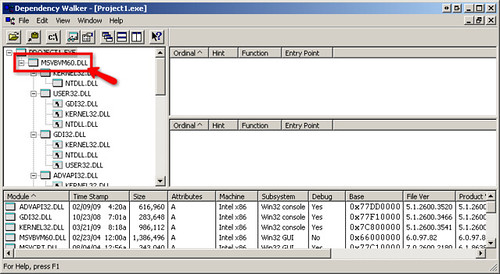
If you are concerned about the VB6.0 runtime not being supported after Windows Server 2008 and Windows 7, this is a trick that can help you decide whether to keep a particular third party ActiveX component in your application through COM Interop after migrating to the .NET Framework or to start looking for a replacement in case the runtime is no longer available (and thus the component will no longer work).
Dependency Walker is a freeware tool that was included with Visual Studio 6.0, is included in the Windows Support Tools and can be downloaded from the Dependency Walker homepage.
This is a very simple configuration option that can really help you speed up the process of reviewing all migration EWIs (Errors, Warnings and Issues) when working with migrated code. In Visual Studio, you can use the Task List panel to keep track of a list of items (tasks) you need to go through. This Task List can be configured to show migration EWIs, as shown in the following screenshot:

For this to work, in the Visual Studio IDE, select Tools->Options from the main menu. In the Options window, navigate to Environment->Task List. Here, you’ll need to add the four types of EWIs inserted by the VBUC, along with their priority:
- UPGRADE_ISSUE: Issues appear when there is some migrated code that is very likely to cause a compilation error. My recommendation is that you add it with Normal priority
- UPGRADE_NOTE: Notes are basically information messages. For example, if the VBUC detects dead code, it will comment it out and add an UPGRADE_NOTE comment to make sure the developer understand why it was removed. This can be added as Low priority, since they very rarely require manual intervention after the migration.
- UPGRADE_TODO: Partially upgraded code. These EWIs should be added as high priority, since they indicate the developer needs to perform some additional work to complete the migration.
- UPGRADE_WARNING: Warnings appear when there is a difference in behavior between the VB6 code and its .NET equivalent. The solution provided normally works, but there are some scenarios where additional manual intervention may be required (most likely from runtime errors). I normally add them to the Task List as Normal priority.

With this configuration, you can very easily and quickly browse through all the EWIs in a file, and determine which ones actually require you to perform some manual work, and which ones can be either removed because the line they are tagging will work, or if their verification will be deferred until functional testing takes place.
You can read more about VBUC’s Errors, Warnings and Issues here, and about Visual Studio’s Task List at this link.
Yesterday I blogged about Windows 7’s XP Compatibility Mode, and have some additional pieces of information that I consider interesting if you are considering using it in the future:
- First of all, not all CPUs would be able to use XP compatibility mode. Take a look at this page over at Tom’s Hardware, and the post over at Ed Bott’s blog. I think the image halfway down the page on the second link speaks for itself – you probably won’t be able to know if the deployment target for your application supports XP Mode or not, which can complicate the installation experience.
- The second bit of information I want to comment about is the fact that even though applications running under XP mode appear seamlessly alongside Windows 7 applications, they are still running on a virtual machine. From what I’ve seen the boundary is not noticeable to the end user - the application’s shortcuts appear in Windows 7’s start menu, the tray icons appear in Windows 7’s tray, etc. But apps in XP Mode run completely separate from their Win7 counterparts, and the VM itself needs to be patched with its own version of Windows Update, requires specific policies applied to it, etc. It goes without saying that all this adds overhead to managing these type of deployments, and may cause incompatibilities if an app requires interaction with other programs installed on the Windows 7 side (VB6 apps using Office’s COM API is a common example – will you require separate versions of Office, one in the XPVM, and another one on W7 for daily use?).
- Finally, XP Mode uses Terminal Services and something similar to the RemoteApp mechanism to display applications on the Windows 7 desktop (not sure how other VMMs such as Parallels’ Coherence manage it) . Even though the integration is almost seamless, there are a few quirks here and there that make for an inconsistent experience (drag and drop files, etc), and may affect the performance and L&F of the application.
This post argues that the best solution would be to use Microsoft’s App-V technology to virtualize “XP and older” applications. I agree that would be an ideal solution. But maybe there is a reason why it works like it does – so that you won’t get too comfortable. XPM, IMHO, should be considered as an intermediate step towards moving your legacy apps to the latest technologies.
(As a side note, remember I did a lot of work on Virtualization, and think it is a good way to get the most out of your IT infrastructure resources. XPM, to me, is an excellent idea to start dropping all the legacy parts of Windows without compromising application compatibility, and a smart move at that. )
I know this is completely off-topic to what I normally blog about, but I’ve been having problems this past couple of days when trying to checkout a document from SharePoint using Internet Explorer 7. It crashes every single time – which has been a very frustrating experience, to say the least. I have no idea what caused it to (mis)behave this way. Anyway, turns out the fix was incredibly easy:
- Close all IE7 Windows
- Run Microsoft Office Diagnostics from Start->Programs->Microsoft Office->Microsoft Office Tools
- Click on Run Diagnostics, wait a few minutes, and you should get a dialog saying that 1 repair was performed:
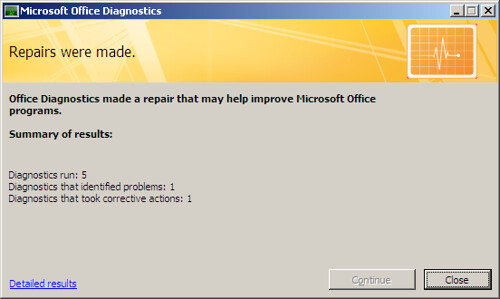
- Continue using SharePoint normally
FYI, I am using MS Office 2003 and Windows SharePoint Services 3.0.
As a Visual Basic 6.0 developer you may want to become yourself familiar with the .NET platform before putting it into production (and making the corresponding investments). In this blog post I wanted to give some pointers to commonly used resources that can help you in that regard.
To run one of the latest Microsoft operating systems you can take advantage of the VHD Test Drive program that I blogged about some time ago. Through this program you have access to a large number of OS configurations that you can try out for a limited time. The ones I would recommend to get started are the Windows Vista 30-Day Eval VHD, the Windows Server 2008 Evaluation, and the Microsoft Windows Server 2003 R2 Enterprise Edition VHD. Remember you need either Virtual PC, Virtual Server or Hyper-V in order to run the virtual machines.
You’ll also need to install Visual Studio 2008, and for this you can either install the Express Editions (which have some limitations, but are free), or a 90-day trial version of Visual Studio 2008 Professional Edition or Visual Studio Team System 2008 Team Suite. Another alternative is to download a full virtual machine with Visual Studio Team System 2008 Team Foundation Server installed.
Also, to get familiar with specific .NET features, you can take advantage of the free e-book offer and the additional content currently up at Microsoft Visual Studio 2008 Learning Portal.
Microsoft's Patterns & Practices group released last week a new version of the Application Architecture Guide. This book provides you with the best practices in the design of .NET applications. I recommend you read this when planning the evolution of your migrated applications after you reach functional equivalence in the .NET Framework.
Download the Application Architecture Guide, version 2.0
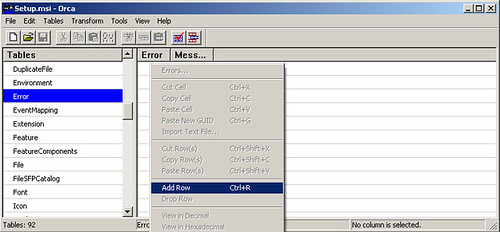
Every once in a while when trying to install the VBUC you may run into error 2869:
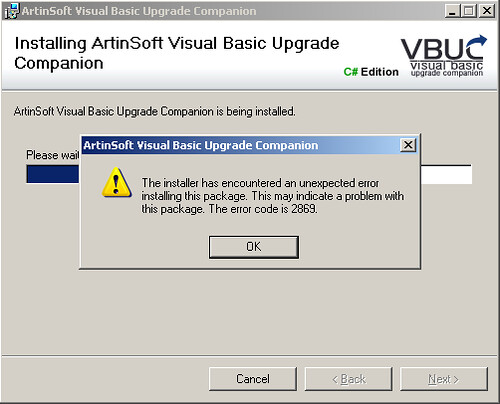
This error, as you can see, doesn't really give you any insight on what may be wrong with the installation. Well, thanks to this blog post, here is a quick process you can follow to troubleshoot the installation and get the actual error that is being masked:
- First, you need to have ORCA installed on your system. ORCA is available as part of the Windows SDK.
- Once you have it installed, find the file setup.msi from the VBUC installer package. Right click on it and select "Edit with ORCA" from the popup menu:

- Once in ORCA, in the Table panel, scroll down and highlight the "Error" line. On the right-hand panel right-click and select Add Row:
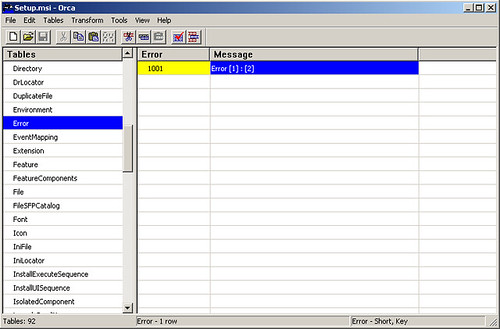
- In the panel that is displayed, enter "1001" for the Error, and "Error [1]:[2]" on the Message. Press OK and the table should look like the following:
- Once you are done editing, save the file in ORCA, close it, and launch the installer. You will now get a more explanatory error:
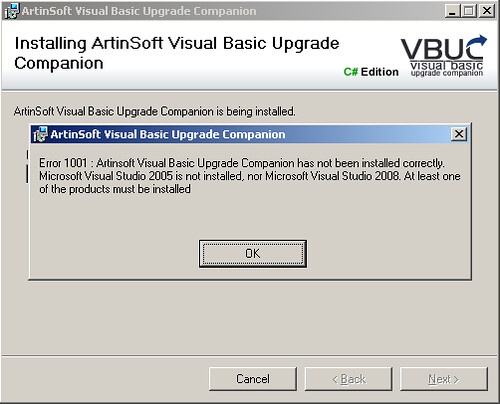
As you can see, in this case at least, the error was caused by not having one of the requirements, Visual Studio (2005 or 2008) installed. This only applies to the current version of the VBUC, as the next version will have these issues with the error messages solved. I still wanted to put this out there, as I got some feedback on it last week.
In some migration projects you have to take an incremental approach. You just can't disappear with an application for a few months, and then come back with the application in the target language. Because of this, when we do migration projects, we try to divide the project in smaller milestones, so that developers can continue working on a certain module of the application, while another group migrates a different module.
It turns out that is you are migrating from Visual Basic 6.0 to the .NET Framework (using either Visual Basic.NET or C#), you can do even smaller steps. Microsoft offers the Microsoft Interop Forms Toolkit, a set of tools that you can use to run .NET forms and controls in VB6 applications. This Toolkit allows you to create an even less disruptive migration strategy, by creating an incremental upgrade process in which you can start out by moving some controls first, then some forms, and, before you know it, you'll have your applications running completely in .NET.
I realize this has been out for a while, but it is still worth mentioning, since there's tons of people out there that haven't moved from VB6 yet. This may give all of you some incentive to at least get started with the first incremental steps. :)
This tip isn't really migration-related, but I've used it so many times these past few days that I think it is worth sharing. We work with virtual machines A LOT, using Virtual Server 2005 R2 SP1. Every once in a while you need to log into a server using Terminal Services to delete old VHDs to make room for a new one, opr just for any other miscelaneous task that can't be done through the web administration client. And, unfortunately, sometimes there are two terminal services sessions open already, so you get the following error:
"Terminal server has exceeded maximum number of allowed connection"
You then stare at your monitor in frustration for a few seconds. After that, you figure out who the culprit is and ask him politely to "PLEASE LOG OFF".
Well, after discovering this tip, there is no longer a need to stare at your monitor or to ruin your relationship with your coworkers. Turns out there are a couple of command line tools you can use to close remote Terminal Services sessions. They are available in both Windows XP and 2003. The first one, qwinsta, lists all the open sessions on a particular server:
c:\>qwinsta /server:192.168.123.123
SESSIONNAME USERNAME ID STATE TYPE DEVICE
console 0 Conn wdcon
rdp-tcp 65536 Listen rdpwd
jpena 1 Disc rdpwd
administrator 3 Disc rdpwd
In this case, you can see that Juan Peña (user jpena) has an open session in the disconnected state. In order to close his session, you need to use the second tool, rwinsta:
rwinsta /server:12.12.12.12 3
This command will kill the session with ID 3 (jpena's). And voilà! After this, I'm able to connect to the server. :-)
Credit goes to Scott Forsyth's WebLog.
A quick post to tell everyone that the day finally came: Windows Server 2008 was released today. You can find more information about it on the Windows Server 2008 page, and watch the keynote here.
The biggest deal, from my perspective, is Hyper-V. This will have a significant impact on the IT market, by exposing thousands of IT profesionals to a hipervisor-based virtualization solution. Another very interesting technology is RemoteApp, which allows you to use, through Terminal Services, just one application instead of the complete desktop. It solves a deployment issue that required expensive software solutions in the past - and something we run into every once in a while when determining the best deployment strategy for migrated Informix 4GL applications.
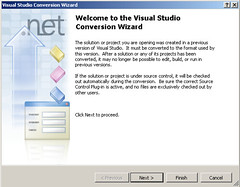
Now that Visual Studio 2008 is available, you might wonder what will happen with the Visual Studio 2005 projects generated with the current version of the VB Upgrade Companion (VBUC). For starters, it is worth mentioning that Visual Studio 2008 fully supports projects created in the .NET Framework 2.0, like the ones generated with the VBUC. The newer version of the .NET Framework (3.0, shipped with Vista, and 3.5, shipped with VS2008) keep the same core version of the CLR (2.0) as before, with very few minor changes. There are no compatibility or breaking changes like when upgrading from versions 1.1 to 2.0 of the .NET Framework.
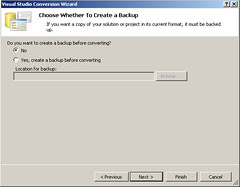
When you open a VS2005 project in VS2008, you are greeted with the new Visual Studio Conversion Wizard:
Once you click Next, you can select whether to create a backup of the project or not. I chose to NOT create a backup, since this is a copy of the project, since I will be comparing both .csproj files later on. Press Next.
The next step tells you what will happen during the conversion:
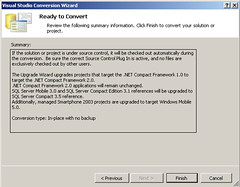
Press Finish, and after a little while, the process will be complete:

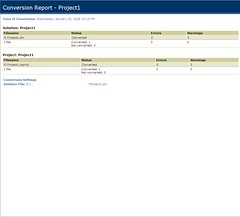
You can check out the Conversion Report afterwards. For most projects, however, the reports should be in blank:
So there you have it. After converting this test VS2005 Windows Form application, I was able to continue working on it without any issues. It is true that the code generated by the VBUC will not take advantage of all the neat features of the .NET Framework 3.5, such as WPF, but you should be able to continue working with the migrated code after moving to Visual Studio 2008 without any problems.
A large percentage of the work I do here at ArtinSoft is related to what we call Ready programs. The Ready program is part of the Ready-Set-Go methodology – a migration project methodology developed here at ArtinSoft that has given us great results.
The Ready assessment program, or Ready, is the first stage of this methodology. As you are probably aware, the more planning you put into a project, the higher the probability that the project will be succesful. Well, with the Ready, we do a an in-depth analysis of the project before we start, and come up with a detailed project plan that takes into account any risks and possible issues with the migration.
The first step in a Ready is a thorough assessment of the size, complexity, migration goals, and testing procedures for your current application. This step involves a 5– to 10– day on-site analysis of an application. During that week(s), we perform interviews with the development, PM and testing teams, to get a feel for the project and gather enough information to proceed with the project. Once we come back to our office, we work alongside the development team to create an accurate estimate of the effort required to perform the migration. This normally includes any customization of the migration tools necessary to minimize the manual effort in the project.
The final product of the Ready program is a detailed written report that includes a fixed-cost proposal for completing the migration. This is usually delivered two or three weeks after the on-site visit. This report, on its own, has tremendous value for the organization. It summarizes the requirements for the migration, and the issues that need to be addressed even if the project is not performed by ArtinSoft. It can also help in justifying the need to modernize outdated applications.
The Ready program is a low-cost, low-risk approach to getting detailed information on your migration project. For more information on the ready, and on the overall methodology, check out the Ready-Set-Go methodology page at ArtinSoft's website.
Sometimes you need to extract one file from an MSI file. A typical example is when you need just one DLL in order to make a project compile, but in order to get it you need to download and install a complete application. The ideal solution is to get the DLL file from the MSI file without having to perform the installation.
Some installers allow you extract the files to create a network installation. This is normally done using the command msiexec /a . Not all of them extract all the files, though.
Well, there is a small utility hilariously called Less MSIérables that allows you to extract files from msi installers. It works great – it has been around for a while, and I’ve used it several times to get me out of tough spots. I definitely recommend that you check it out!!
Recently I kept getting this error when trying to install SQL Server 2005 Express Edition:
An installation package for the product Microsoft SQL Server Native Client cannot be found. Try the installation again using a valid copy of the installation package 'sqlncli.msi'
After re-downloading the installation package and running the setup several times, I found this page. There I found a solution: go to Control Panel->Add or Remove Programs, and UNINSTALL the Microsoft SQL Server Native Client. Run the installation again, and this time it should work correctly.
In order to fully take advantage of the XML source code comments available in C#, you need to use all the features offered by the XML comment system.For this, the best guide I’ve found so far is this: XML Comments Let You Build Documentation Directly From Your Visual Studio .NET Source Files .
Also, in order to extract the XML comments that work as and input to the Sandcastle tools, follow these steps:
- Inside the Visual Studio 2005 Solution Explorer, right click on your C# project
- Select Properties from the popup menu
- Select Build
- Make sure the checkbox XML documentation file is selected. Enter the path and file name where you want the XML file to be generated.
With that setting, the next time you build your application the XML file will be generated for you.
Some time ago we had some issues with the WDS Image Capture Wizard that WDS inserts into WinPE to create capture images . When we got to the screen where you select the drive letter you want, the WDS Image Capture Wizard didn't list the drives, not even the C: drive. We could get to it using the command prompt, though, so we created those test images by running imagex manually.
Well, it turns out that we were just documenting the processes at the time, with a full OS install on the hard disk. In what could be described as a RTFM moment, we finally figured out what was wrong – the WDS Image Capture Wizard only lists Sysprep’d drives. Once we ran Sysprep on the OS installation, everything worked smoothly with the Capture Wizard.
The moral of the story is that sometimes it pays to read the manual (and follow the instructions) before jumping head-first into a project. 